
Rundocs › POS
Sales
Last updated 2026-09-18
Ringing up a customer at the counter (cart to payment to receipt). Cash, card, on-account, check, gift card, or any mix.
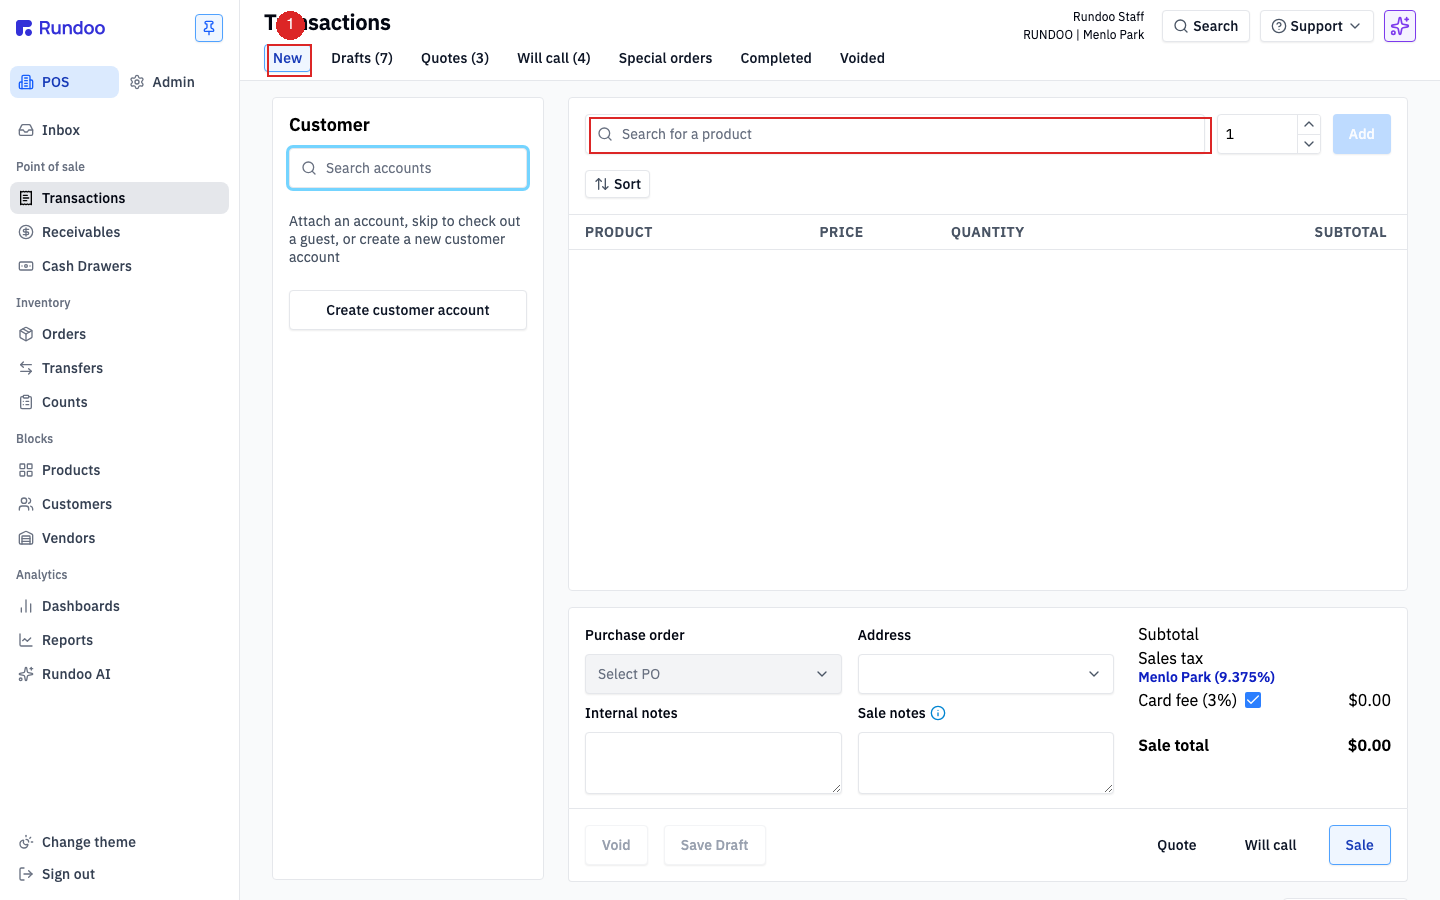
In the POS mode, open the Transactions left tab and stay on the New top tab. That's where every sale starts.
Video walkthrough
Step 1: Start a cart
The New top tab is the Transaction-builder's starting state. The top-tab strip (New, Drafts, Quotes, Will call, Special orders, Completed, Voided) lets you jump between in-progress carts and already-saved work, and each held-sale tab shows a live count next to its name. Adding an item, attaching a customer, or picking a payment method starts the cart.
💡 Not ready to take payment? Stash it instead, see Drafts, quotes & will-calls for when to use each.
Step 2: Add items
Four ways to get products into the cart:
-
Type to search. Click Search for a product and start typing (Rundoo matches on SKU, name, or barcode). Pick from the dropdown.
-
Scan a barcode. Click into the search box to give it focus, then scan. Scanning a product that's already on the cart increments its line quantity instead of adding a duplicate.
-
Browse by department. Click into Search for a product without typing and Rundoo shows a grid of department tiles. Pick one to drill down through product categories (
Department>Class>Fineline) to a list of products, then click one to add it. Good for a new hire who knows the aisle but not the SKU. If you don't see the tiles, an admin has hidden them (see Hiding the category browser). -
Quantity first. Set the number in the stepper to the right of the search box, then Add. Handy when a customer's buying ten of the same thing.
Each line appears in the table with PRODUCT, PRICE, QUANTITY, and SUBTOTAL columns. The Subtotal, Sales tax, and Sale total on the right update live.
Fit more items on screen: cart density and collapsible lines
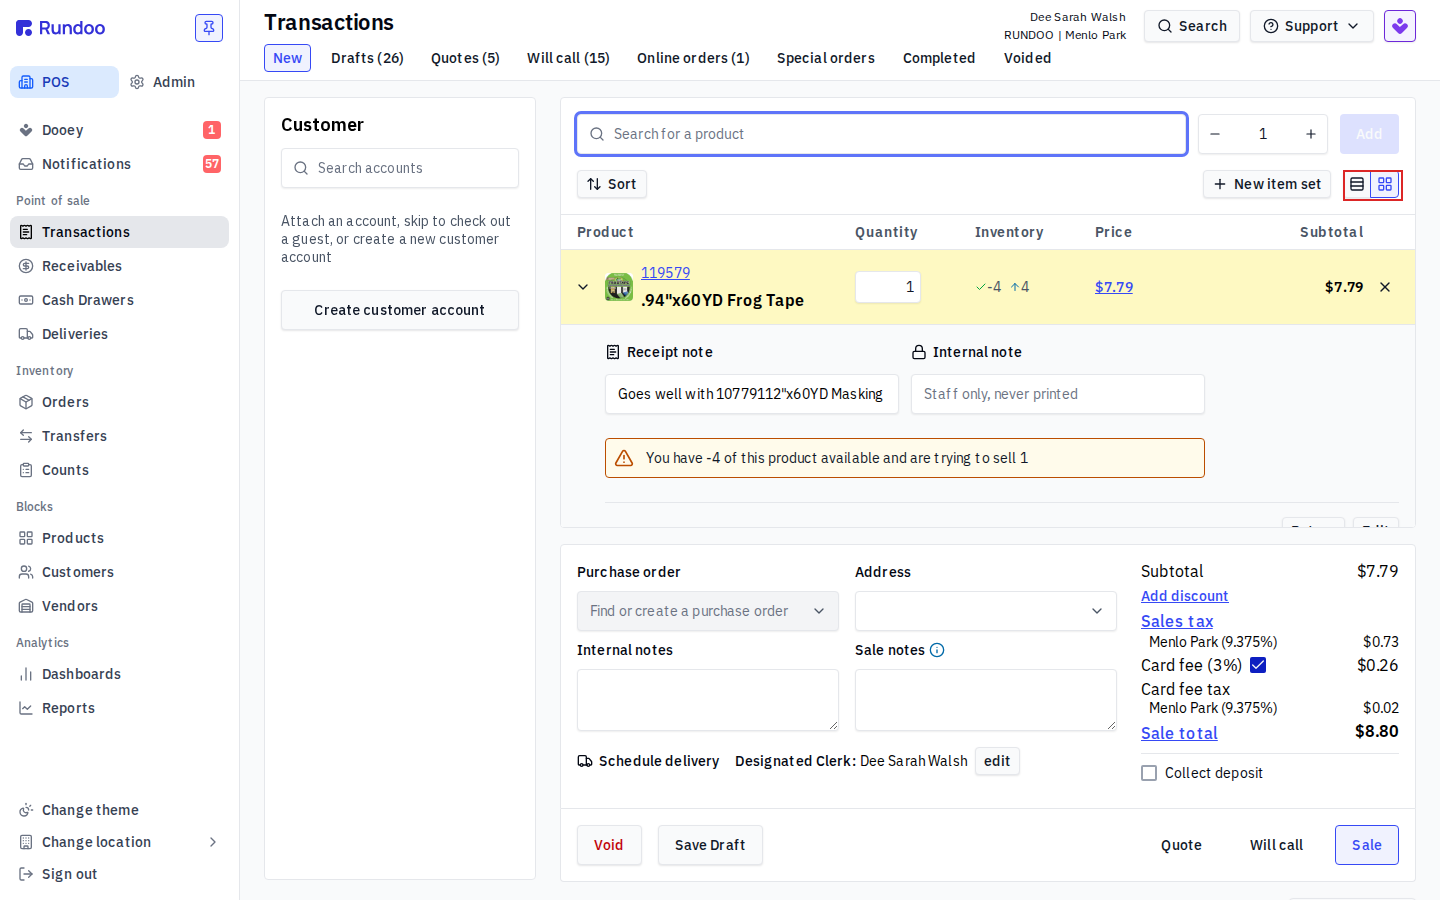
If the cart only seems to show one item at a time and you want to see more of the order at once (or make the cart feel bigger on a small screen), you have two controls, no admin setting needed.
-
Switch the cart density. The two icons at the top-right of the cart, next to + New item set, toggle the view: Comfortable shows more detail per line, and Compact shrinks each line so more items fit on screen at once. Click the icon to switch, the cart remembers your choice.
-
Collapse a line. Click the chevron (˅) on the left of any cart line to collapse it. Collapsing hides that line's
Receipt note,Internal note, sale forms, and return info, while the details that matter for the sale (product, quantity, inventory, price, subtotal) stay visible. Click the chevron again to expand it and edit those fields.
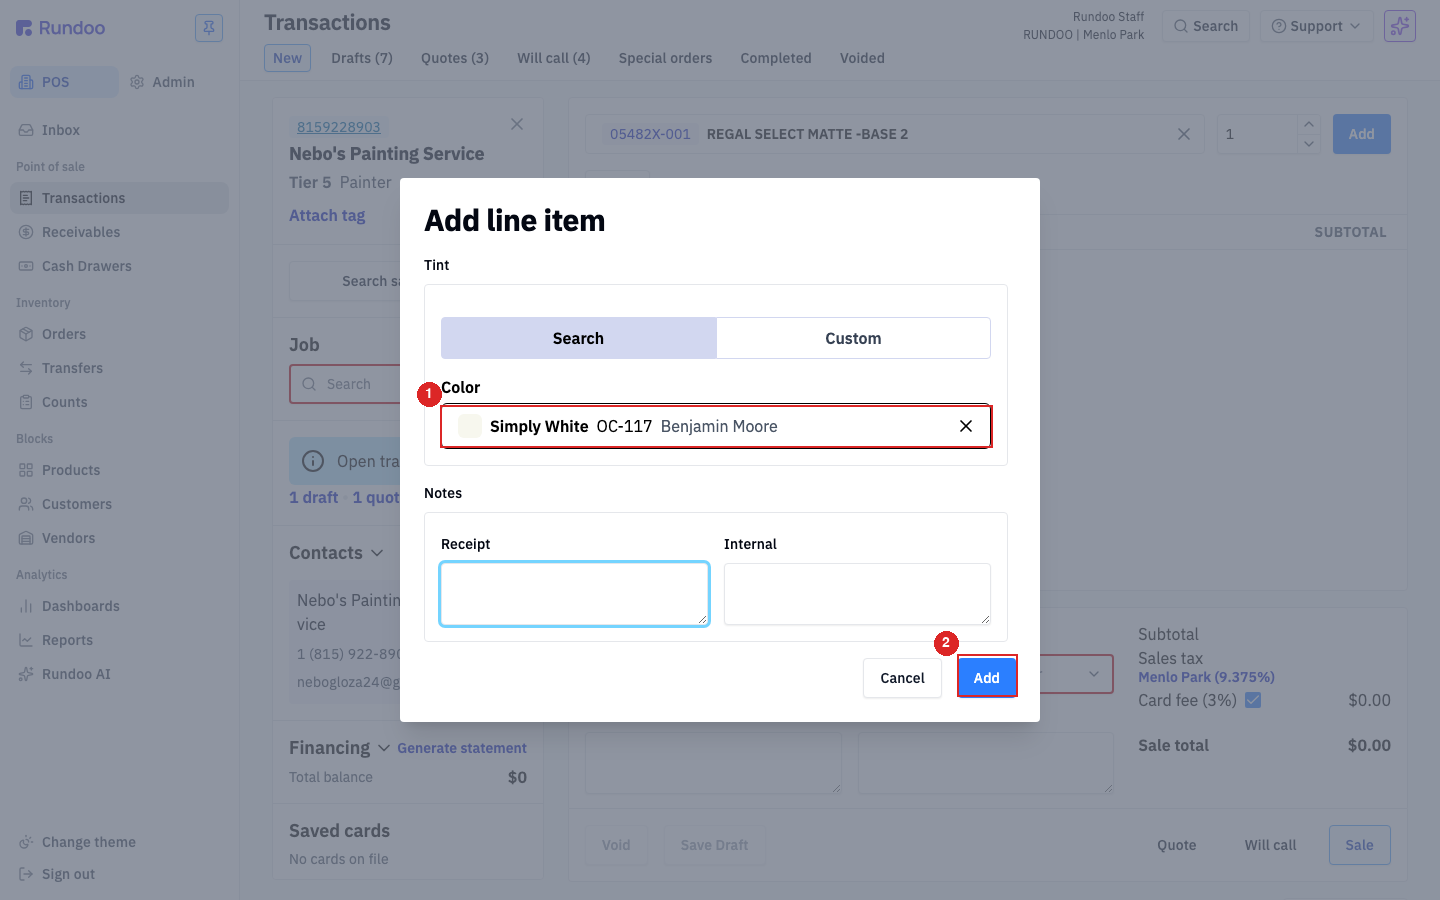
For tinted paint, the Add line item modal opens. This is where you pick the color and formula before the line drops into the cart, a real paint-store step, not an afterthought. On the Tint section, leave the toggle on Search and start typing a color name (e.g. Simply White). The dropdown shows matches from every color catalog loaded on your Rundoo, pick the row whose code and brand match what the customer wants. Optionally add a Receipt note that'll print on the customer's receipt or an Internal note that won't, and click Add to drop the tinted line into the cart.
💡 If you made a typo on the color, click Edit on the line in the cart to reopen the tint modal and fix it (no need to remove and re-add).
Scanning a barcode Rundoo doesn't have yet? If the scanned SKU isn't in your product catalog, Rundoo pops a quick-add modal so you can create the product without leaving the sale. When the UPC matches one in the Rundoo product database, the name and MSRP prefill automatically, just confirm, and the line drops into the cart. Use this for one-off counter additions; for a whole vendor's catalog, Product imports is faster.
Which color catalogs does your Rundoo support? The color search pulls from every catalog Rundoo has loaded for your store (typically the brands you sell or carry color cards for). Catalogs Rundoo can load include Behr, Benjamin Moore, C2 Paint, Color IS, Dunn-Edwards, Farrow & Ball, Kelly Moore, Miller, O'Leary, PPG, Sansin, Sherwin-Williams, Valspar, and Vista. Need a catalog turned on or one that isn't in this list? Email support@rundoo.ai.
Selling more than you have on hand
If your store has Warn if selling quantity would make on hand inventory negative on (Admin > Communications > General), Rundoo speaks up when a line's quantity is more than the on-hand count at the fulfilling location. You get a banner on that line, reading how many are available versus how many you're ringing, and when you take payment a confirmation step appears before the sale goes through.
It's a warning, not a wall. Confirm and the sale completes, driving on-hand negative, which is often correct at a counter (the pallet arrived but nobody received it yet, or the count drifted). What it buys you is a cashier who notices, so someone can fix the count instead of finding out at month end.
Two things it deliberately stays quiet about: returns (a negative-quantity line isn't selling anything), and stock already committed to the will-call or special order you're editing, which counts as available so reopening an order doesn't warn about inventory it's already holding.
With the setting off, nothing warns and negative on-hand happens silently. See Inventory counts for getting the numbers straight again.
Step 3: Attach a customer (or skip)
The left panel's Customer section is where a customer gets attached. Click Search accounts and type a name, phone, or customer ID. If the customer is new, Create customer account opens the new-customer form without losing the cart.
You don't have to attach one. Walk-in cash and card sales finalize fine without a customer. You do have to attach one if you plan to:
-
Charge on account (tenders like
Charge account). -
Apply custom prices tied to that customer or put the sale on a job.
-
Have the sale appear on a later statement.
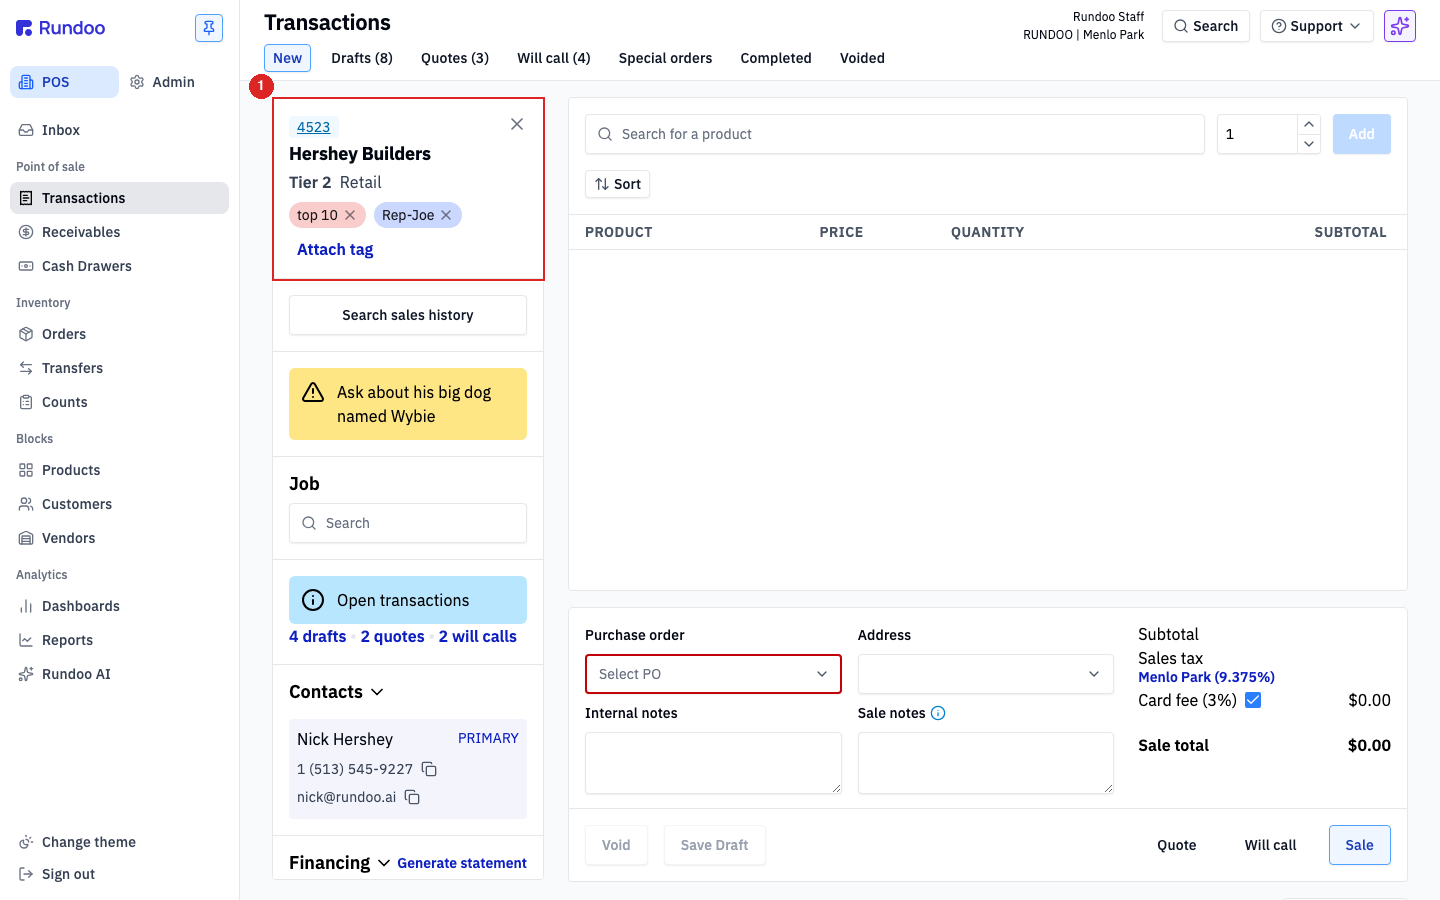
⚠️ If
Charge accountis missing from the tender list, the cart has no customer on it yet. Go back to Search accounts first.
Required-field gates can block checkout. A customer's Settings tab carries per-account toggles (Require PO, Require Job, Require Buyer, Require Receipt Signature, Require Sale Notes, Require Internal Sale Notes). If any are on, the cart blocks checkout until those fields are filled (the missing field surfaces as a red box on the cart). The customer's Hide Prices On Printed Invoices toggle also lives there. Same Settings tab, different effect (suppresses price columns on the printout).
Step 4: Apply discounts
Rundoo has three ways to discount a sale. Pick by scope.
-
Line-level. Override the price. Click a line's price to open the
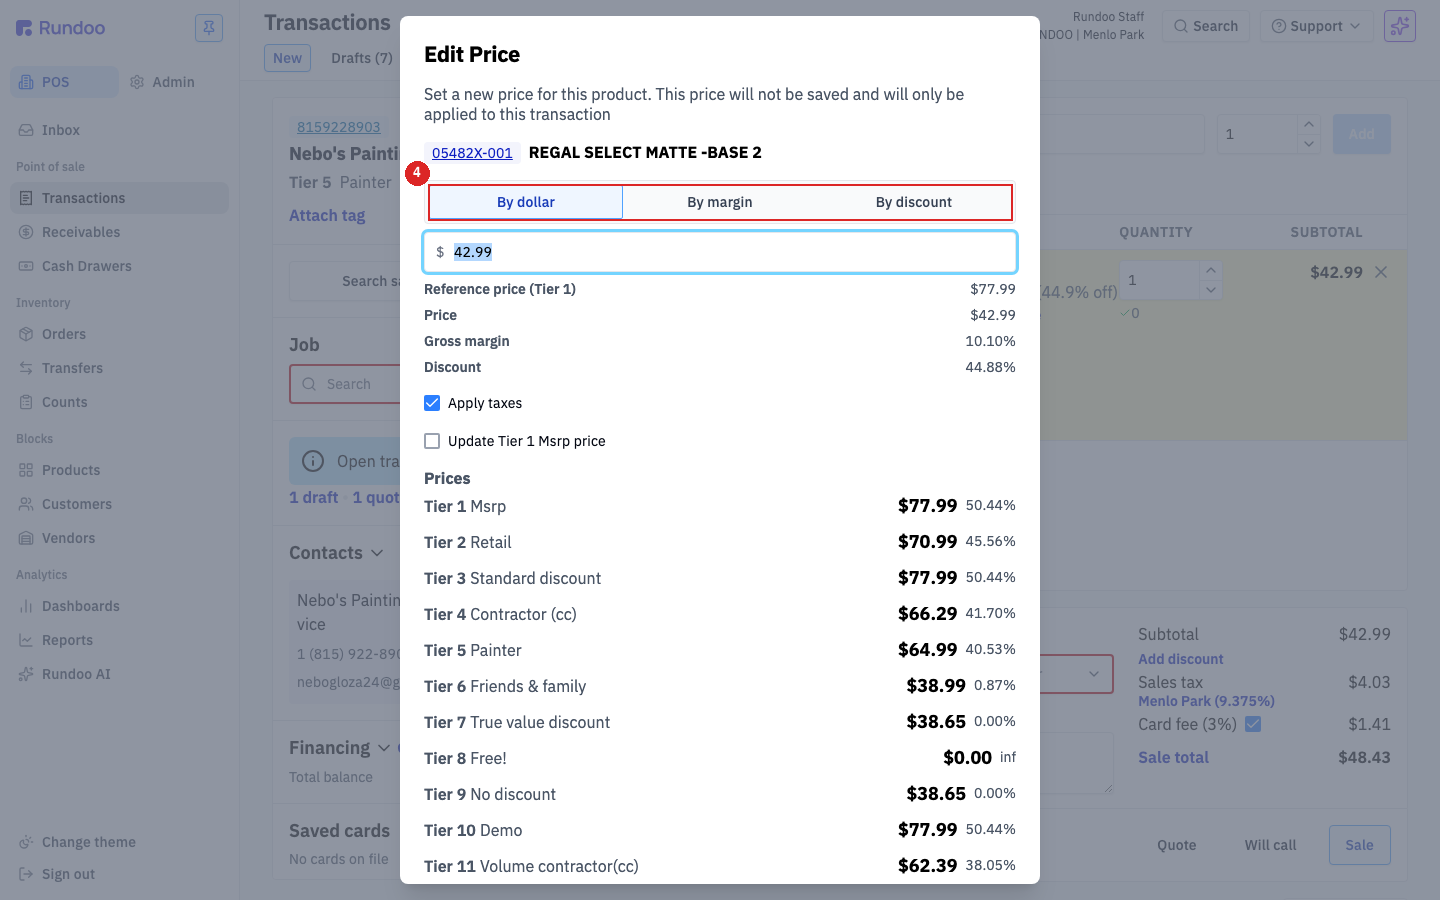
Edit Pricemodal (as of September 2026 the price itself is the control, there's no separate "Edit price" link). Enter a new priceBy dollar, adjust marginBy margin, or take a flat percentBy discount. Rundoo shows the reference price and every tier alongside so you can price confidently. The override is recorded against that line for reporting. -
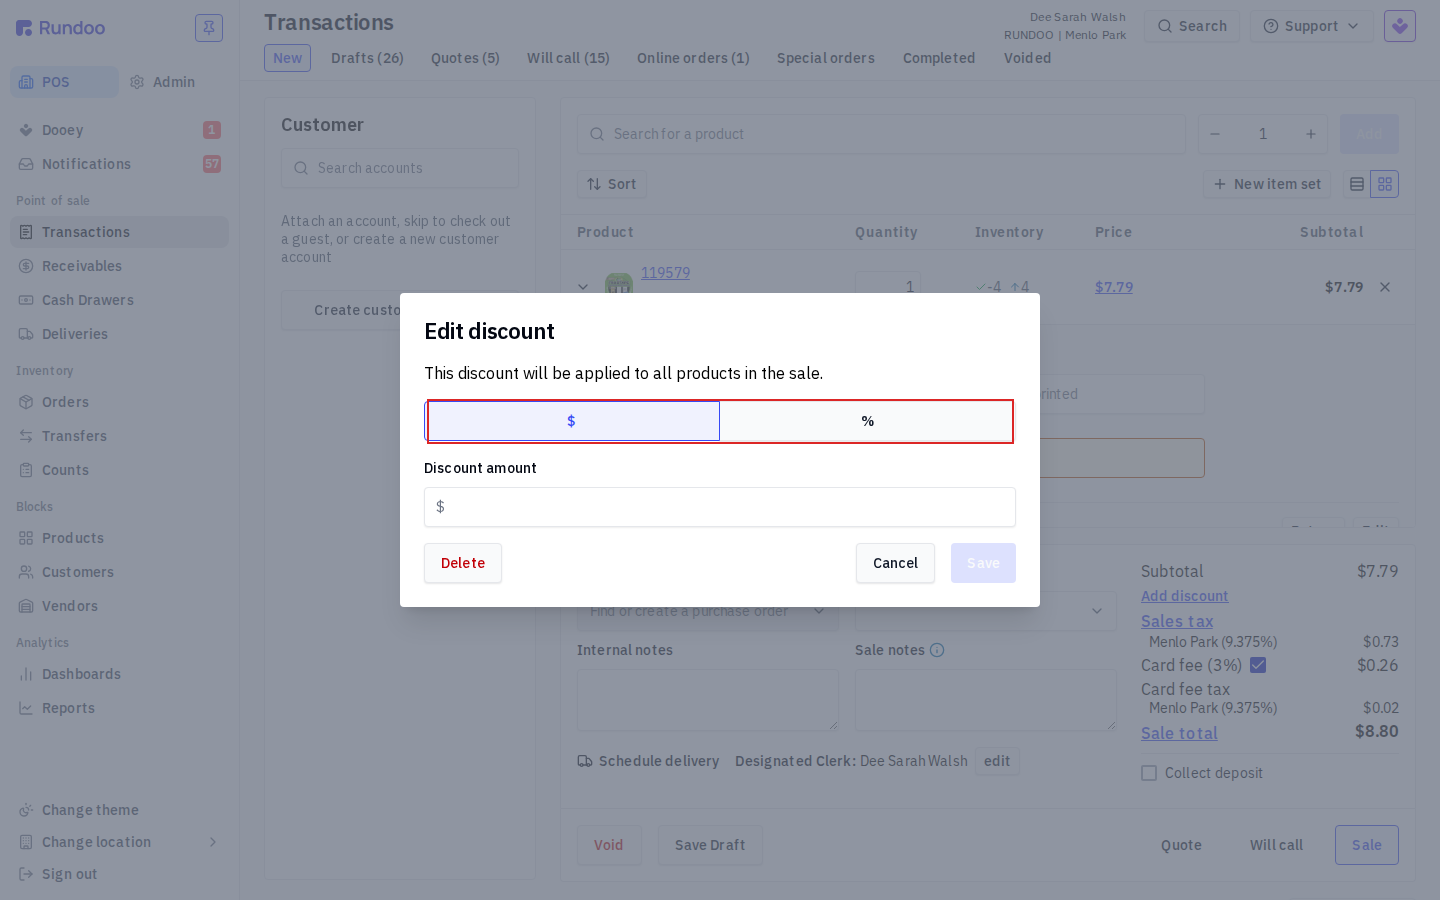
Sale-level, apply a manual discount. To take a discount off the whole cart at once (a flat percent off, or a set dollar amount off the order), click Add discount in the totals summary on the right, next to Subtotal and above Sales tax. The Edit discount modal opens ("This discount will be applied to all products in the sale"). Toggle $ for a flat dollar amount or % for a percent, enter the Discount amount, and click Save. This is the button to use when someone asks how to add a manual discount, take a percent off the cart, or discount the entire sale. To remove it later, click Add discount again and hit Delete in the modal.
-
Sale-level, let a promotion fire. Promotions configured under Creating Promotions apply automatically when the cart matches their rules (customer, vendor, product, schedule). You don't pick a promotion at the cart; you set it up once and it fires on qualifying sales.
💡 A line priced below cost will flag at the bottom of the totals area. Below-cost sales can be allowed or blocked depending on your company settings. Check with your manager before finalizing if you see the flag.
Override the sale's tax rate at checkout. Common when a customer has a tax-exempt job or a one-off resale. Edit the rate per sale before completing instead of changing the customer or product config. See Tax for how the rate is sourced and when to override.
Step 5: Take payment
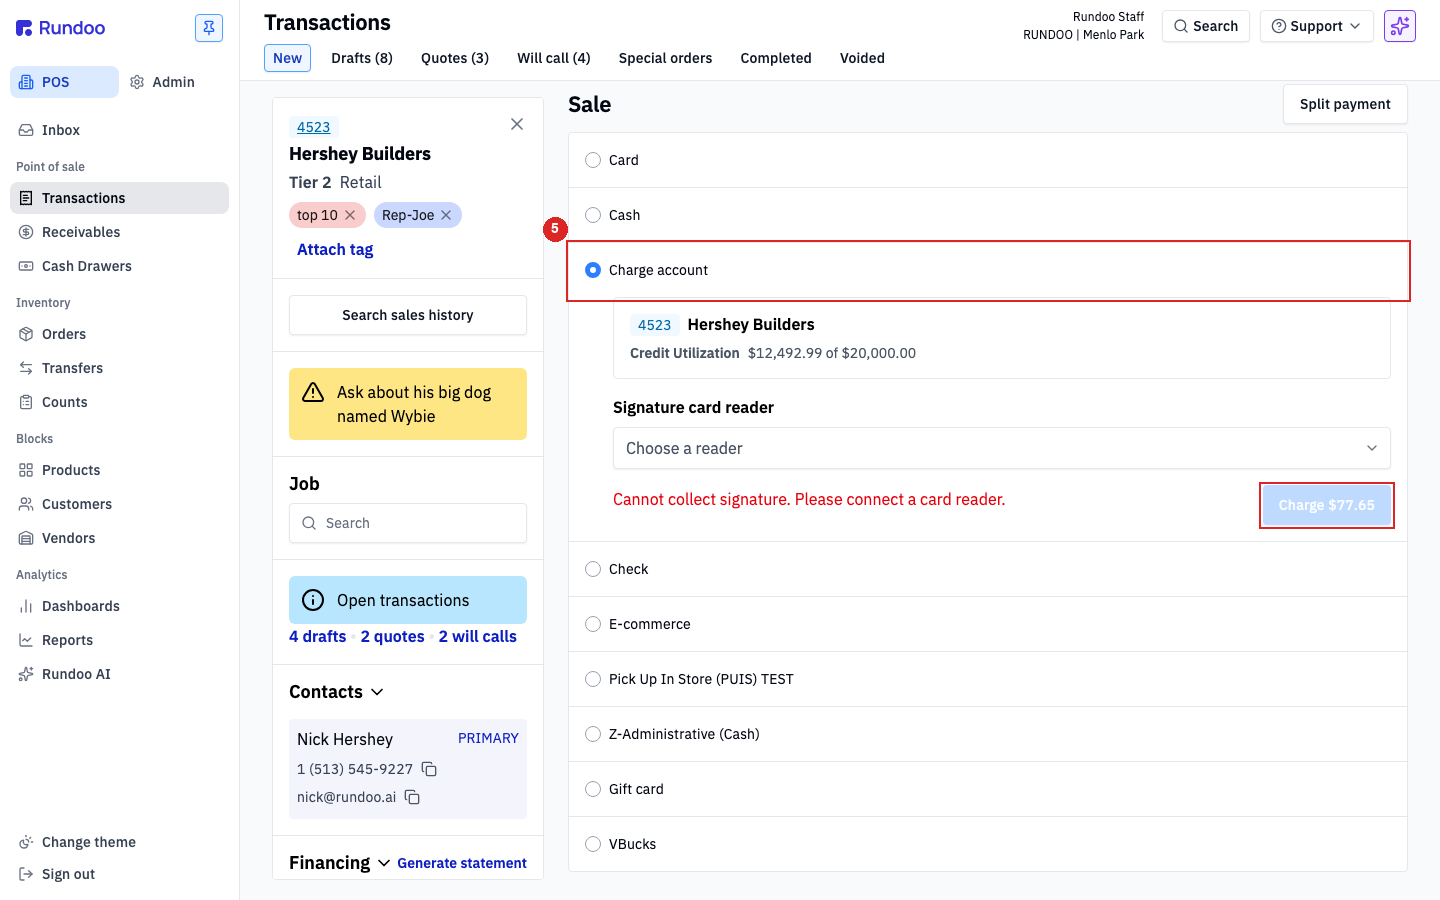
Click Sale in the action cluster at the bottom right. The payment panel slides in with a radio list of tender methods. The exact list is tenant-configured in Admin > Company > Tender methods (see Tender methods). Typical options: Card, Cash, Charge account, Check, Gift card.
The big blue Charge $0.00 button on the right is your commit. Its label updates live with the amount about to be charged on the selected tender. Click it to take payment and finalize the sale.
Card
Pick Card. Two paths:
-
Swipe card. Click Choose a reader and select the connected Stripe reader. Hand the reader to the customer; the charge runs when they tap, insert, or swipe.
-
Enter card manually. For card-on-file or phone orders. Type the number,
Expiration,CVV, andZIP. Charge $0.00 lights up once the form is valid.
💡 Cancel a card transaction. If the reader hangs or the customer changes their mind mid-swipe, hit the X button on the card reader to cancel the charge (Rundoo drops back to the payment panel with no charge taken).
Card payments need to be at least $0.50. If you see "Card payments need to be at least $0.50. Please increase the payment amount," the charge amount is under the Stripe minimum. Either up the amount or switch tenders.
Cash
Pick Cash and enter the amount the customer handed you. Rundoo calculates change against the Sale total. Charge commits the sale and pops the drawer on the attached register.
Charge account (on-account)
Pick the Charge account method for a customer with a charge account. No reader, no card, the sale commits as an invoice that lands on the customer's balance, due per their Finance terms. The customer pays it down later via bill payment.
Requires a customer attached in Step 3. The customer card also shows Credit Utilization so you can see how much of their credit limit is used before committing.
Check
Pick Check. Enter the Check number and the Amount. Rundoo logs the number alongside the sale. That's what keeps the drawer reconciling at close-out (see Cash drawer).
Gift card
Pick Gift card and scan or type the card number. Rundoo looks up the balance and applies it against the Sale total. If the card doesn't cover the full sale, the remainder rolls over, either split to another tender or top up the card first.
Split payment
Click Split payment at the top right of the payment panel to break the Sale total across multiple tenders on one sale (also called a partial payment, mixed payment, or split tender). Common patterns: Gift card + Cash for the balance on the card plus the rest in cash; Check for a deposit + Charge account for the remainder. Enter the amount for each tender, then Charge. Rundoo runs each leg in order.
⚠️ Voiding a sale is different from deleting a draft. To reverse a sale after payment's taken, the payment has to be refunded separately before the sale can be voided, it's not a one-click Void. Unpaid drafts, quotes, and will-calls can be voided freely (see Drafts, quotes & will-calls).
Voided receipts are now visually unmistakable. PDF and emailed receipts render a centered TRANSACTION VOIDED banner with the total struck through; thermal-printed receipts render *** VOID *** in bold near the top. Useful when a customer who got an emailed void mistakes it for a duplicate charge, point them at the banner.
Step 6: Print, email, or reprint the receipt
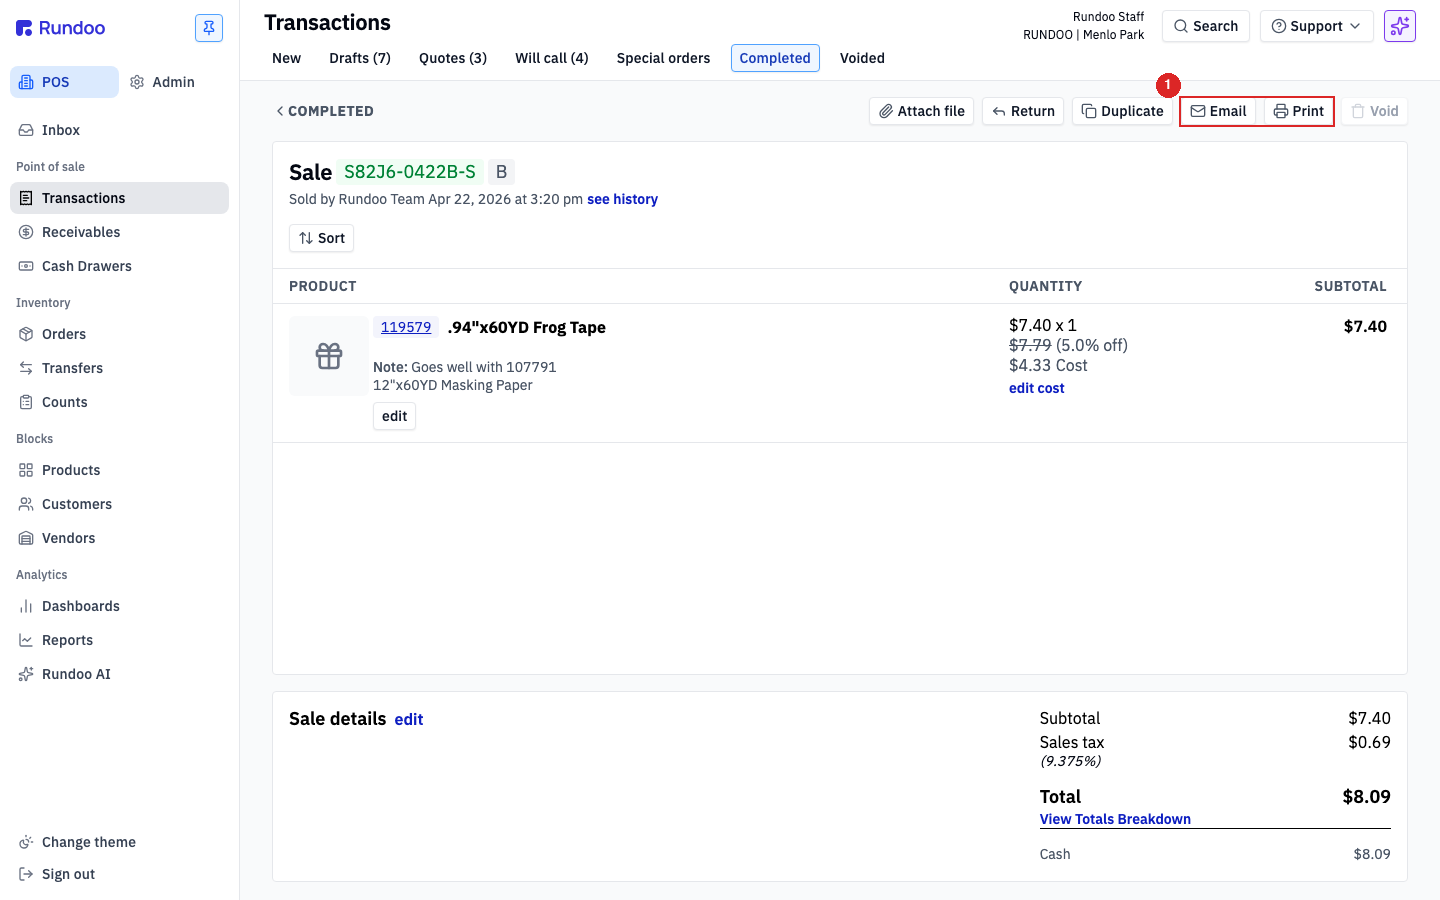
Once Charge fires successfully, Rundoo drops you onto the completed-sale view with the receipt actions at the top:
-
Print sends to the configured receipt printer for this register. If nothing prints, see Printer troubleshooting.
-
Email receipt sends to the customer on file. No customer attached? You'll be prompted for an email before sending.
To reprint later, open the sale from the Completed top tab on Transactions. The same receipt buttons are on the detail view.
Receipt-wide display settings (how many thermal copies print, which fields show on the receipt (crossed-out original price, discount percent, color formulas, balance), and the return-policy text that prints at the bottom) live in the Admin mode, Communications left tab, the General section. The Number of thermal receipts printed field is where you change the default copy count (for example, from 2 to 1); edit it inline and click Save at the bottom of the section. Tender, tax, and line breakdown are baked in automatically. No per-sale configuration.
Grouping a sale into item sets
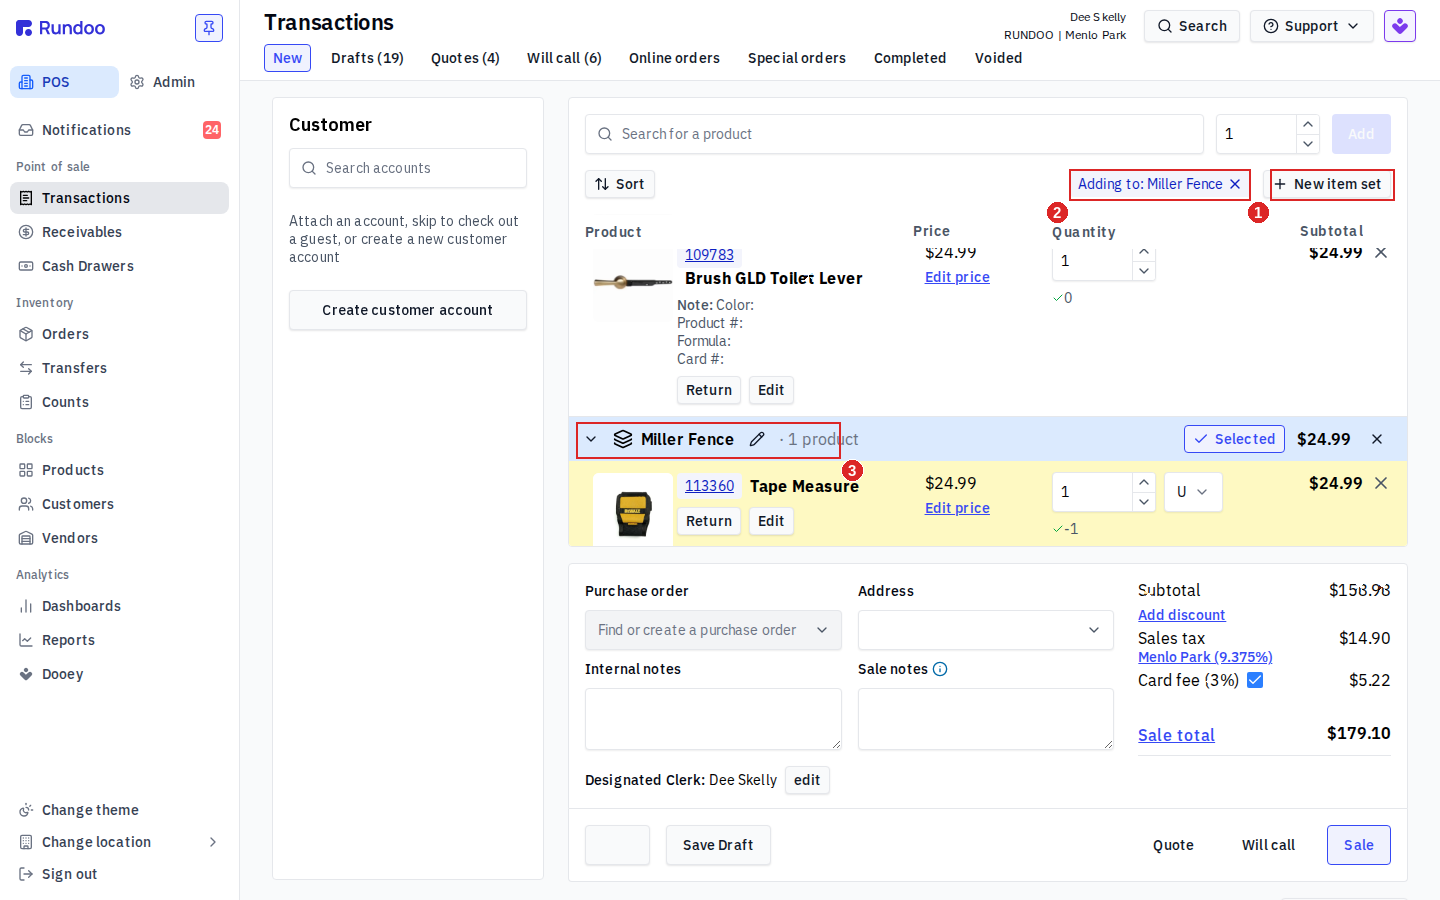
When one order really covers several things (a contractor buying for three separate job sites, or a delivery that ships in two loads), you can split the cart into named item sets. Each set is a labeled group inside the same transaction, with its own running subtotal, so the order stays itemized by group instead of one long undifferentiated list. It's still one sale, one payment, one customer.
-
In the cart header (next to Sort), click New item set, type a name for the group (for example, a job name), and pick New item set: {name} to create it.
-
The Adding to: {name} pill appears at the top of the cart. Every product you add now drops into that set. Add items the usual way (see Step 2).
-
Each set shows as a header row: the set name, a pencil to rename it, the number of products in it, and the set's own subtotal. Products you add without a set selected sit ungrouped at the top of the cart.
-
To start a second group, click New item set again and name it. To switch which group new items land in, click the Selected toggle on the set you want, the Adding to: pill follows it.
The cart's overall Subtotal, Sales tax, and Sale total still add up the whole ticket. Item sets organize the order; they don't split it into separate sales.
The grouping carries onto the printed and emailed sale, too. Each item set prints as its own labeled section (the set name as a heading), with that set's line items listed under it and the set's Subtotal on its own row at the end of the group. Below the last group the document rolls everything up the usual way: one overall Subtotal, Sales tax, and Total, paid by a single tender. So a contractor gets a receipt or invoice that reads job-by-job while you still ring and settle it as one sale.
Removing a set doesn't cancel the sale. Click the ✕ on a set header and Rundoo asks Remove item set?, then Remove clears that group. Removing a set removes the grouping, not the customer's order. To take an item out of a group instead, use the ✕ on that product's line.
Editing a completed sale
A completed sale isn't frozen. From the sale's detail page, you can fix the cost booked against each line, move the sold date, and edit per-line notes. Anything else, price, quantity, tender, customer, is not editable post-completion; reverse the sale via a return and ring it up again (see Returns).
Open the sale from the Completed top tab on Transactions, or from a customer's Transactions sub-tab.
Edit the cost on a line
Each line on the sale detail shows the cost that posted with the sale, alongside the product's current Avg Cost and Std Cost for reference. Click edit cost on the line to open the Edit cost modal. Enter the corrected unit cost and Save.
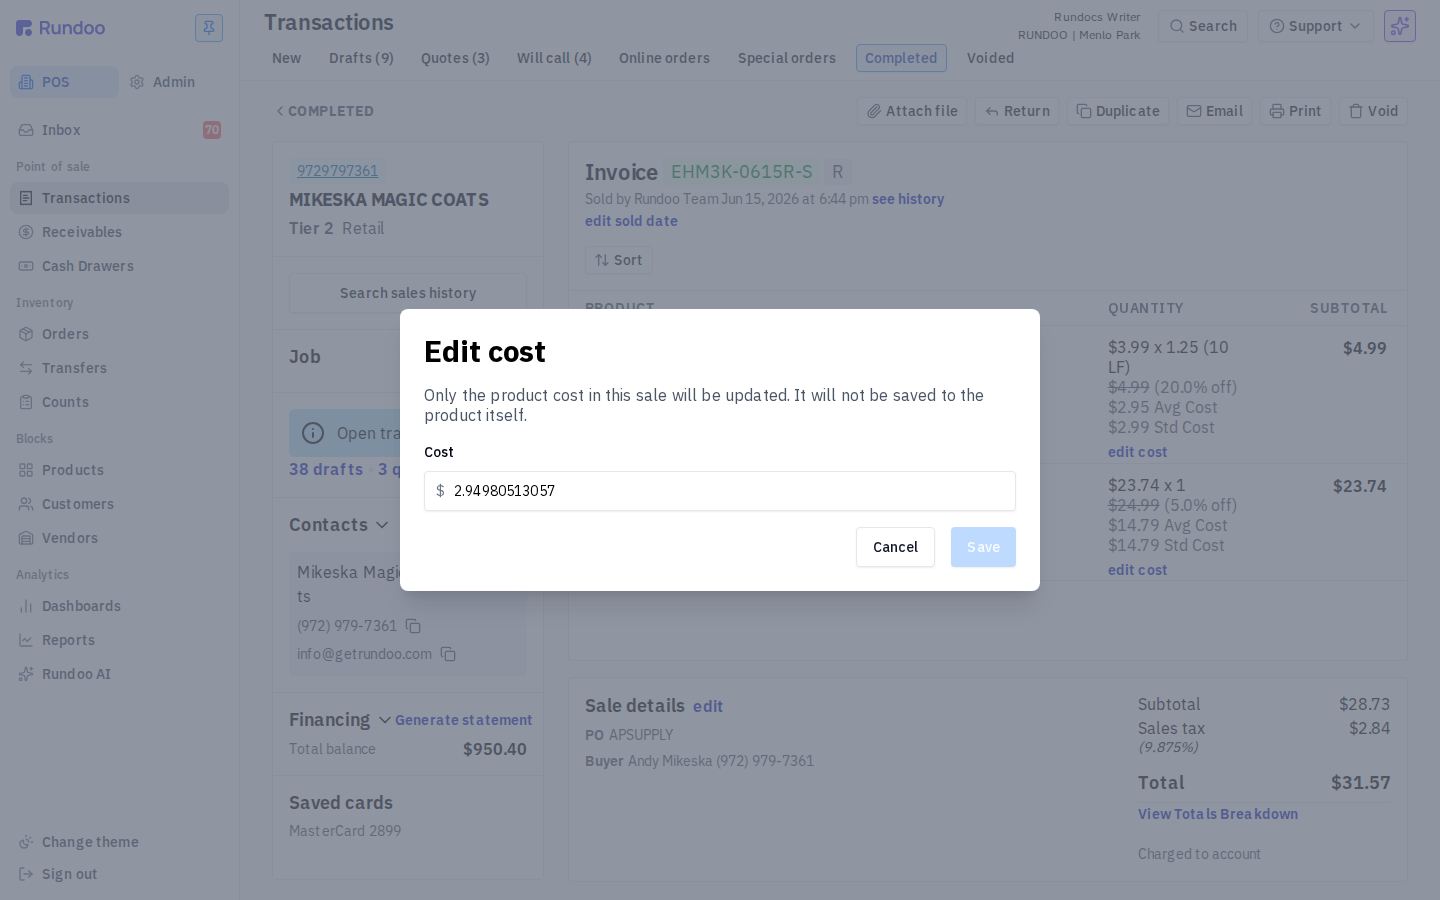
This affects only this sale's COGS. The modal says so explicitly: "Only the product cost in this sale will be updated. It will not be saved to the product itself." Use it for one-off corrections (vendor billed a different unit cost than what was on file when the sale rung). To change the product's default cost going forward, edit the product (see Products); to fix the unit cost on a vendor receipt, edit it at receive time (see Order receipts).
Edit the sold date
Click edit sold date at the top of the detail to open the Edit sold date modal, pick a new date, and Save. The sale's reporting period (and the date the COGS journal entry posts) moves with the new date.
Sold dates that cross a closed accounting period re-post the journal entry into closed time. Talk to your bookkeeper before back-dating into a month that's already been reconciled.
Edit a line's notes
Click edit on a line (the plain Edit button next to the product, separate from edit cost) to open the Edit line item modal. Two notes fields: Receipt (prints on the customer's receipt) and Internal (staff-only, never prints). Use Receipt notes for a one-off clarification to the customer; use Internal notes for accounting flags or job tracking.
Price and quantity are not editable from this modal. The line edit is notes-only post-completion.
On mobile
Sales show up in two mobile surfaces, with different audiences.
Staff view: mobile-pos Transactions
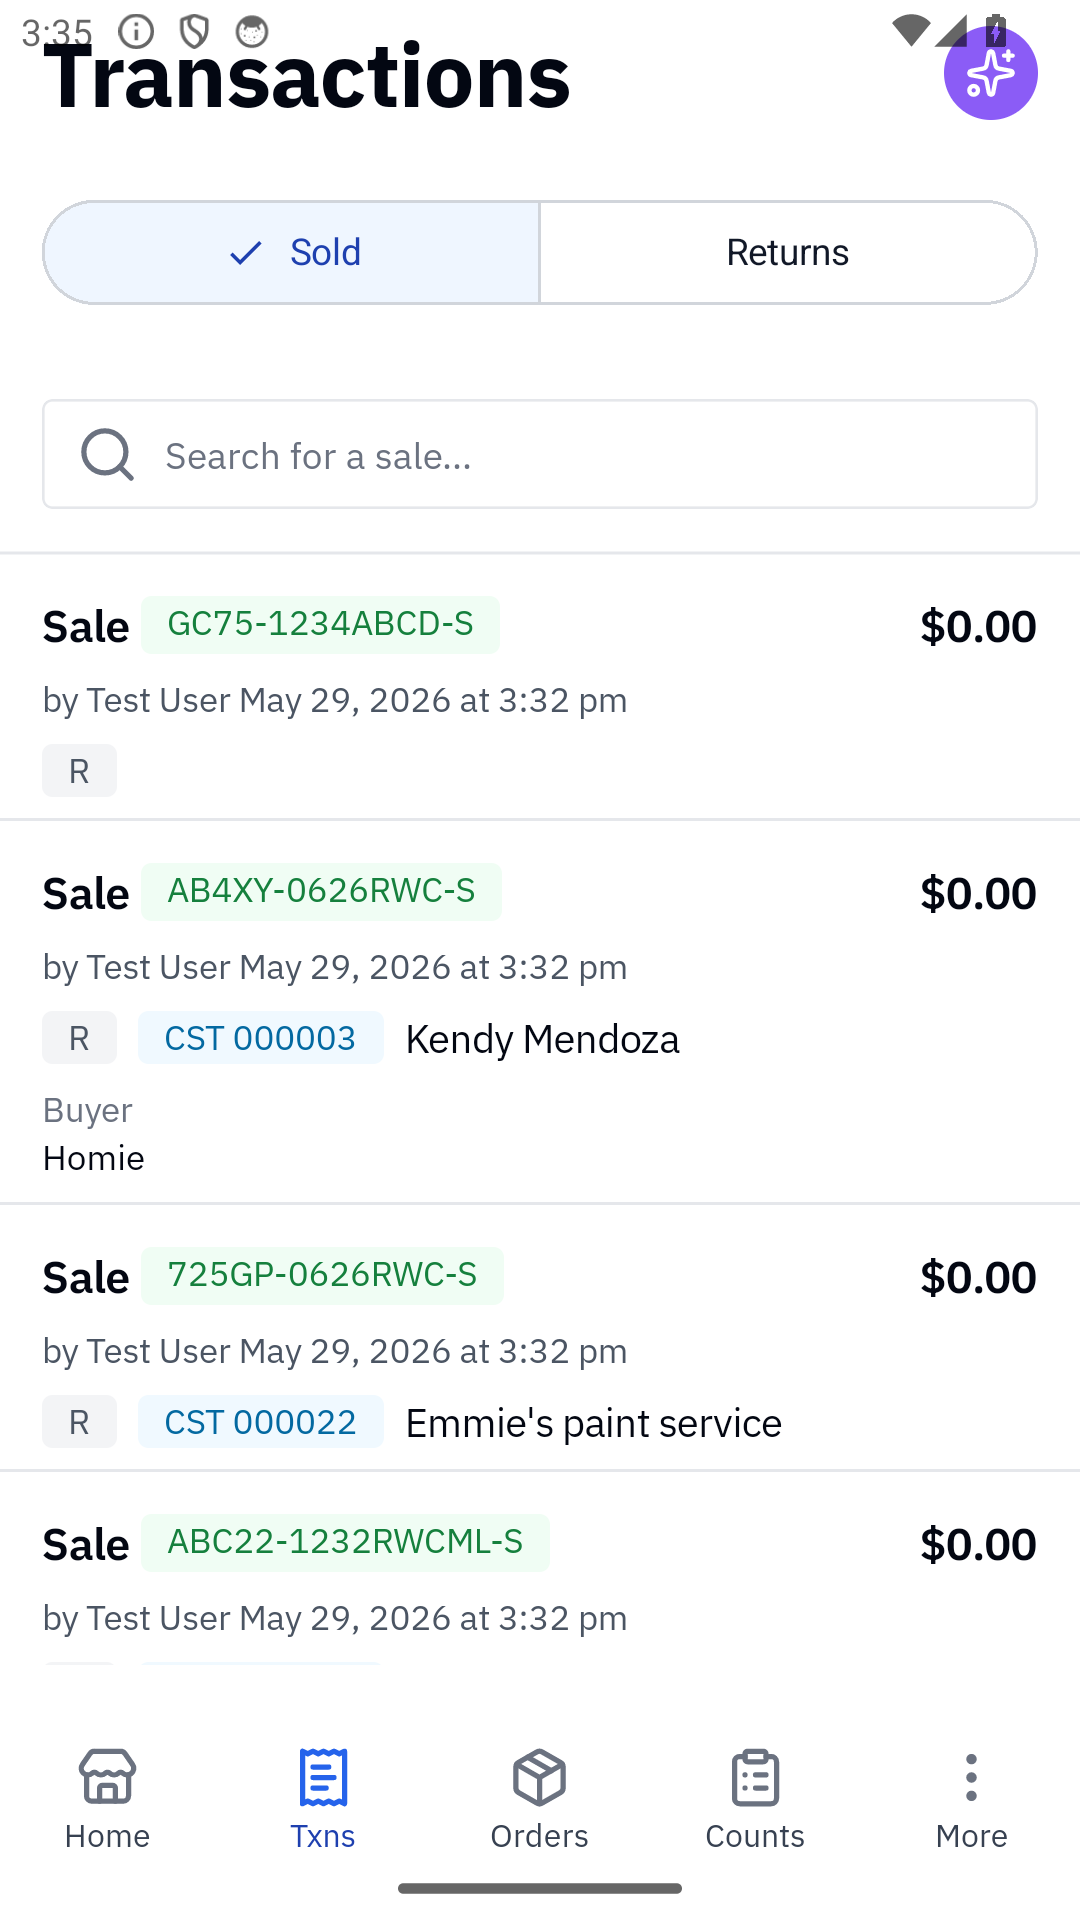
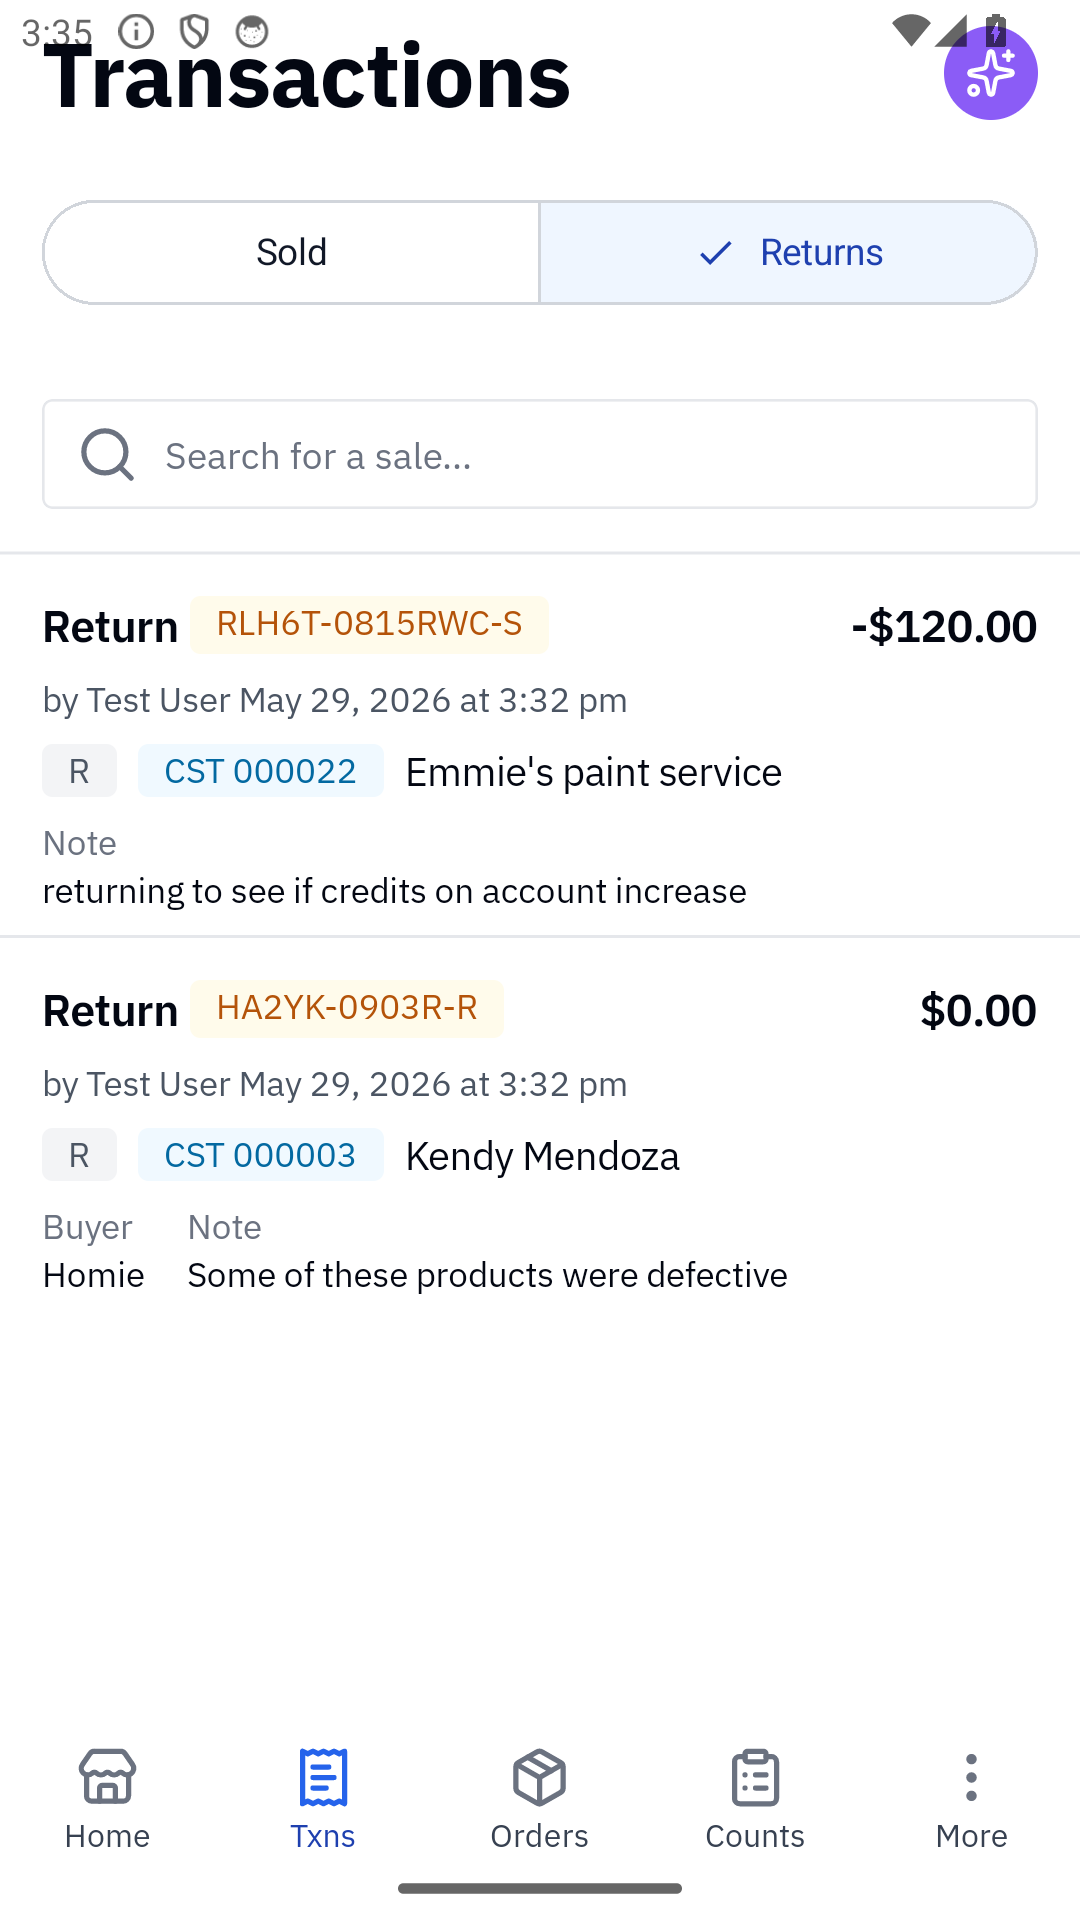
The Rundoo POS mobile app's bottom-tab Txns is where staff see completed sales. Same as the web's Completed top tab, search-driven (type a customer name, sale ID, or product), one tap into the sale detail. The Sold / Returns toggle on top filters by type.
Returns share the same search surface; the Returns sub-tab shows return transactions only.
💡 Empty state shown here is the default local-seed state. In a real store, the Sold list shows the most recent sales filtered to the staff's location.
Customer view: mobile-cxa Sales tab
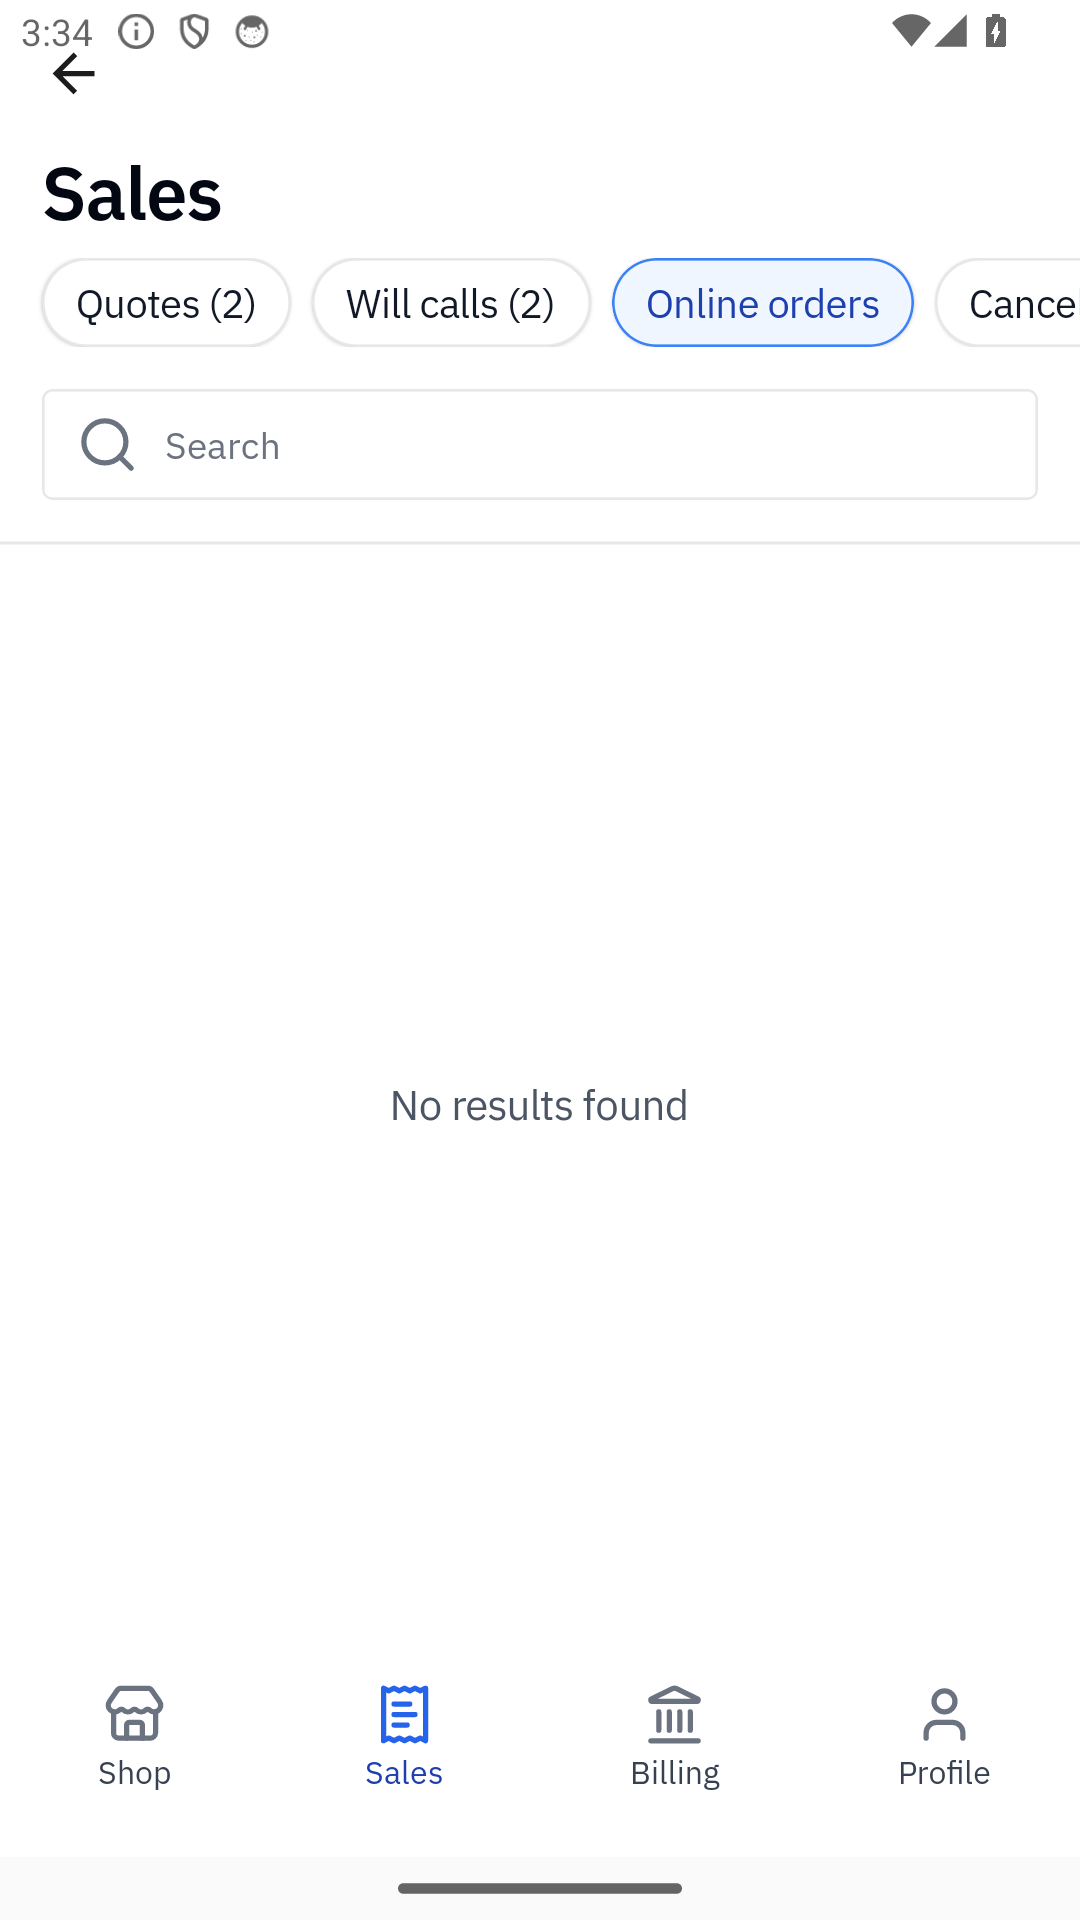
The Rundoo customer app's Sales tab is the contractor's view of their own order pipeline. Filter chips at the top break by status, Quotes, Will calls, Online orders, Cancelled, each with a live count. Tapping a row opens the sale detail with line items, totals, and a downloadable PDF.
See Mobile apps for the broader two-app overview and how contractors get the customer app.
Recommended Rundocs
-
Drafts, quotes & will-calls, when the cart isn't ready to finalize today.
-
Special orders (ordering an out-of-stock product for a customer at the counter).
-
Cash drawer (opening, closing, and reconciling the register behind your sales).