
Rundocs › Vendors & Purchasing
Vendors
Last updated 2026-09-21
Vendors are the suppliers you buy product from, paint lines, hardware wholesalers, feed distributors, card processors, service providers, and anyone you cut a check to. This page covers creating and editing vendors, managing vendor contacts, integration setup, and deactivating.
In the POS mode, open the Vendors tab in the left sidebar.
Adding a vendor
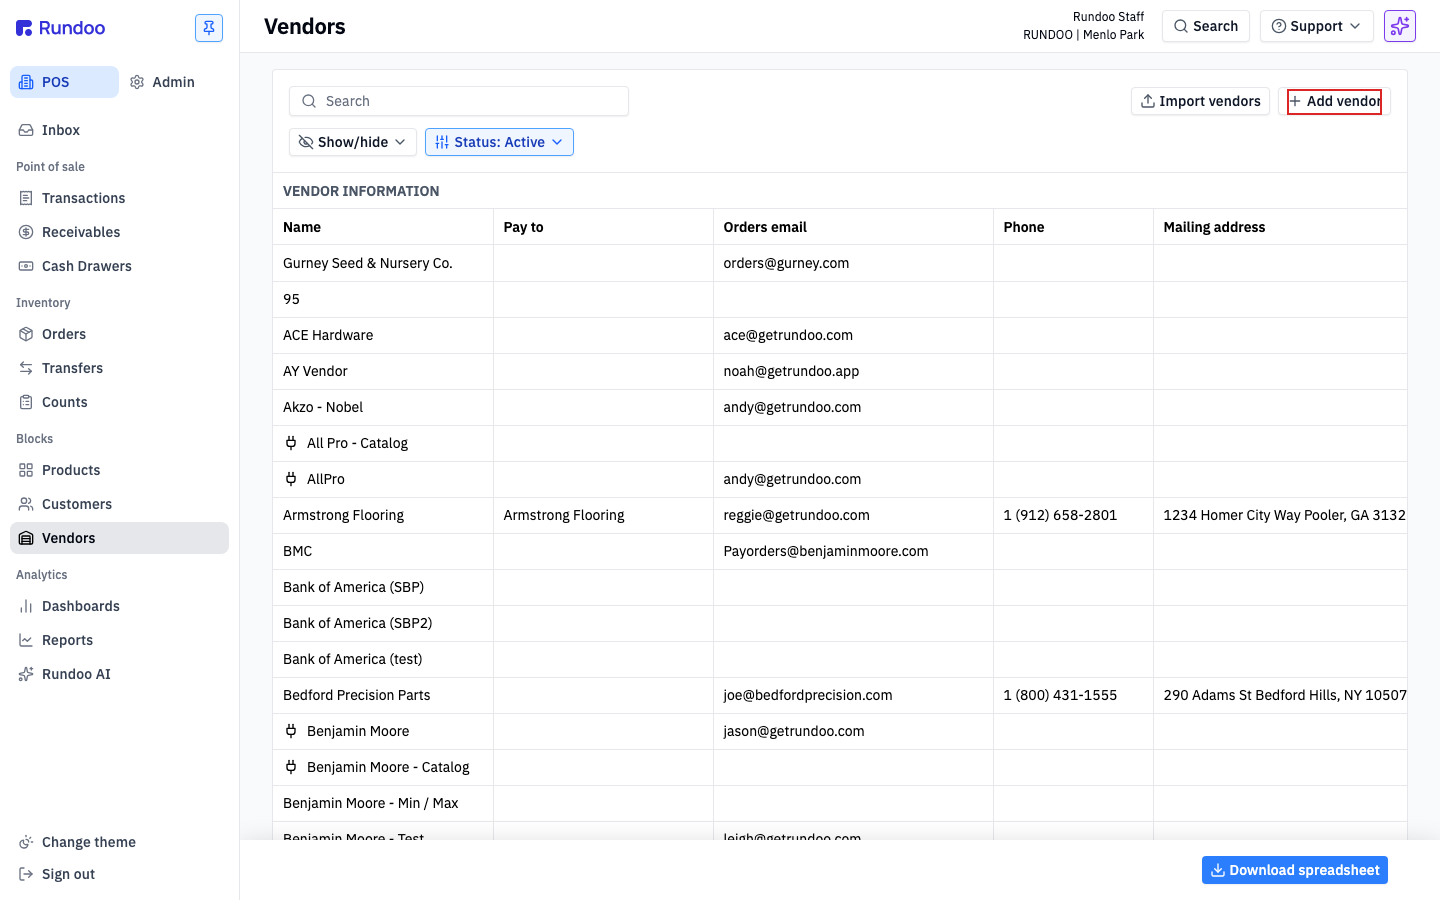
From the Vendors list, click Add vendor in the top-right. A modal opens with the minimum fields needed to create the record. Everything else (mailing address, payment banking, integration pairing, contacts) gets filled in on the vendor's detail page after creation.
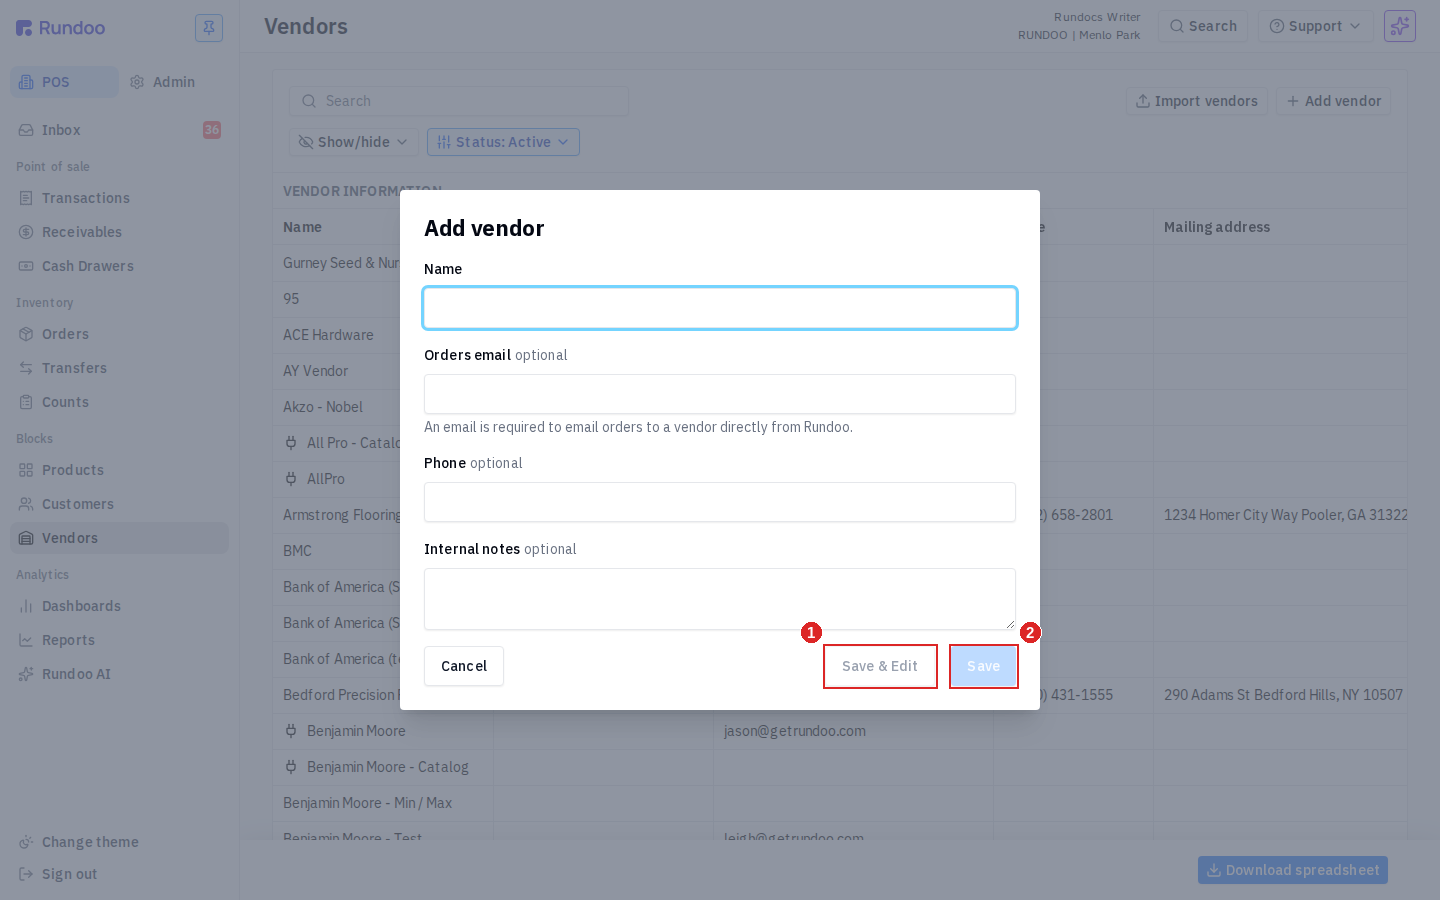
| Field | What it does | Required? |
|---|---|---|
Name |
Vendor name as it appears on purchase orders, invoices, and in the list. Must be unique. | Yes |
Orders email |
Where Rundoo emails POs when you send them directly from the app. Required if you plan to send orders by email. You can leave it blank for a walk-up vendor you only pay, never order from. | Optional |
Phone |
Primary phone on the account. Powers search and shows up in vendor references. | Optional |
Internal notes |
Free-text notes visible to staff only. Good for "rep is Sarah, she answers Tuesdays" or "always short-ships (count twice)." | Optional |
The modal has two save buttons at the bottom:
-
Save creates the vendor and closes the modal. Use this when you just need the vendor to exist so you can reference them.
-
Save & Edit creates the vendor and drops you on their detail page. Use this when you'll immediately go set a mailing address, pair an integration, or add contacts.
Duplicate names are rejected. If another vendor already exists with the name you're entering, Rundoo shows a red banner ("A vendor with the same name already exists in the company"), and leaves the modal open so you can rename. Check the list first if you're unsure.
Invalid email blocks save. If Orders email isn't a valid address, clicking Save keeps the modal open and surfaces "Email address is not valid" inline under the field, plus a "Please fix the errors below" banner at the top. Clear the field or enter a valid address, then click Save again.
Adding vendors one at a time is fine for occasional additions. For migrating a full vendor list from your old system, see Vendor imports instead.
Editing vendor details
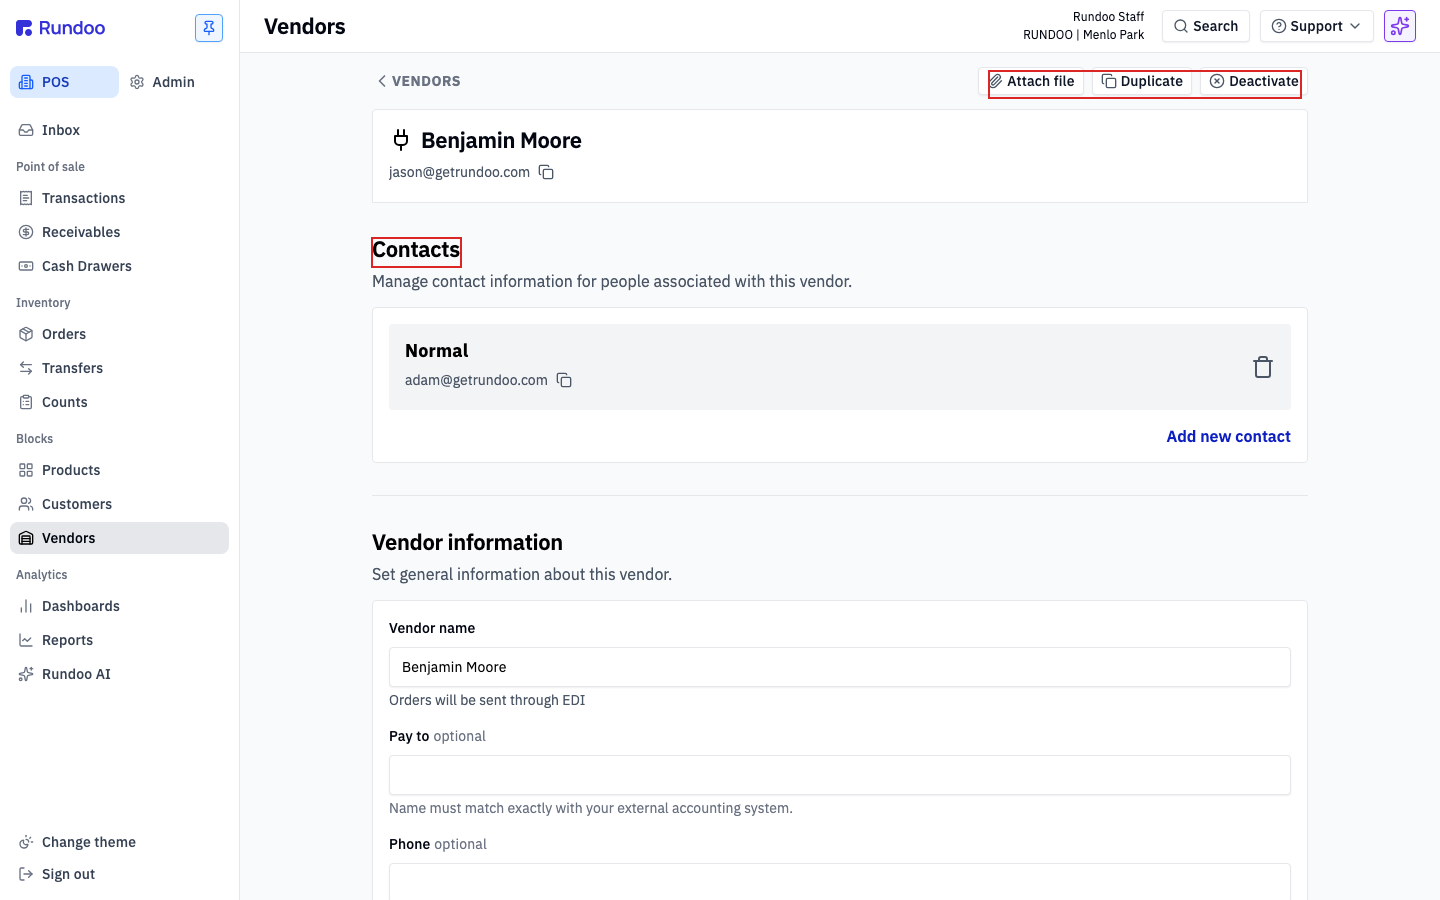
Every vendor has a detail page, reached by clicking their row in the list. The header shows the vendor name, their orders email, and an action cluster top-right with Attach file, Duplicate, and Deactivate. Below the header, the page stacks seven sections, Contacts, Vendor information, Ordering, Payment, Integrations, Assign vendor SKUs, and Vendor settings, and each section saves on its own.
Vendor information
The Vendor information section holds the identity fields: Vendor name, Pay to (the name your accounting system writes checks to (must match exactly)), Phone, full mailing address (Address, Apt, suite, etc., City, State, ZIP, Country), Orders email, an Integration Vendor dropdown, and Internal notes. Edit any field, then use the section's own Save at the bottom to commit. Cancel reverts to the last saved state.
Ordering
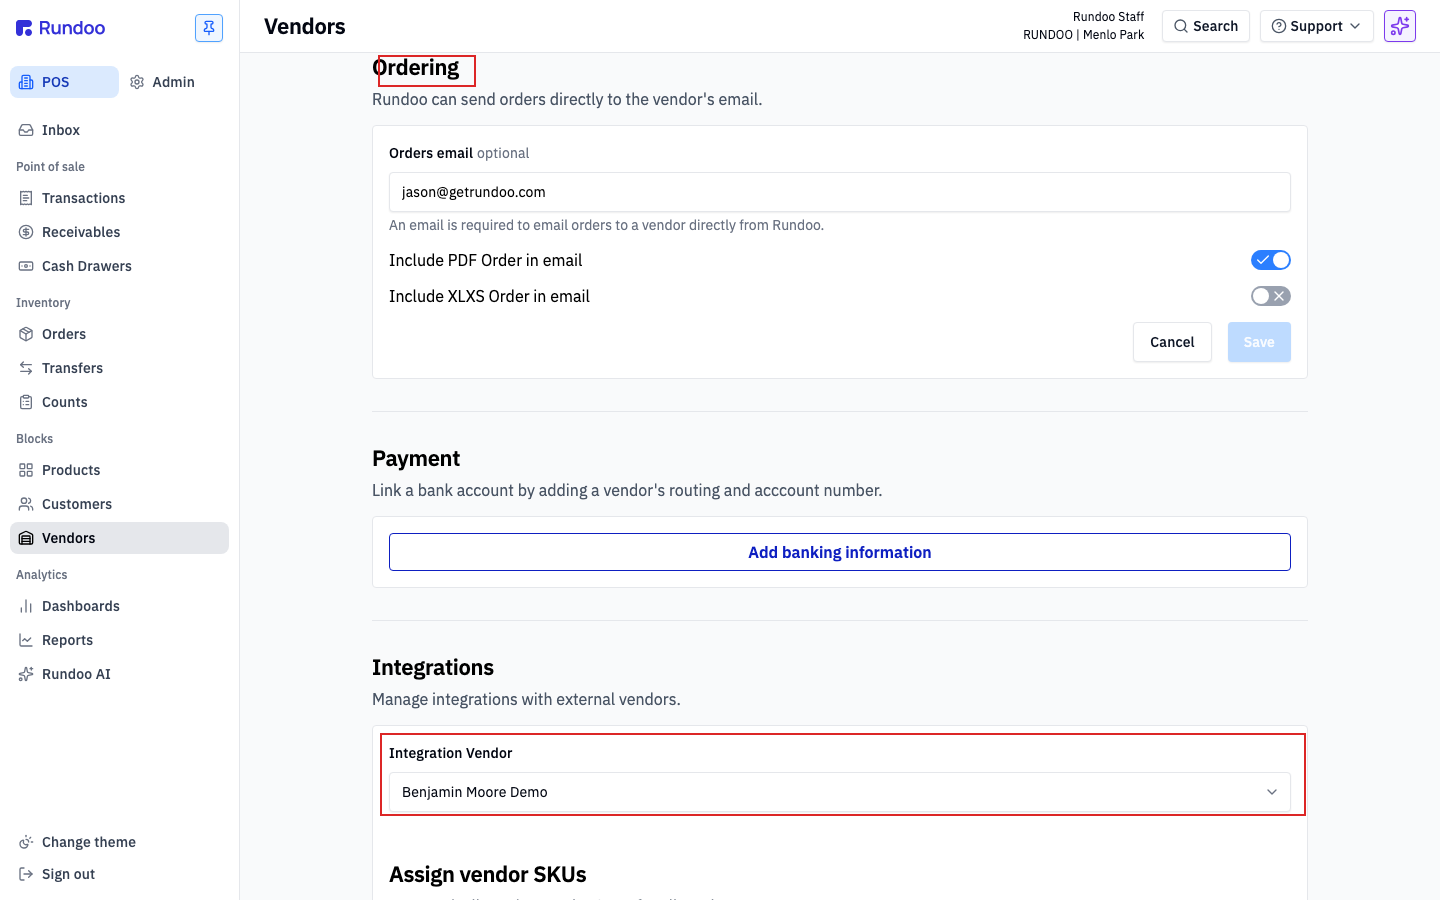
The Ordering section controls how Rundoo emails POs to this vendor. Beyond the Orders email field, two toggles, Include PDF Order in email and Include XLXS Order in email, decide which attachments go out with the order. Save the section to apply.
The Orders email is a single address. Rundoo doesn't accept a comma-separated list, a CC field, or a second recipient at PO send time. If you need a PO copied to a second person, set up an inbox rule on the vendor's email account or use a distribution list (or a vendor alias that fans out to multiple recipients) as the Orders email.
Payment
The Payment section stores ACH banking info so you can pay the vendor directly from Rundoo. Click Add banking information to fill in a routing and account number.
Integrations
The Integrations section pairs this Rundoo vendor with one of Rundoo's Vendor Catalogs, the first-class catalog integrations for Benjamin Moore, Do It Best, True Value, and Orgill. The Integration Vendor dropdown is how Rundoo knows, say, that "Benjamin Moore" in your list corresponds to the Benjamin Moore price-and-availability feed. Pick the matching integration from the dropdown and save the section.
Catalog pairing here is not the same as EDI ordering. The Integration Vendor dropdown pairs the vendor to its product catalog (SKUs, pricing, availability), and you set it yourself. Sending purchase orders to that vendor over EDI (the plug icon and "Orders will be sent through EDI" helper on the vendor's detail page) is a separate, server-side pairing Rundoo Support turns on. See Orgill EDI.
Under the same section, Assign vendor SKUs is a bulk operation that walks your product catalog and pairs each product with the integration vendor's SKU. It changes data across many products at once. Confirm you want it before clicking. Sync catalog data to products pulls fresh pricing, descriptions, and inventory fields from the integration feed into your products; same caveat.
Vendor settings
The Vendor settings section holds the per-vendor knobs that don't fit elsewhere (things like tax exemption status and vendor-specific defaults). Edit the field, save the section.
A successful save flashes a green Vendor saved banner at the bottom of the screen for about two seconds. If you didn't see it, your change may not have committed. Scroll back and check the field.
Vendor contacts
Each vendor can have multiple contacts, the actual people you work with at the vendor (your rep, the shipping manager, accounts receivable). The company is the Vendor; the people are contacts underneath.
The Contacts section sits at the top of the detail page, above Vendor information. Existing contacts show as grey cards with name and email. To add another, click Add new contact at the bottom-right of the section. A modal opens with Name, Phone, Email, and Notes.
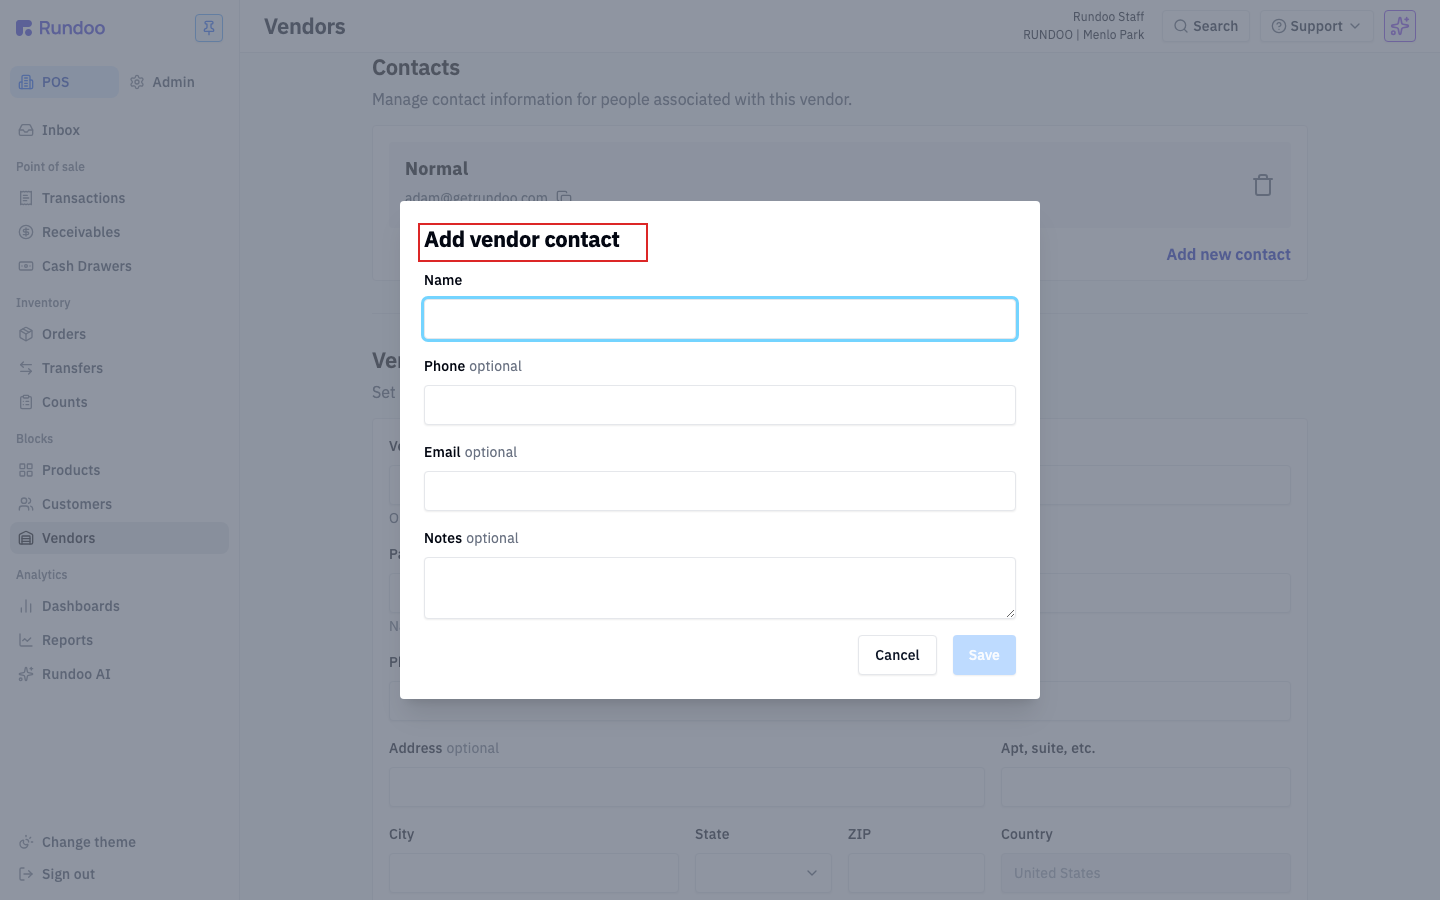
Fill in at least a Name and click Save to add the contact. To remove one, use the trash icon on the contact's card.
Contacts are reference-only. They don't receive POs automatically. Rundoo emails orders to the vendor's Orders email (on the detail page's Ordering section), not to individual contacts. Store contacts so staff can look up who to call; route emails through the vendor-level address.
A former sales rep's name still prints on your Purchase Orders after you deleted their contact card? That name isn't coming from this Contacts list. Deleting a contact card (the trash icon) only takes the person off the vendor's Contacts section. For an integrated vendor, the sales rep tied to your account comes from the vendor's own system through the integration, so it isn't a field you can edit or clear here, and removing the contact card won't stop the rep from appearing on new POs. To change or remove the rep that shows on Purchase Orders to that vendor, email support@rundoo.ai with the vendor name and the rep to remove.
Deactivating a vendor
Click Deactivate in the action cluster at the top-right of the vendor's detail page to hide them from everyday use. Deactivation is a soft archive. The vendor disappears from the default list view and from vendor pickers when creating new POs, but their history stays intact for reporting and for any open orders or vouchers referencing them.
To bring them back, flip the list's Status filter to show inactive vendors, open the detail page, and click Reactivate where Deactivate used to be.
Don't deactivate a vendor with open orders or unpaid invoices. The orders and invoices stay on the books, but the vendor won't appear in new-PO or voucher pickers until you reactivate. Close out or void open work first, then deactivate.
Recommended Rundocs
-
Vendor imports (bulk-creating vendors from a spreadsheet).
-
Purchase orders (ordering product from the vendors you just set up).
-
Benjamin Moore orders, the integration-specific flow for BM vendors.