
Rundocs › Customers & Jobs
Statements
Last updated 2026-09-11
Statements are the monthly bill you send charge-account customers (one document per customer, listing the outstanding activity for the period).
In the POS mode > Customers left tab > Statement runs top tab, you generate and send statements in bulk. For a single customer, per-customer statement settings live on the customer detail page under Settings.
Only charge-account customers get statements. Assigning a statement-based Finance term (for example Net 30 Statement) on a customer is what turns that customer into a charge account and opts them into statement runs. See Customers for where the Finance term is set.
Is sending statements automatic?
Rundoo generates a statement run for you automatically once a month, on your Statement day. But it doesn't send anything on its own. Generating a run (automatic or manual) and delivering it (printing, mailing, or emailing) are two separate steps, and delivery is always something you do by hand.
So if you're wondering "do I need to generate a run myself or can I use the auto-generated one?" and "do I have to do anything to email or print statements, or is that automatic?", the answer is: the monthly run is generated for you, but you send it. When it's ready, the Statement runs tab shows a banner reading "Your automatic monthly statement run for {period} is ready to send" (not "has been sent"). Click View details to open the Send statements modal and choose how each customer gets their copy:
-
By mail, Download the PDF packet to print and hand-deliver or post.
-
By email, Send statements emails each customer's statement to the contacts on file.
Nothing is emailed or printed until you do one of those. You can also generate a run by hand any time instead of waiting for the monthly one (see Running statements in bulk) — the automatic run just saves you the generate step on your billing day.
What's required to run a customer statement
For a customer to be eligible for a statement run, three things have to be in place:
-
A statement-based Finance term on the customer. Assigning a term like
Net 30 StatementorNet 10th(anything ending in Statement) is what turns a customer into a charge account and opts them into statement runs. Set on the customer detail page under Settings > Financing > Finance term. Customers on Invoice-based terms (Net 30 Invoice) get individual invoices, not statements. -
A delivery channel. For email delivery, the customer needs at least one Contact with an email address on the customer detail page. Customers without any contact email are skipped from the email count and have to be handed a printed/PDF copy instead. For mail delivery, no extra config needed.
-
(Optional) Autopay setup. If you want statements auto-charged to a card or bank, the customer needs Autopay statement balances enabled in their Settings > Statements section, plus a saved payment method on file.
If a customer statement isn't running for someone, walk those three checks first. Missing Finance term is by far the most common cause.
What's on a statement
Every statement is a one-page-or-more PDF per customer. The top of the page shows who it's for, the statement date, and a balance summary, Total balance, then an aging breakdown (Current, 1-30 days, 31-60 days, 61+ days), plus Finance charge and Credits. Under the summary, a single table lists every relevant row for the period, one line per invoice, payment, finance charge, or credit.
The columns are DATE, DUE, IDENTIFIER, TYPE, PO, JOB, ORIGINAL, BALANCE. The TYPE column is the one to know:
-
Invoice, a charge-account sale that adds to the balance. -
Payment(a bill payment the customer made), shown as a negativeORIGINAL. -
Finance charge, interest assessed on overdue balance (see Finance charges). -
Credit(a credit memo or refund-to-account), also negative.
Payments appear on statements automatically. There's no toggle to turn them on. Every Payment the customer made during the statement period lists as its own row, tied to the invoice(s) it paid down.
What fills the table depends on the Statement type set on the customer:
-
Open item (default). Only lists line items that were still open at the end of the statement period. Payments that fully paid down earlier invoices drop off. Use this when a customer asks for a statement showing just what they owe.
-
Balance forward. Shows a starting balance from prior periods, every transaction in the period (invoices, payments, finance charges, credits), and the ending balance. Use this when a customer wants a running ledger.
The informational banner on the Generate statement page is a good reminder: "Open item statements will contain line items that were open as of the end date of the selected date range."
Running statements in bulk
Bulk runs are the normal way to send statements (one run covers every eligible charge-account customer for the period).
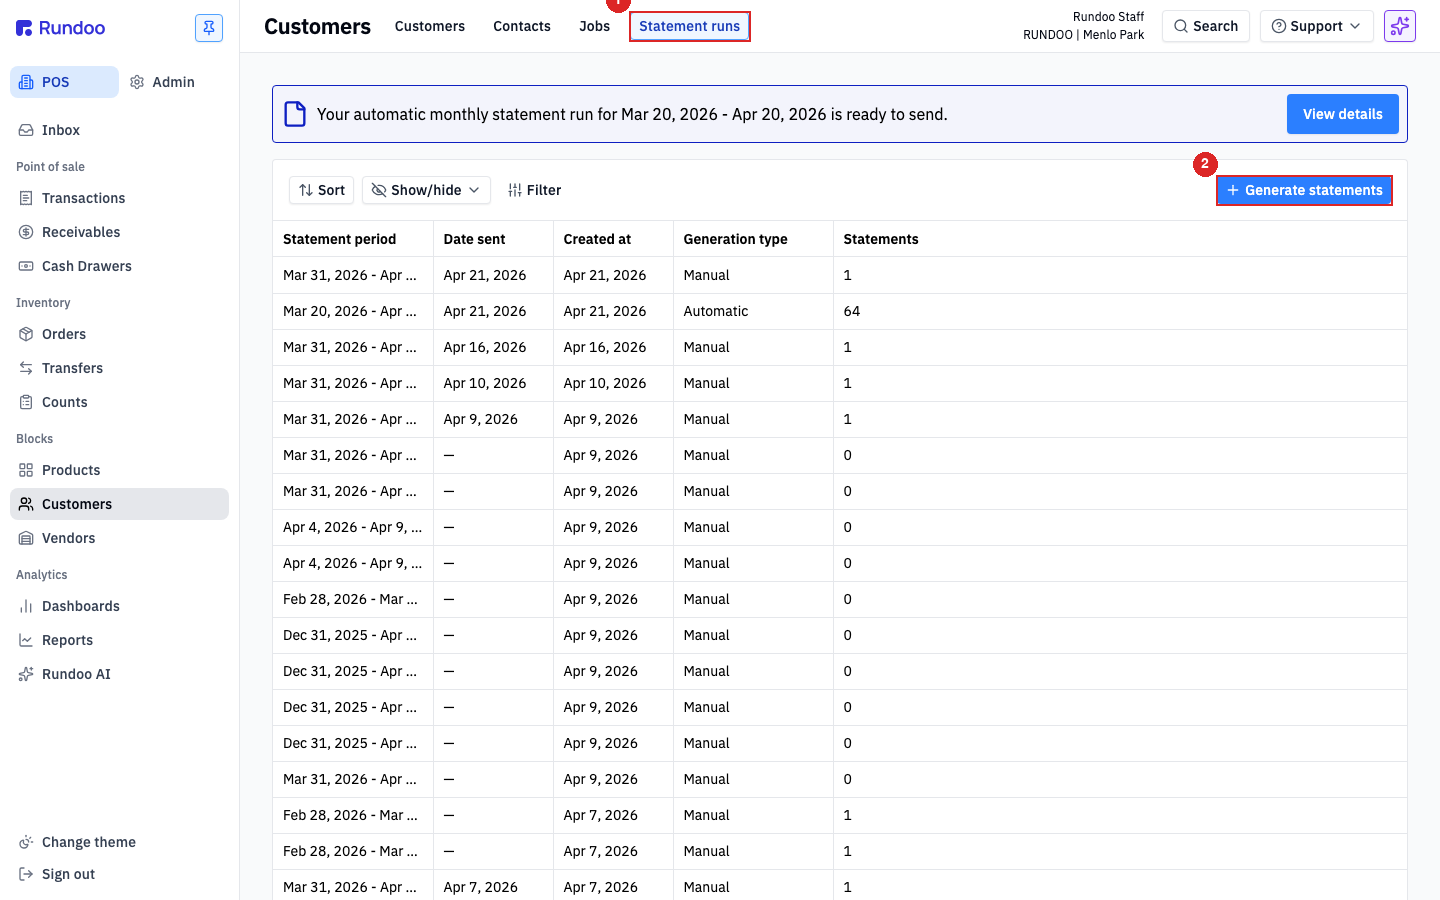
On the Statement runs tab you see every past run as a row: Statement period, Date sent, Created at, Generation type (Manual or automatic), and the count of Statements in the run. A Date sent of — means the run was generated but not delivered yet.
At the top of the page, a highlighted banner appears when the automatic monthly run is ready to send. Click View details on that banner to open the delivery modal (see Delivery: PDF or email below).
To start a new run, tap + Generate statements in the top-right corner. That opens the Generate statement page:
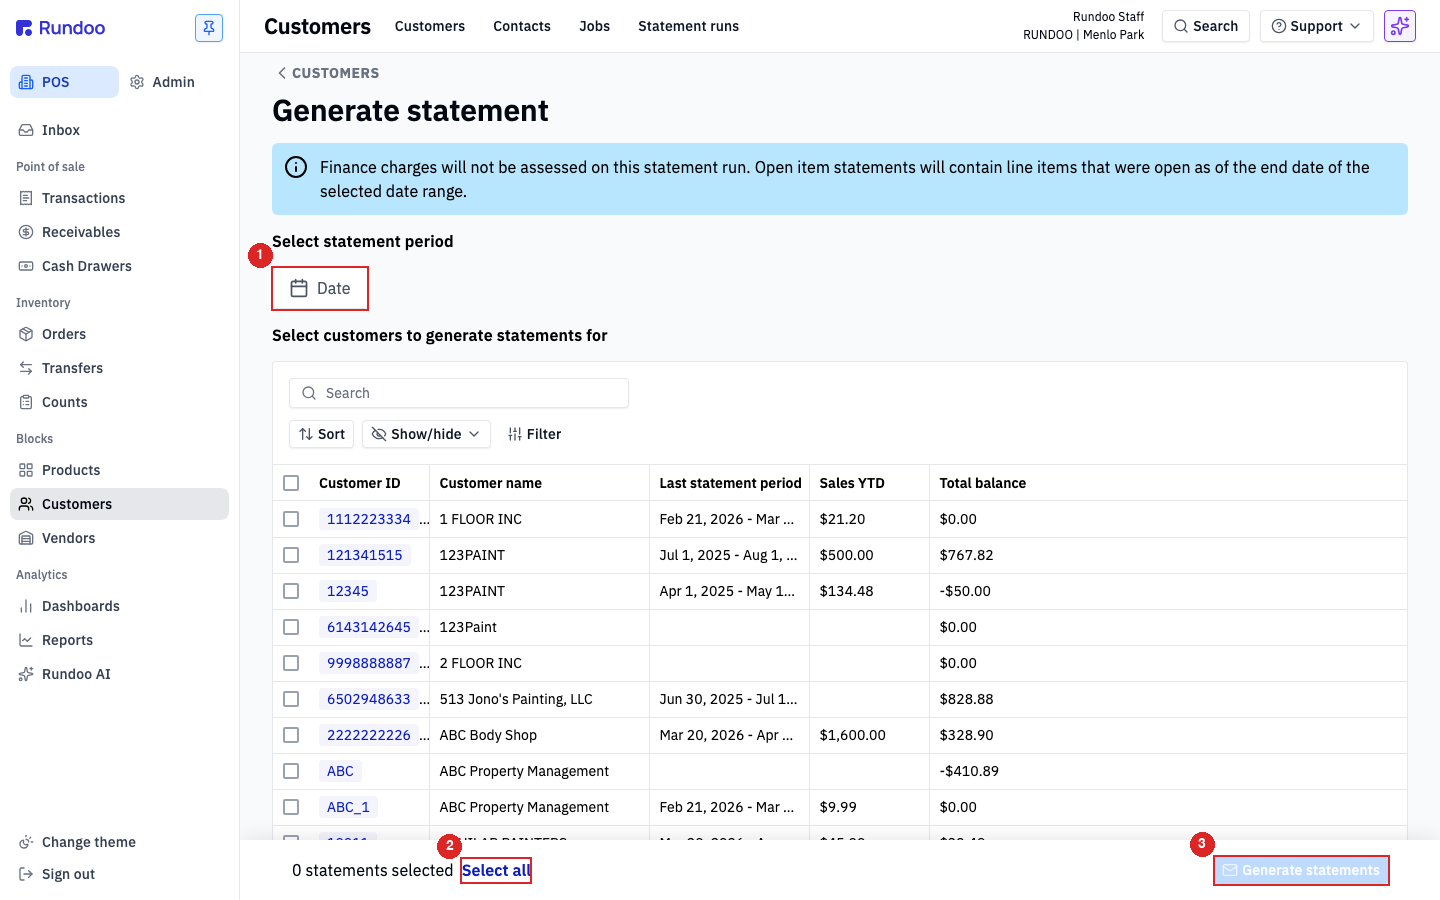
-
Select statement period, tap the Date picker and pick the start and end of the period you're billing for. A short informational banner at the top reminds you that finance charges are not assessed during a statement run, and that Open item statements include line items that were still open at the end of the selected range.
-
Select customers to generate statements for, the table below lists every charge-account customer, with their
Customer ID,Customer name,Last statement period,Sales YTD, andTotal balance. Check the customers you want to include, or use Select all at the bottom-left. -
Filter by finance term. Tap Term in the control strip above the customer table to narrow the list to one or more finance terms (
Net 30 Statement,Net 1 Invoice,Net 10th, etc.). Pick the terms you bill for this run and only matching charge accounts stay in the table. Useful when you cycle different terms on different days of the month (for example, billing everyNet 10thaccount on the 10th of each month). -
Tap Generate statements at the bottom-right to build the run. Nothing is sent yet. The run appears back on the Statement runs tab, and from there you choose whether to email it or hand-deliver PDFs.
Finance charges are applied separately. See Finance charges for how and when they're assessed. For how balances carry forward and how customers pay them down, see Bill payments.
Running a single statement
To issue a statement for one customer (say, a mid-cycle courtesy send or a reprint), run the same bulk flow and pick just that customer in the Select customers table. Statements are always generated per customer, so a one-customer run is simply a bulk run of size one.
Per-customer statement behavior (the format, delivery preferences, autopay) is configured on each customer's detail page.
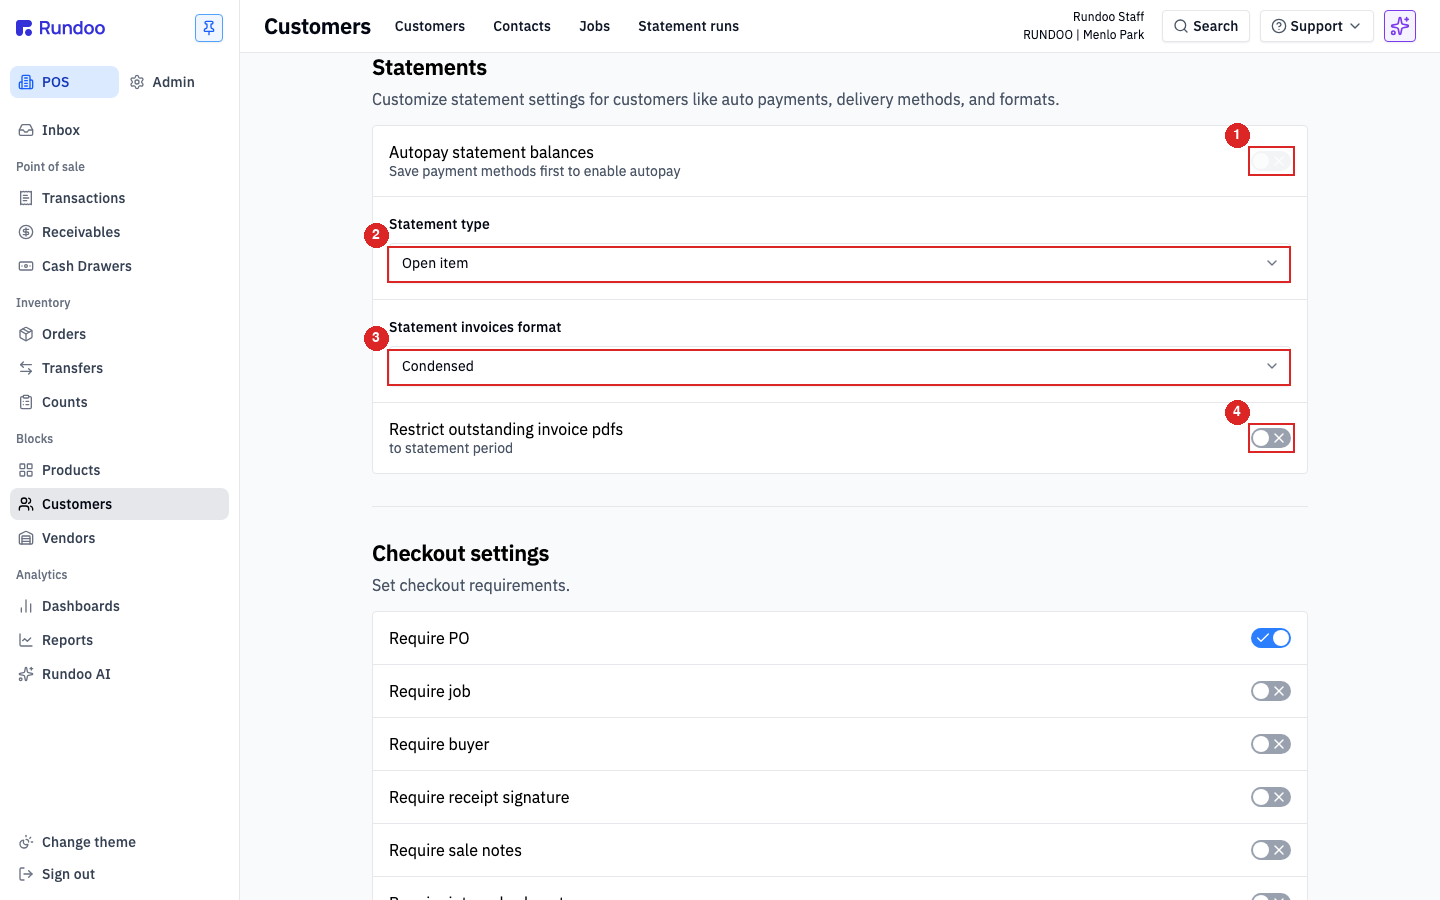
Open the customer from Customers (click the customer row), then tap the Settings sub-tab. Scroll to the Statements section. The controls that shape their statements:
-
Autopay statement balances, toggle on to auto-charge the customer's saved payment method for each statement balance. Requires a saved card or bank account on file (set in the Cards / Bank Accounts sections above). Whether the customer's credit balance is netted against the statement before that charge is a company-wide switch (see Apply credits on automatic statement payments under Company-wide statement settings below).
-
Statement type,
Open item(default) lists only the invoices still open at period end, with any payments that applied to them.Balance forwardshows a starting balance + every transaction in the period + ending balance. See What's on a statement above for the row-level detail. -
Statement invoices format. How detailed the invoice copies attached to the statement are.
Noneattaches no invoice PDFs;Condensedattaches a one-line-per-invoice summary;Full pageattaches the full invoice PDF for every invoice on the statement. Pick what your customer's AP team prefers. -
Restrict outstanding invoice pdfs to statement period. When on, attached invoice PDFs are clipped to transactions from the statement period only. Off by default.
The Financing section above it is where the Finance term (the charge-account switch), Credit limit, and Finance charge live. Those aren't statement-specific, but they gate whether a customer gets statements at all.
Delivery: PDF or email
Once a run is generated, it sits on the Statement runs tab waiting to be delivered. Use View details on the banner (or from the run row) to open the delivery modal:
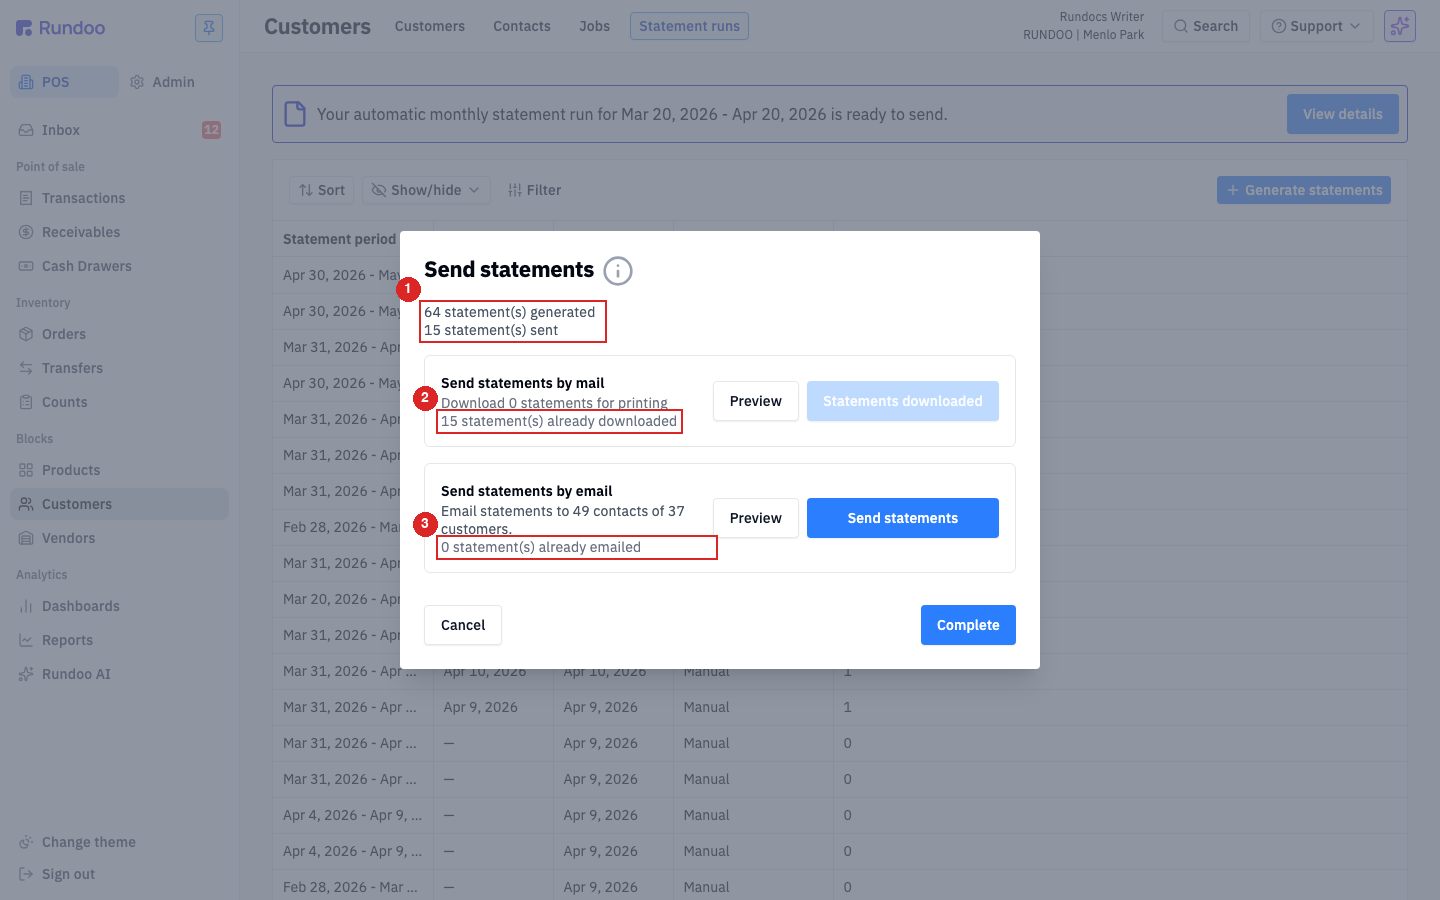
The modal is titled Send statements. The header shows where the run stands, {N} statement(s) generated is the total in the run, and {N} statement(s) sent counts what's been delivered so far across both tracks. Below the header, two delivery tracks:
-
Send statements by mail (for customers you want to hand-deliver or postal-mail).
Previewopens a PDF of every statement in the run;Download statementsdownloads the full packet for printing. The helper text tells you how many statements are in the packet (for example "Download 14 statements for printing"), and below it{N} statement(s) already downloadedis the running re-send tally for this track. Once everything in the run has been downloaded, the primary button readsStatements downloaded(greyed out) and the count above it drops to0. -
Send statements by email (
Previewopens the same PDF;Send statementsemails each customer's statement to the contacts on file). The helper text tells you how many contacts will receive it (for example "Email statements to 86 contacts of 62 customers"), and below it{N} statement(s) already emailedshows how many of this run's statements have already gone out by email.
You don't have to do both at once. The modal is reopenable from any run row, so you can email some customers now and mail the rest later, and the counters tell you what's still outstanding.
Below both tracks:
-
Complete. Marks the run done without sending anything. Use this after a manual delivery (you printed and mailed paper copies yourself) so the run is recorded as sent.
-
Cancel. Closes the modal without affecting the run. You can reopen it anytime from the run's row.
For a customer to receive a statement by email, they need at least one Contact with an email address on the customer's detail page. Customers without an email on any contact are skipped from the email count. Send them a PDF or printed copy instead.
Reprinting a past statement
Every statement a customer has received lives on their own record, and you can reprint or re-email any of them without generating a new run.
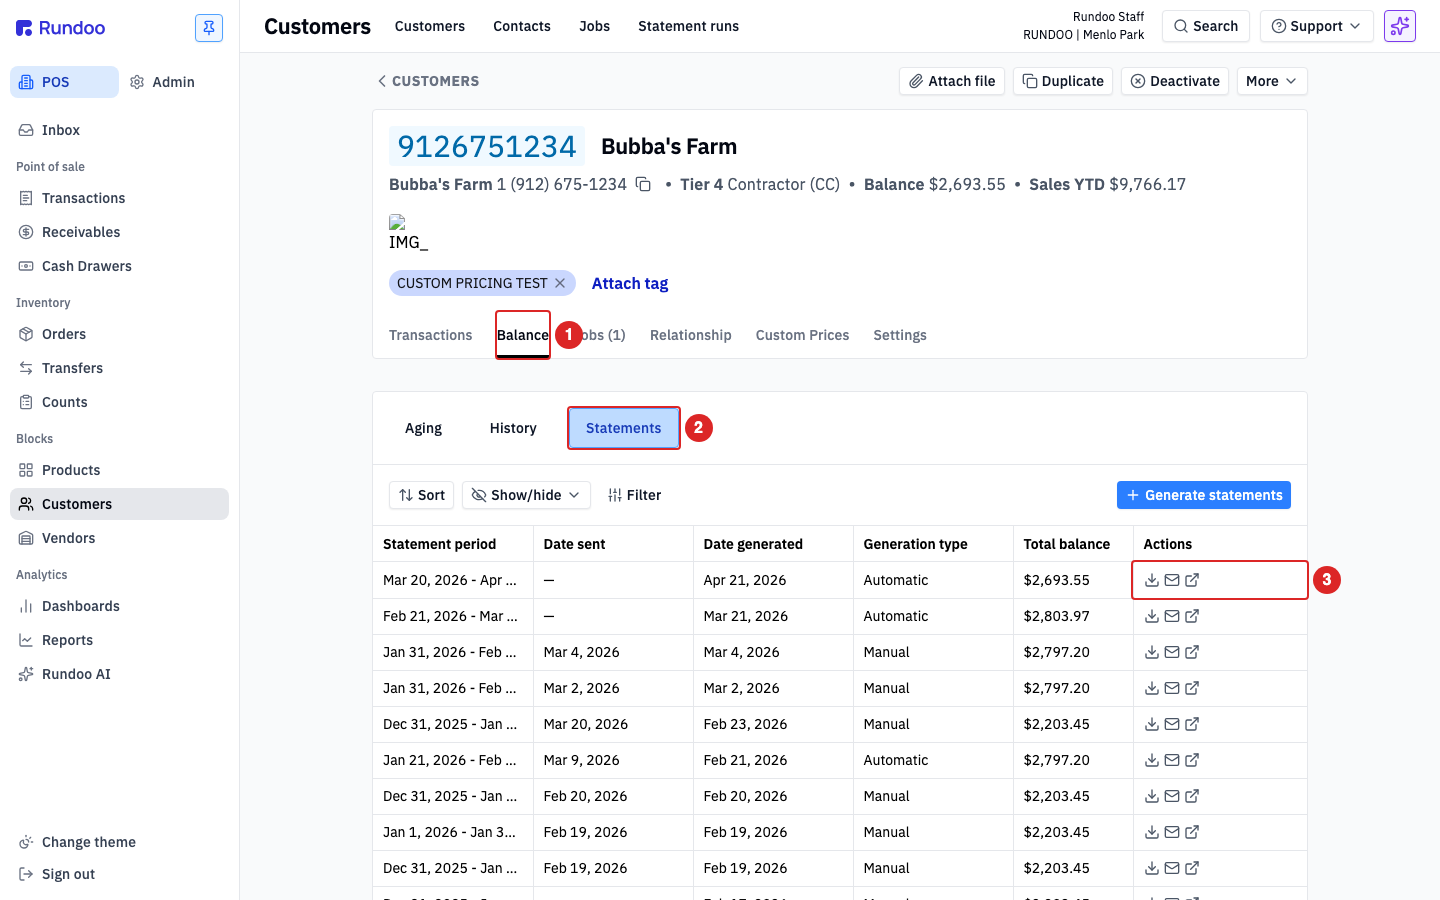
Open the customer from the Customers list, then switch to the Balance tab and the Statements sub-tab. You see one row per past statement, Statement period, Date sent, Date generated, Generation type, Total balance, and an Actions column with three icons on each row:
-
Download, download the statement PDF to print or attach to an email manually.
-
Email. Opens the Send Statement modal pre-filled with the customer's contacts, so you can re-send the same statement to anyone on file or to an added email. Each contact is a checkbox; Send to additional emails lets you add an address that isn't on the customer yet.
-
View full statement run (jumps to the original bulk run this customer's statement was part of, in case you want to reprint the whole run instead of one customer).
If you prefer, you can also resend statements from the other direction. Open the run from the Statement runs tab, check the specific customer rows you want to resend, and tap Send selected statements at the bottom.
Where to find this for one customer. Open the customer from the Customers left tab, switch to the Balance top tab, and click the Statements segmented button. The Date sent column shows whether each past statement has gone out yet, — means generated but not delivered. The three row-action icons are Download (PDF saves immediately), Email (opens the Send Statement modal), and View full statement run. To issue a fresh statement for this customer right now, tap + Generate statements in the top-right of the same view, it opens a Generate statements modal scoped to one customer, with a date picker, Include jobs, statement type, invoices format, and the contact checklist.
The Send Statement and Generate statements modals both end in the same two buttons: Print and Email. Print builds a PDF and downloads it to your computer for hand-delivery or sending to a printer. It does not pop the OS print dialog. Email sends the statement to the contacts you've checked. A customer with Mail statements toggled on in their Settings tab still gets the email button on demand. That switch only governs whether they're picked up in the bulk run's mail-by-mail track.
Reprinting does not regenerate the statement against today's balance. It sends the same PDF the customer first received, with the same period, same totals, same aging. To send a fresh snapshot of where they stand today, run a new single-customer statement (see below).
Applying a credit that doesn't match the statement total
Credits don't have to zero out against a statement total. Partial credits, or credits larger than what the customer currently owes, both work. The bill-payment builder allocates credits against specific invoices, not against the statement as a whole.
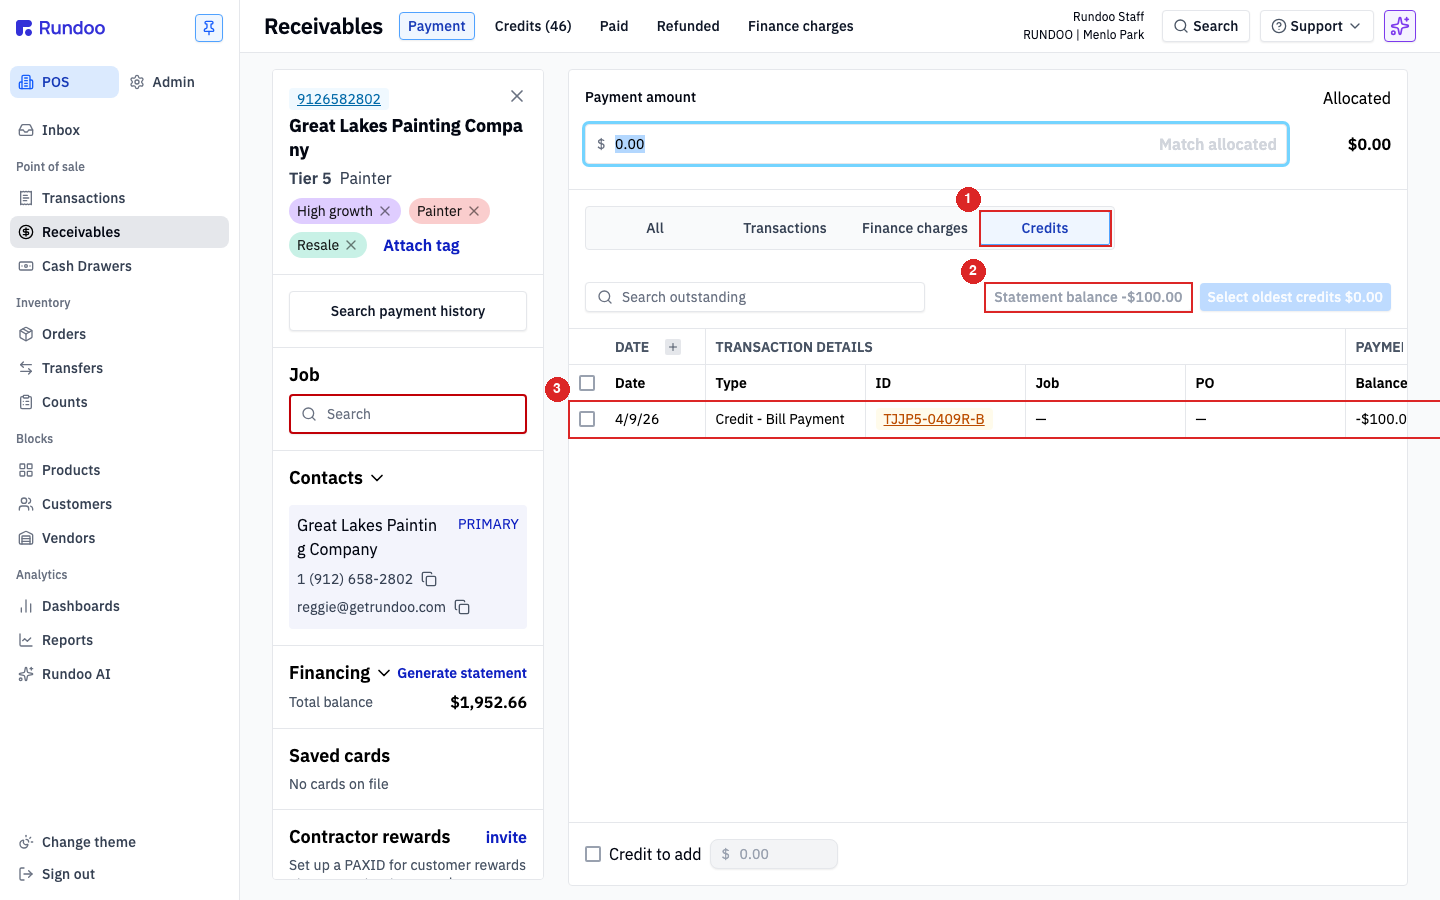
In the POS mode > Receivables left tab > Payment top tab, attach the customer (the left panel fills in with their details and financing, and the right panel shows their outstanding activity). Switch to the Credits sub-tab to see only the credits on file. Two things to know:
-
Statement balance reads as a negative when credits exceed invoices. With a $100 credit and no open invoices, the pill reads
Statement balance -$100.00. That's Rundoo telling you the customer is ahead, not that something's wrong. -
Apply the credit by checking invoice rows. Switch back to All (or Transactions), check the invoice row(s) you want the credit to pay down, and check the credit row. Rundoo allocates automatically, with the net showing in
Allocatedat top right.
The customer can apply more credit than they currently owe (the excess stays on their account and shows as a negative statement balance until a future invoice draws it down). Nothing special happens, no error. If the allocation math doesn't line up with the Payment amount you typed, Rundoo shows a red Please resolve all allocations warning at the top and disables the submit. Tap Match allocated to auto-fill the payment amount to whatever you've checked, or adjust your selections until the numbers agree.
Credit to add at the bottom of the page is for issuing a new credit as part of this transaction (say, to refund an overcharge). It doesn't pick an existing credit off the account. To apply credits the customer already has, use the Credits sub-tab above the transaction table.
See Customer credits for how credits get onto the account in the first place (refunds, writeoffs, manual issue), and Bill payments for the full allocation flow.
Including jobs on a statement
Customers who work off multiple jobs often want a statement that groups their activity by job, not one long flat list. The Include jobs toggle on the generator does exactly that.
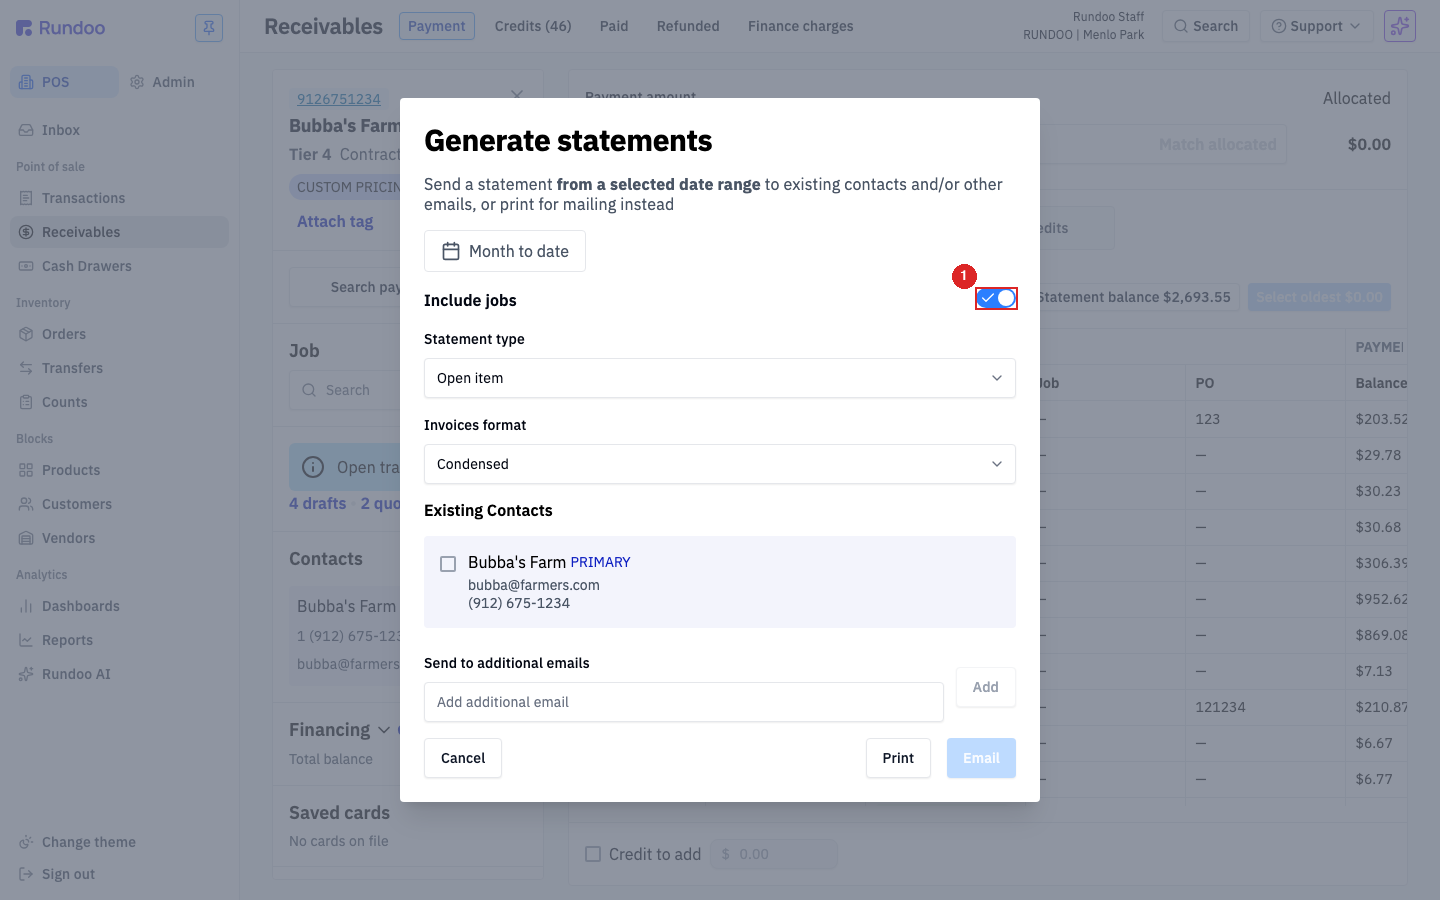
From the customer's Financing section on the bill-payment builder, click Generate statement. The modal opens pre-scoped to that one customer:
-
Date range. Defaults to
Month to date; adjust for a mid-cycle send or a prior period. -
Include jobs (toggle on). The generated PDF groups the customer's activity by job, using the
JOBcolumn on each invoice to pick which section a row lands in. -
Statement type (
Open itemorBalance forward), same meanings as on a bulk run. -
Invoices format.
None/Condensed/Full page, same meanings as on a bulk run.
Below the configuration, the Existing Contacts checklist lets you pick which email addresses receive it; Send to additional emails adds a one-off address. Use Print for a PDF preview you can save or hand-deliver, or Email to send to the checked contacts directly.
The same modal is available from Statement runs > + Generate statements when you want to start a bulk run with the same job-grouping option. Toggle Include jobs on before running it.
Invoices need a job attached to show up under that job's section. The JOB column on each invoice is set at ring-up. Invoices without a job still appear on the statement, but aren't grouped. See Jobs for attaching jobs at the POS.
Only some of a customer's jobs showing up? Check the date range first. A statement lists only invoices dated inside the run's period, so a job with no activity in the selected window is left off, even when you can still see it with open invoices in Receivables. This bites most often when a statement is generated for a single day or a narrow range instead of the full month. Widen the Date range to cover the whole period and the missing jobs come back. (A job with no JOB attached, above, is a separate cause.)
Company-wide statement settings
A few statement-shaping settings are set once for the whole company (they don't live on the per-customer Settings tab). From the Admin mode, open Communications in the left sidebar and scroll to the Statements section:
-
Statement day, the day of the month the automatic monthly statement run fires on (defaults to the 20th). The banner on the Statement runs tab keys off this setting. If your statement day is the 15th, for example, statements are ready to send on the morning of the 16th. You have until midnight on the 15th to make any corrections before the run fires
-
Envelope type (e.g.
#10 double window). Drives where the customer's address prints on the PDF for window-envelope mailing. -
Troubleshooting: If statement addresses aren't landing in the envelope windows correctly, check your printer settings when the print dialog opens. Confirm paper size is Letter (8.5 × 11) and scaling is set to Default (100%). If the mailing address is still cut off, try reducing scaling to around 80%.
-
Apply credits on automatic statement payments (off by default). When a customer is on Autopay statement balances (set per-customer under Settings > Statements), this decides whether their Customer credit balance is netted against the statement before their saved card is charged. Turn it on and Rundoo applies available credit first, so autopay bills only the remainder (a customer with a $1,000 statement balance and $400 of credit on file is charged $600, and the credit is drawn down by $400). Leave it off and the full statement balance is charged while the credit stays on the account. This only governs autopay; it never changes how credits apply to manual bill payments.
-
Format statements for double-sided printing (inserts a blank back page when a statement is odd-page so the next customer's statement doesn't print on the back of this one).
-
Hide net zero activities on statements (off by default). By default a statement lists every activity in the period, including ones whose net amount is zero (for example two credits or transactions that cancel each other out, or a $0 line) so the customer sees a complete record. Turn it on to leave those net-zero activities off the generated statement, so it shows only the activity that moves the customer's balance. This changes the statement's appearance only; the underlying transactions still exist on the account and in the receivables tab.
-
No custom statement message or footer. These toggles are the whole set of statement-shaping controls. There's no free-text field to add a message, note, or footer, either on the statement document or in the send-statement flow, so a statement shows the account activity, aging, and balance and nothing you can drop your own copy into.
Already have a message printing on your statements and want it removed? Stores that moved to Rundoo from another system often have a one-time transition notice printed on their statements (for example "we've switched to a new POS system"). Because there's no statement-message field in the app, that text isn't something you added through a setting, so it isn't a toggle you can edit or turn off in Admin > Communications. It was placed by Rundoo staff during onboarding, so to change the wording or take it off entirely, contact Support at support@rundoo.ai.
Adding a custom message or other documents to a statement is a common request. Want this? Vote for it on the Idea board at rundoo.nolt.io/397.

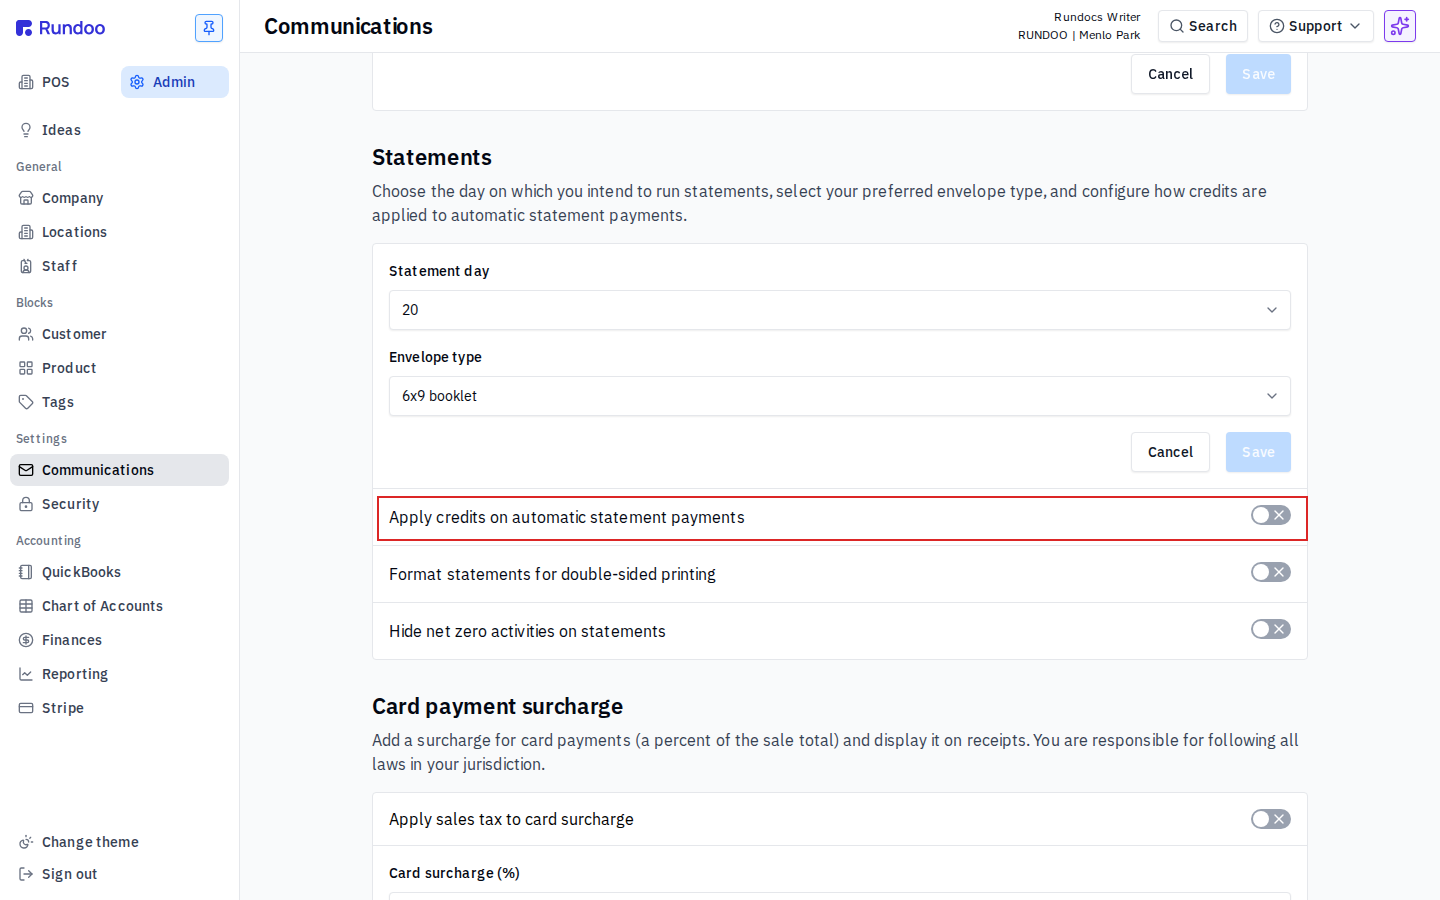
These settings are global. Changing them affects every customer's statement going forward. Per-customer overrides (statement type, invoice format, autopay) live on each customer's Settings tab; the Admin > Communications settings are about all statement runs.