
Rundocs › Hardware
Printer setup
Last updated 2026-05-29
Setting up a thermal receipt printer is a hardware bring-up that happens once per printer, before Rundoo can print receipts to it. This page walks the Star Micronics TSP100IV, Rundoo's recommended model, from box to first test receipt.
For receipt printer issues after the printer is already paired, see Printer troubleshooting.
What you'll need
-
TSP100IV thermal printer (wired Ethernet or wireless models both work)
-
Power cable plus outlet
-
Ethernet cable OR Wi-Fi credentials, depending on the model
-
Roll of 80mm thermal receipt paper
-
A phone with the Star Quick Setup Utility app: iOS / Android
The standard Rundoo terminal package doesn't include the printer. You order it (along with the cash drawer and paper) yourself when you're set up for cash sales. See Hardware setup for the full register-station gear list.
Step 1: Place and power the printer
Set the printer on a flat surface near a power outlet and your network gear. Make sure there's room around it for ventilation and for paper to feed out the front.
Step 2: Load receipt paper
-
Open the printer cover using the lever on the side or front.
-
Insert the paper roll so it feeds from the bottom and comes out the front.
-
Pull out a short paper length, then close the cover firmly.
-
Power on the printer (the blue Power LED should illuminate).
Step 3: Print the network configuration
To register the printer with Rundoo, you need its IP and MAC address. Both print on the network configuration sheet.
-
Open the paper door.
-
Hold the Feed button (front-right of the printer, below the indicator LEDs) until it begins blinking blue.
-
Release the button and close the door.
-
The printer prints a configuration receipt with the IP address, MAC address, and network status.
If the IP shows 0.0.0.0 or "Not Connected," the printer hasn't joined the network yet:
-
For Wi-Fi setup: make sure no Ethernet cable is plugged in (wired takes priority).
-
For Ethernet: confirm the router is giving the printer an IP via DHCP.
Older TSP100 with a separate wireless dongle? Reset the dongle first by pressing the small reset pinhole on the white module before continuing.
Step 4a: Connect via Wi-Fi
-
Power on the printer with no Ethernet cable plugged in.
-
Install the Star Quick Setup Utility from the App Store or Google Play.
-
Open the app → Start Guide (Initial Settings) → Use Wireless LAN.
-
Pick
tsp143IV-uewbif your printer has built-in wireless, orMCW10if your wireless came as an attachment. -
Follow the prompts to connect to the printer.
-
Enter your Wi-Fi SSID and password.
-
Tap Connect. The app shows a list of printers it can find on the network. Pick yours.
Pick the right Wi-Fi network. Rundoo and the printer have to be on the same network, or they won't talk. Match the SSID your store registers use, checking your phone's connected network is a quick sanity check. Wrong-network setup is the most common cause of "the printer is set up but not printing" on go-live day.
Step 4b: Connect via Ethernet
-
Plug one end of the Ethernet cable into the printer's LAN port.
-
Plug the other end into your router or network switch.
-
Turn on the printer; the network LED should light up.
-
Print the network config sheet (see Step 3 if not already done).
-
The bottom of the printout has a QR code. Scan it with your phone camera. Your phone opens the Star Quick Setup Utility automatically and connects to the printer.
-
Tap Print test page when prompted.
Step 5: Update the firmware
With the printer selected in the Star Quick Setup Utility, open Printer Settings → Firmware Update. The app prompts you when an update is available. Updates take ~10 minutes; let it finish before continuing.
Step 6: Configure CloudPRNT
Rundoo prints receipts via a service called CloudPRNT. The printer polls a Rundoo URL on a schedule and pulls down receipts to print. Configure that URL in the app.
In the Star Quick Setup Utility, open Printer Settings → Star CloudPRNT Settings.
-
The default password is
public. After you enter it, you're prompted to change it. Set it torundoo(lowercase). -
Toggle CloudPRNT Service on.
-
Set Server URL to:
https://device.stario.online/cloudprnt/rndo -
Set Polling Time (Sec.) to
1. -
Tap Apply. The printer restarts.
Older printers may use a different URL. Some printers configured before the Stario migration use Server URL https://api.rundoo.app/printer with username public / password rundoo. If you're re-pairing a working printer to a new tenant or swapping CloudPRNT URLs on an existing setup, ask Rundoo Support which flow your tenant is on.
Configure CloudPRNT via the printer's web page (Ethernet alternative)
For Ethernet setups, you can configure CloudPRNT directly from a browser on the same network. No Star Quick Setup Utility app needed. Use this section in place of Step 6 above.
Network LED green but no QR code on the self-test? The cable is working but the printer hasn't actually joined the network. Make sure the printer is plugged into a router, or into a powered switch (a switch with its own power supply), not a passive switch. Passive switches don't pass the network data the printer needs.
-
Print a self-test as in Step 3 and find the Current IP parameter status section (it lists the printer's IP address).
-
On a computer connected to the same network, type that IP into your browser's address bar and press Enter. The printer's configuration page loads.
-
Log in with password
public. The page prompts you to set a new password (userundoo(lowercase) to match Rundoo's recommended setting). -
Open CloudPRNT in the left menu (it's labeled
CloudPRNT, notCloudPRNT Settingslike in the mobile app). -
Set Server URL to
https://device.stario.online/cloudprnt/rndoand Polling Time (Sec.) to1. Save. The printer restarts.
Continue to Step 7 below to send the MAC address to Rundoo Support.
Browser doesn't load the printer's page? The printer can see the router but isn't actually on the network. Reprint the self-test and confirm the IP matches exactly what you typed. If it still doesn't load, check the physical connection at the cable and router.
Step 7: Send Rundoo the printer's MAC address
The MAC address is on the network config printout from Step 3. Rundoo needs to associate the printer with your location before it can receive print jobs. Send the MAC address to your Implementation Manager or Rundoo Support, and we'll wire it to your subdomain and location.
Wireless printers, use the LAN MAC. If your printer is wireless, the MAC that works is the LAN MAC printed on the network config printout, NOT the WLAN MAC shown in the setup app. They're different addresses.
Step 8: Test it
In Rundoo, ring up a test sale on a non-inventory item priced at $0.01. After completing the sale, pick the printer from the dropdown on the receipt-printing modal that opens. You should see Print thermal receipt and the printer should print. Refund the test sale afterward if you want to keep accounting clean.
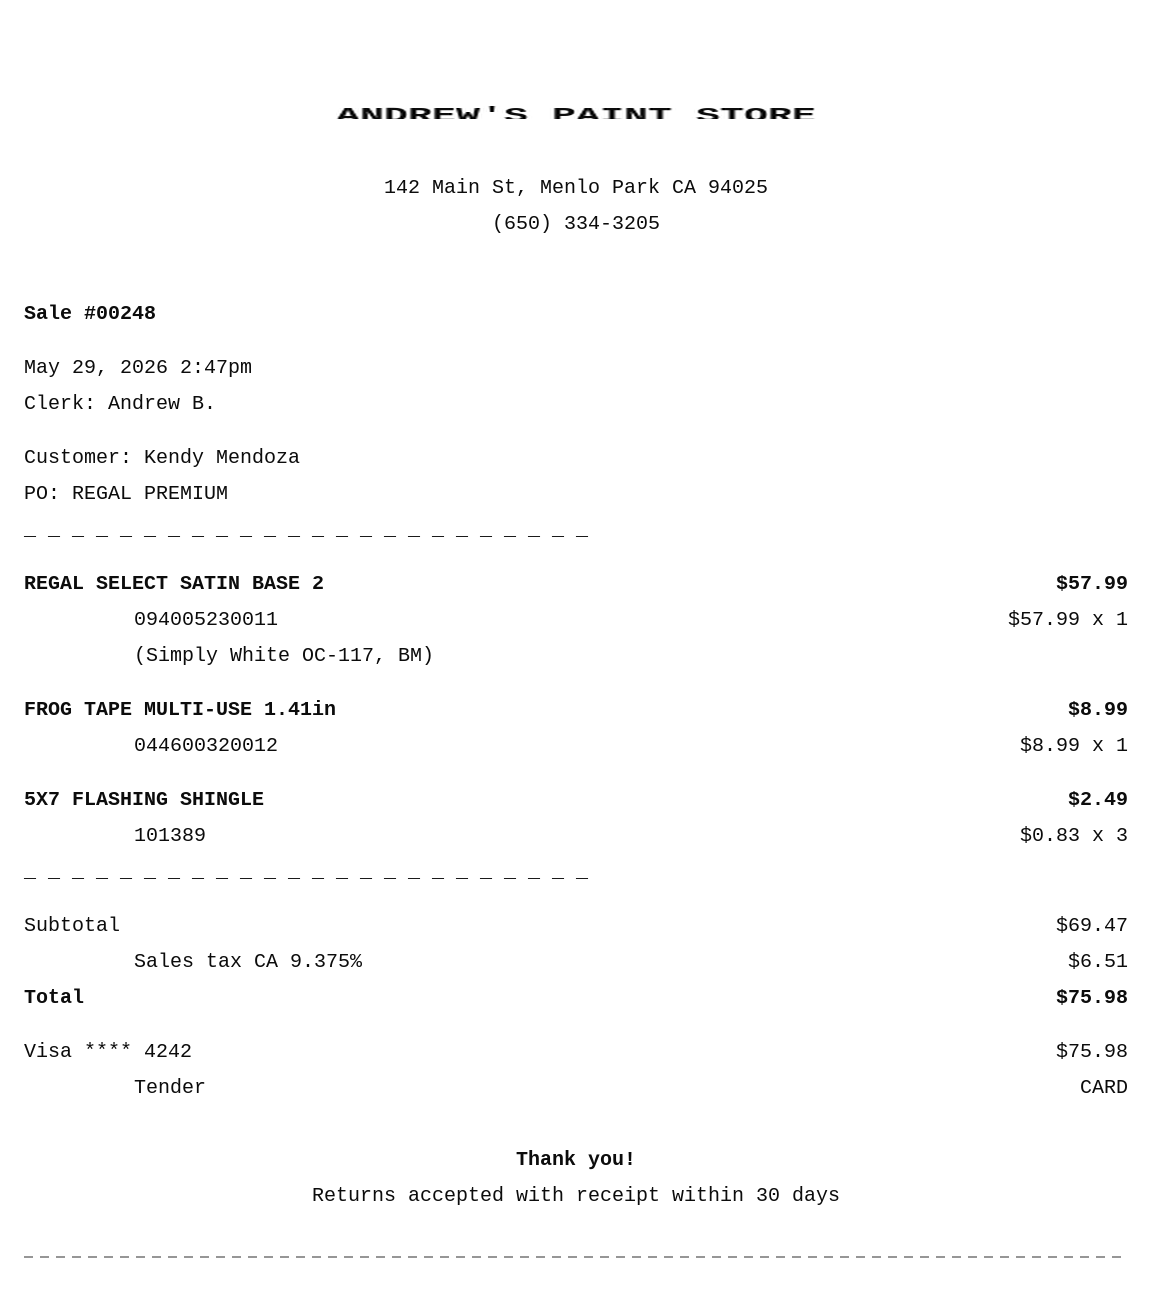
A typical counter receipt has the store header, sale + customer info, line items, totals, tender, and a footer, like this:
If the printer doesn't print, see Printer troubleshooting.
Cash drawer cable direction. If you're attaching a cash drawer to the printer via an RJ-12 cable, the cable is directional. Make sure the end labeled for the cash drawer goes to the drawer, and the end labeled for the printer goes to the printer. A reversed cable means the drawer won't open when receipts print.
Troubleshooting common setup issues
| Issue | Likely fix |
|---|---|
| No IP address on the network printout | Check the Ethernet cable or Wi-Fi credentials; reboot the printer. |
| Wi-Fi setup returns "Failed" | Make sure a 2.4 GHz network is available and the SSID and password are correct. |
| Printer not visible in Rundoo after setup | Confirm the printer is on the same network segment as your computer; verify the CloudPRNT URL from Step 6. |
| Frequent IP changes | Ask your IT team to reserve a static IP for the printer. |
| Paper not feeding properly | Reload the roll, check orientation, close the cover firmly. |
| Printer lost connection to Stario | Power-cycle the printer (off ~30 seconds), then hold the Feed button while powering it back on to trigger a self-test print. The self-print confirms the printer rejoined the network; CloudPRNT polling resumes once it’s back. |
For deeper troubleshooting after setup is complete, see Printer troubleshooting.
Feed button quick reference
| Action | Result |
|---|---|
| Tap once | Feeds paper forward |
| Hold while powering on | Prints self-test / network config sheet |
| Hold 5+ seconds | Diagnostic or reset mode (firmware-dependent) |
Recommended Rundocs
-
Hardware setup (full register-station gear list, including which printer models are recommended).
-
Printer troubleshooting (common issues after setup is complete).
-
Zebra mobile printers (wireless label printing from a phone).
-
Cash drawer (how the cash drawer ledger works in Rundoo).
-
Rundoo Support (for questions about your specific tenant or printer model).