
Rundocs › Hardware
Hardware setup
Last updated 2026-09-01
Rundoo runs in a web browser, so the hardware choices that make up a register station happen outside the app. You pick the gear, we tell you what works. This Rundoc covers equipment, not an in-app surface: what you actually need at a cash station, what's optional, and how the pieces fit together.
Essential at a register station
Rundoo's standard terminal package is three pieces of hardware: a working computer, a barcode scanner, and a Stripe card reader. Thermal printers and cash drawers are an add-on for cash sales, covered separately below. Label printers, hotspots, and authentication keys layer on as needed.
What's included with Rundoo vs what you bring
Your Rundoo contract covers the Stripe card reader. We order, configure, and ship it to you as part of go-live. Everything else at the counter is hardware you source: a computer (any modern Mac or Windows machine running a supported browser), a barcode scanner (we recommend the Zebra DS2278), and, if you ring cash, a thermal receipt printer and cash drawer. Label printers and YubiKey hardware are optional add-ons you'd buy separately. Specific models shift; ask Rundoo Support before you buy.
Computer
Any modern desktop or laptop running a supported browser and operating system. Rundoo is browser-based, so you're not locked into Mac or Windows, whatever your counter staff is comfortable with. A Windows 11 all-in-one with USB-A ports covers the common case. See Browser and OS requirements for the exact supported versions.
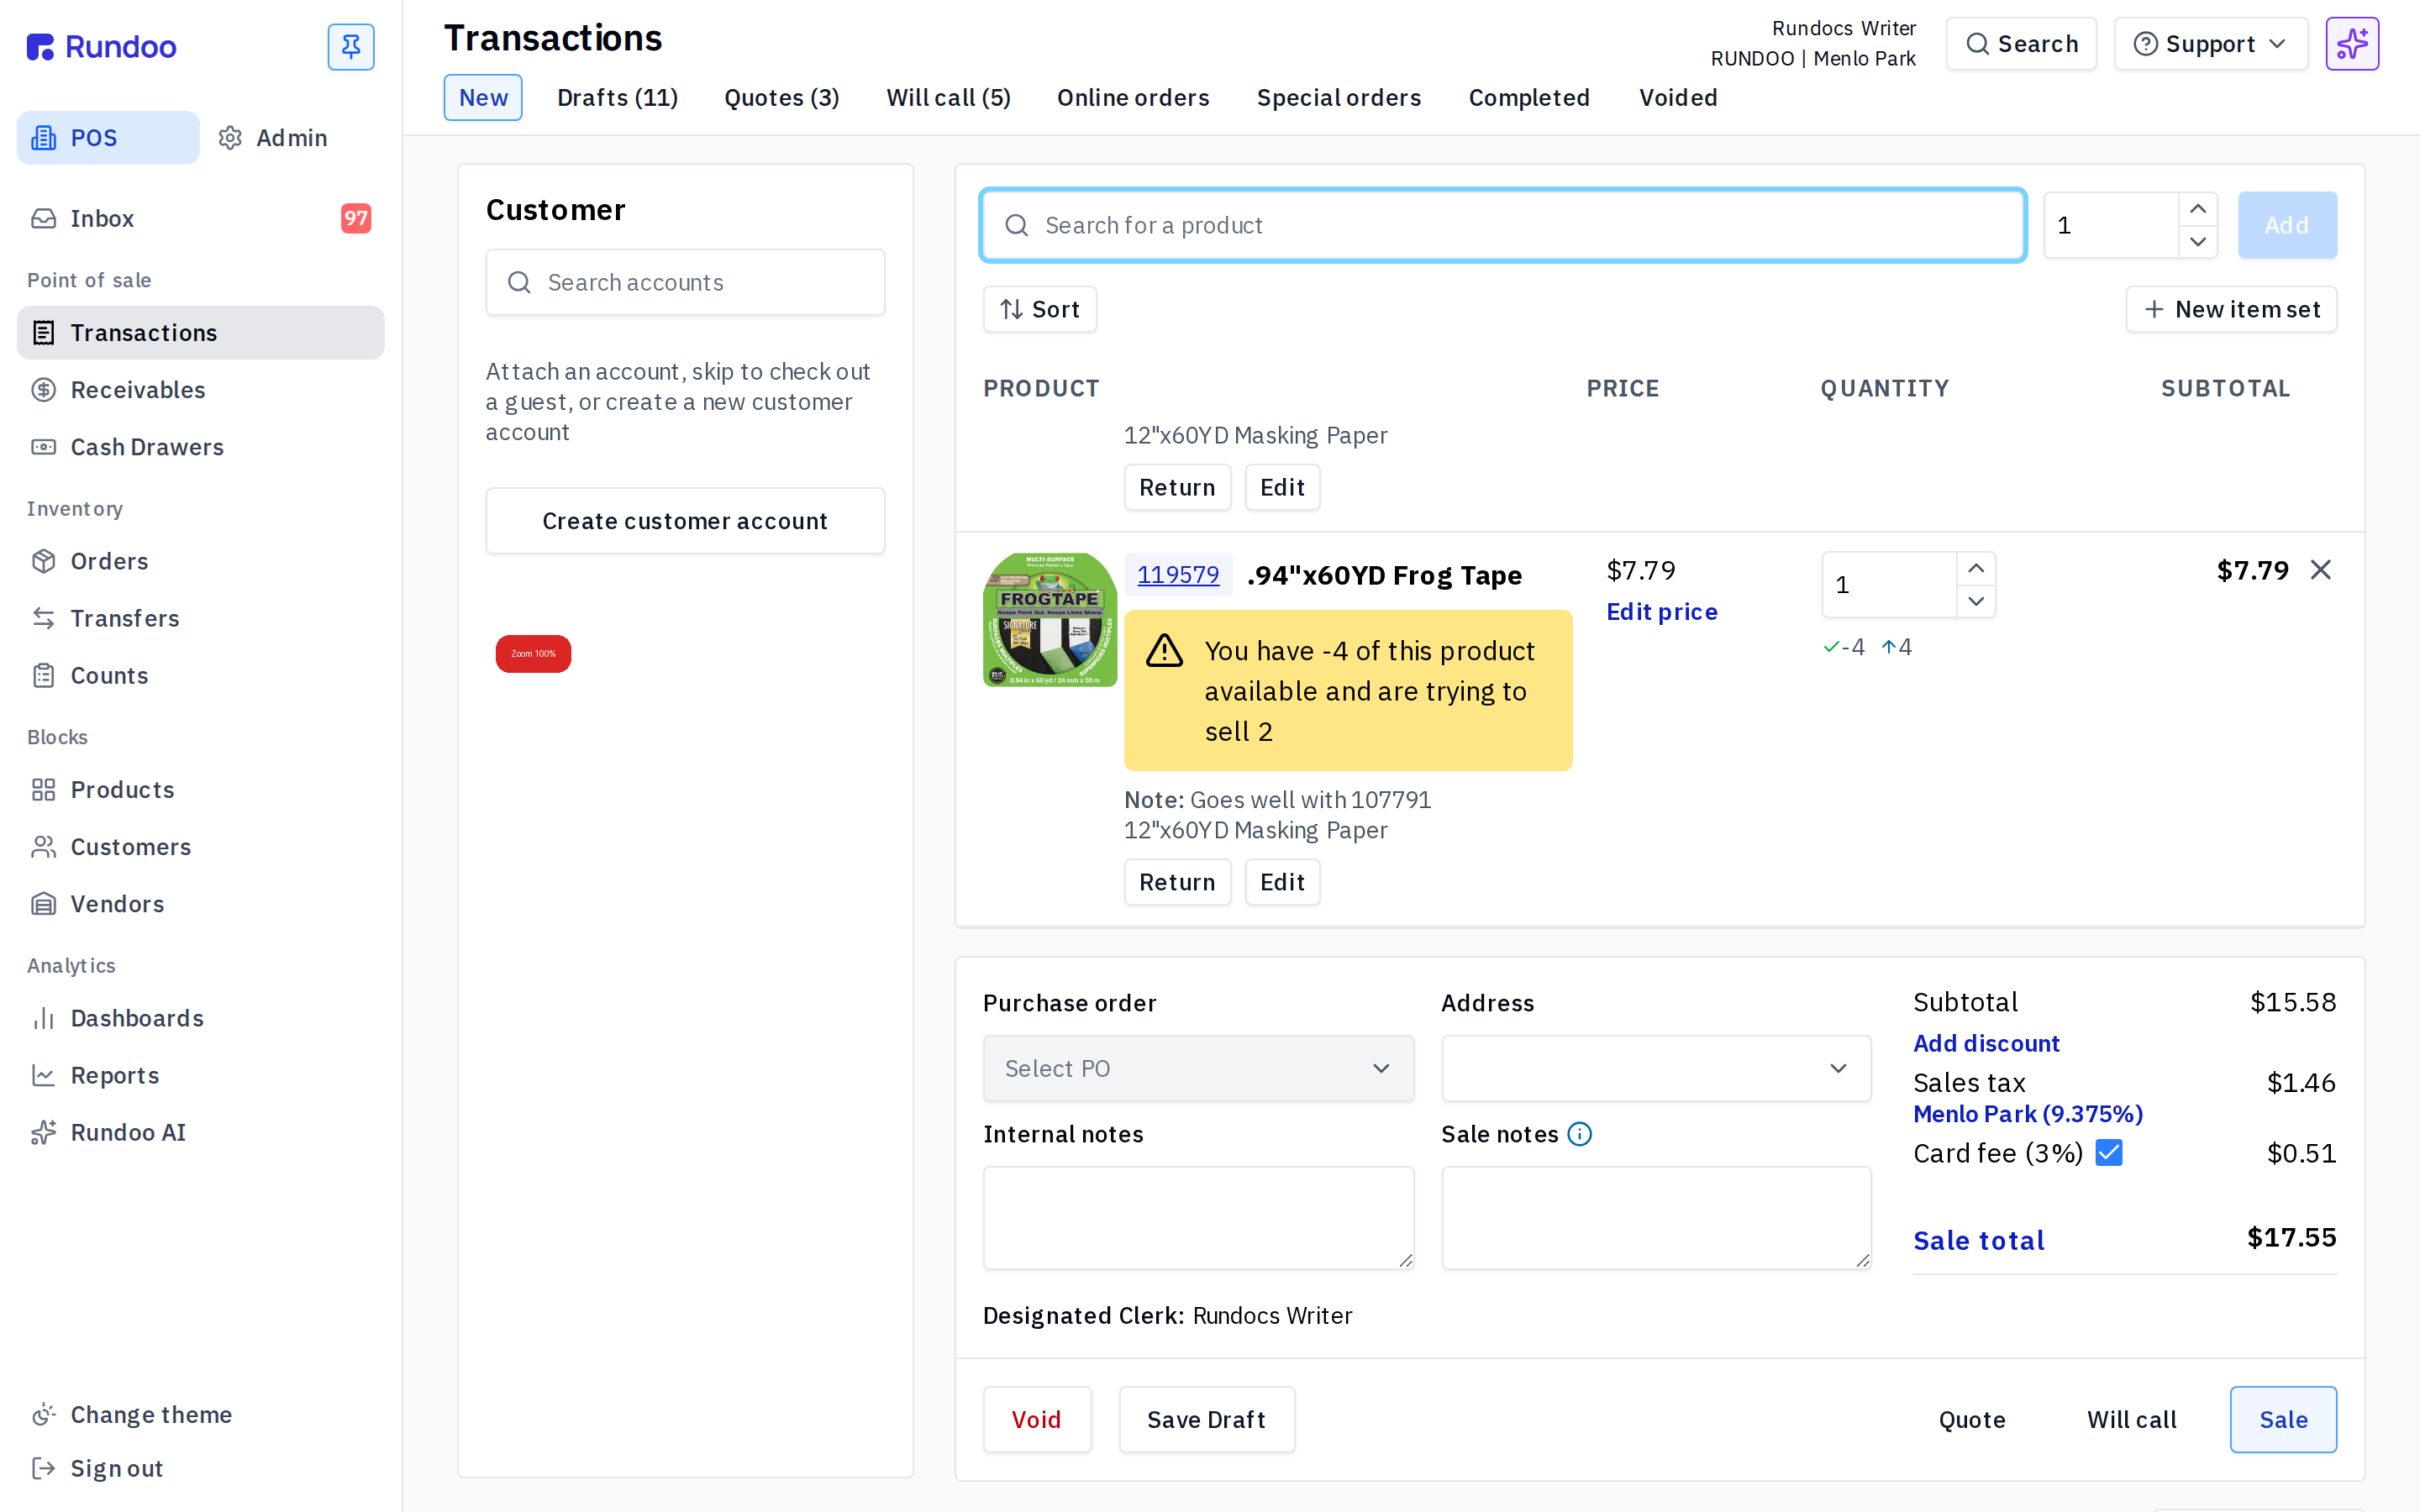
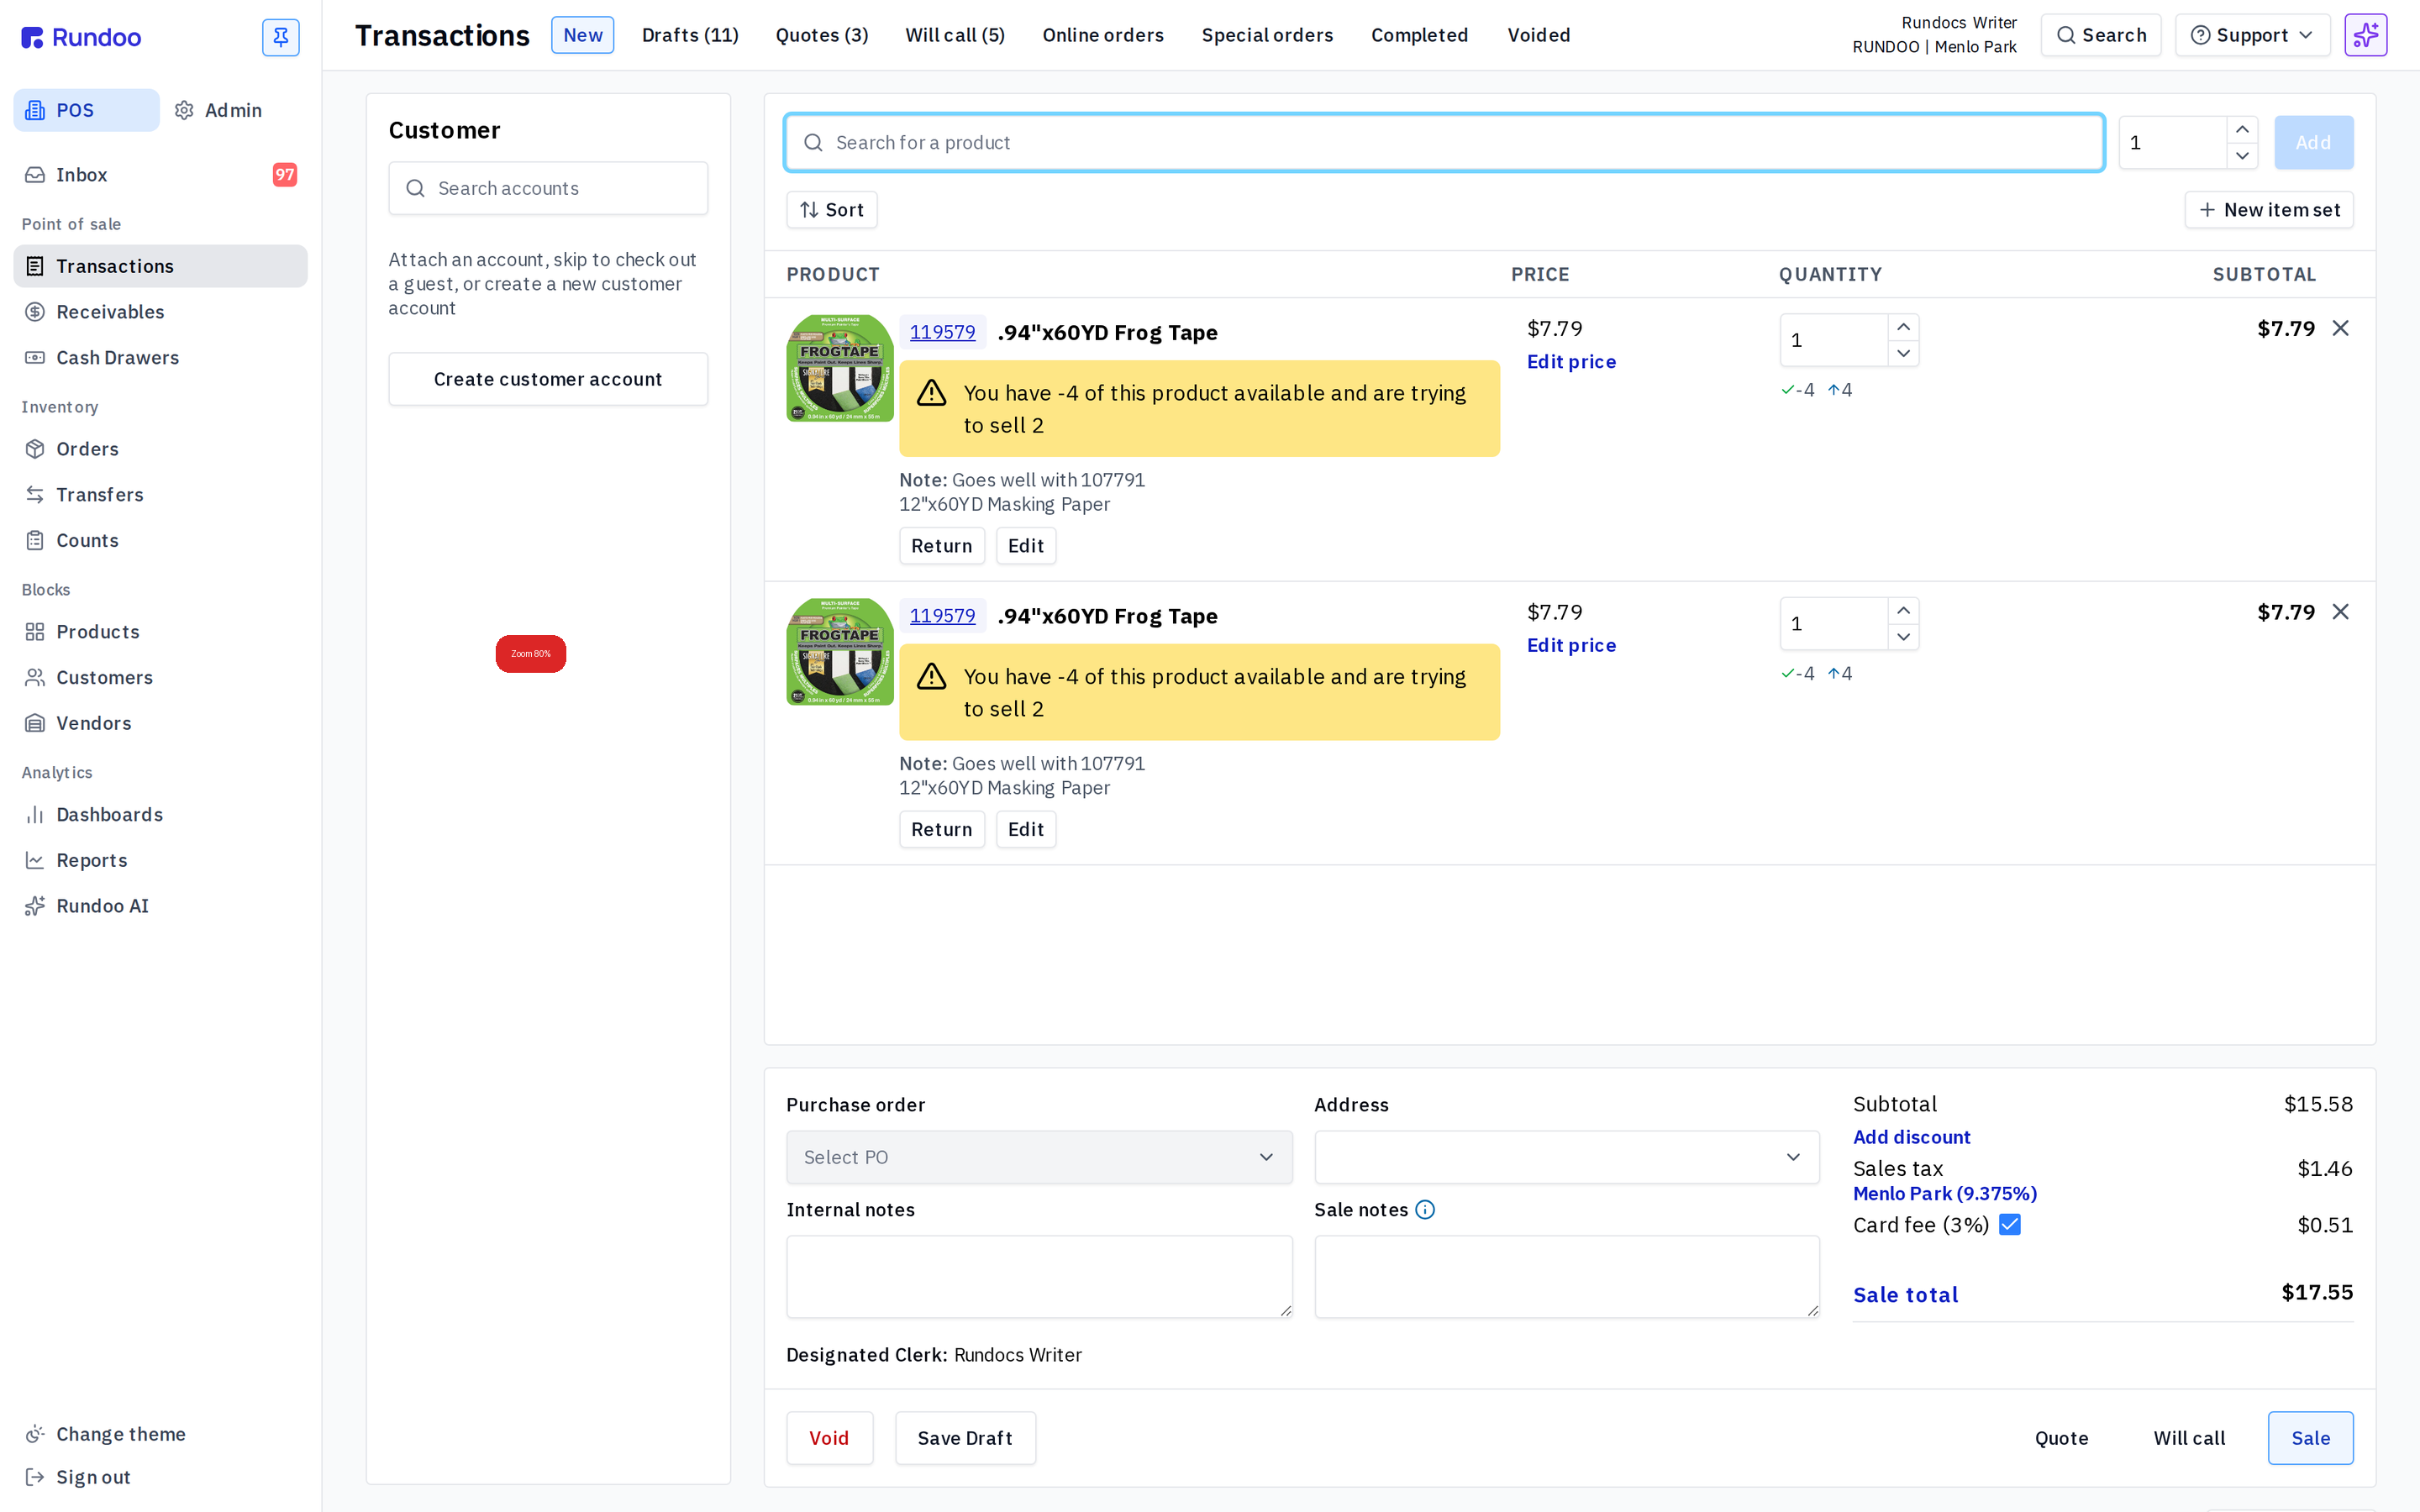
Monitor size matters. Rundoo's POS view is built for a widescreen monitor. We recommend at least 23" measured diagonally. Smaller screens crowd the cart, totals panel, and customer card, which slows checkout. If you're stuck on a small screen, zoom your browser out to 80% to 90% and collapse the left sidebar (see Rundoo looks too big? Zoom your browser below for the exact keys on desktop, iPad, and Android).
Barcode scanner
Any reputable handheld barcode scanner works, USB or Bluetooth, wired or wireless. The only requirement is that the scanner operates in HID mode (Human Interface Device), which means it acts like a keyboard and types the scanned code into whatever field is focused. That's the default mode on every mainstream scanner; no special driver, no Rundoo-side configuration. Our current recommendation is the Zebra DS2278, corded USB, reliable, reads 1D and 2D barcodes.
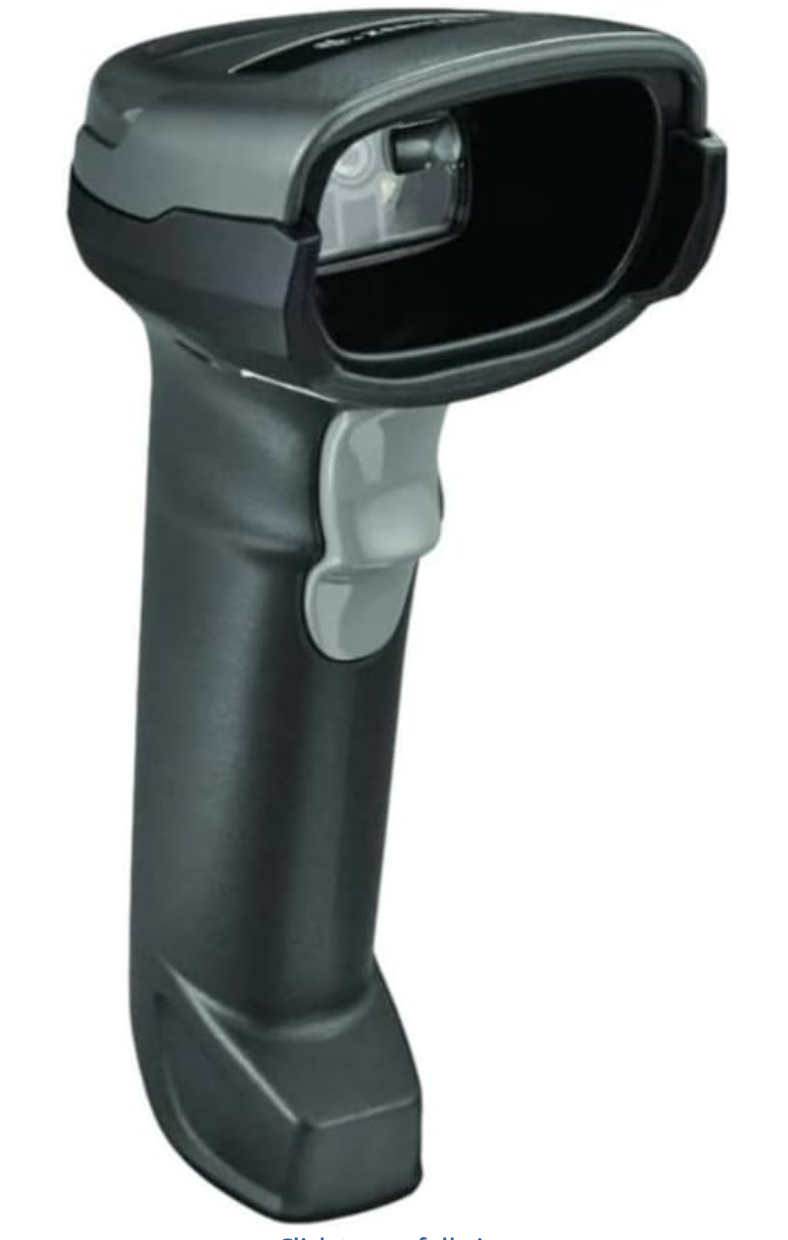
At the register, scanning a product into the cart, scanning a customer's loyalty card, or scanning a receipt barcode on a return all work the same way. Focus the input, pull the trigger.
Configuring a new DS2278
A brand-new DS2278 needs a one-time configuration so its scans land in Rundoo correctly: the scanner must wrap each scanned UPC in | characters (|0123456789|), which Rundoo uses as a marker that the input is a scan rather than typed text. Walk through these steps once when you set up a new scanner.
-
Plug the cradle into the computer that scanner will be used with (USB-A on the back of the desktop or laptop). The cradle is the small base the scanner sits in.
-
Pair the scanner to its cradle. Pick up the scanner, point it at the QR code printed on the cradle, and pull the trigger. One short beep means it paired.
-
Configure the prefix and suffix wrap. Print Rundoo's DS2278 config sheet and scan the QR code at the top of the printed page. The defaults the sheet sets: a
|on either side of the scanned UPC, and medium beeper volume.
Print the config sheet, don't scan it from a screen. Scanners read printed barcodes reliably; on-screen renders are inconsistent across monitor sizes and brightness. If you don't have a printer at the counter, ask Rundoo Support for a printed copy.
-
Confirm the wrap is working. Click into any non-Rundoo input (a Notepad window, your browser's URL bar, a text box anywhere) and scan a barcode. The output should be wrapped: scanning
0123456789should type|0123456789|. If it doesn't, scan the config sheet's QR again. -
Test in Rundoo. In the POS > Transactions tab, on the
Newtop tab (the new-sale screen), click anywhere outside theSearch for a productbar (somewhere in the cart area) and scan a product whose UPC is already attached in Rundoo. The product should drop into the cart.
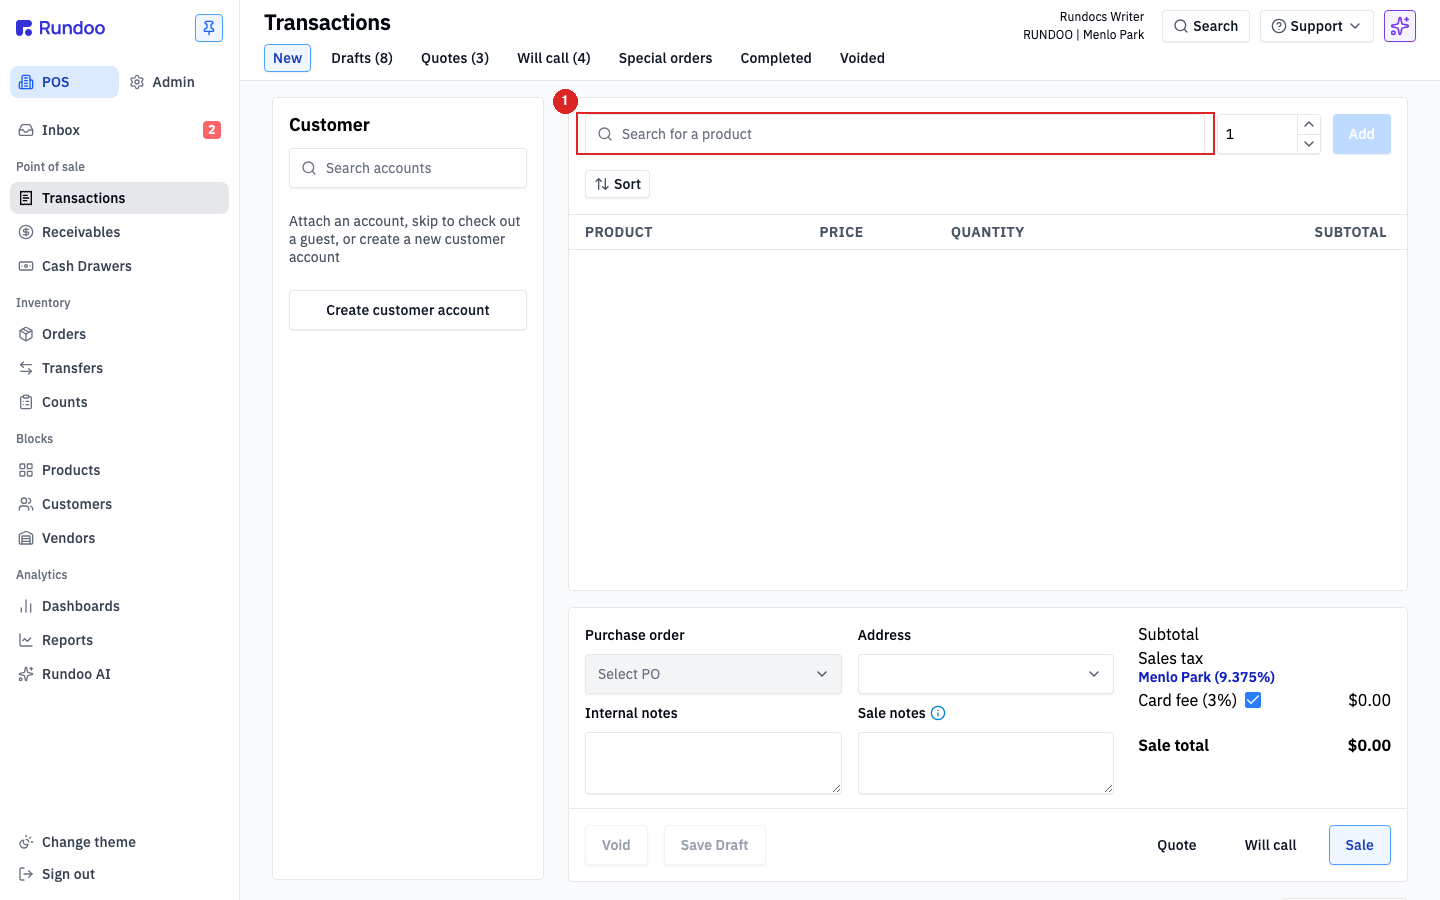
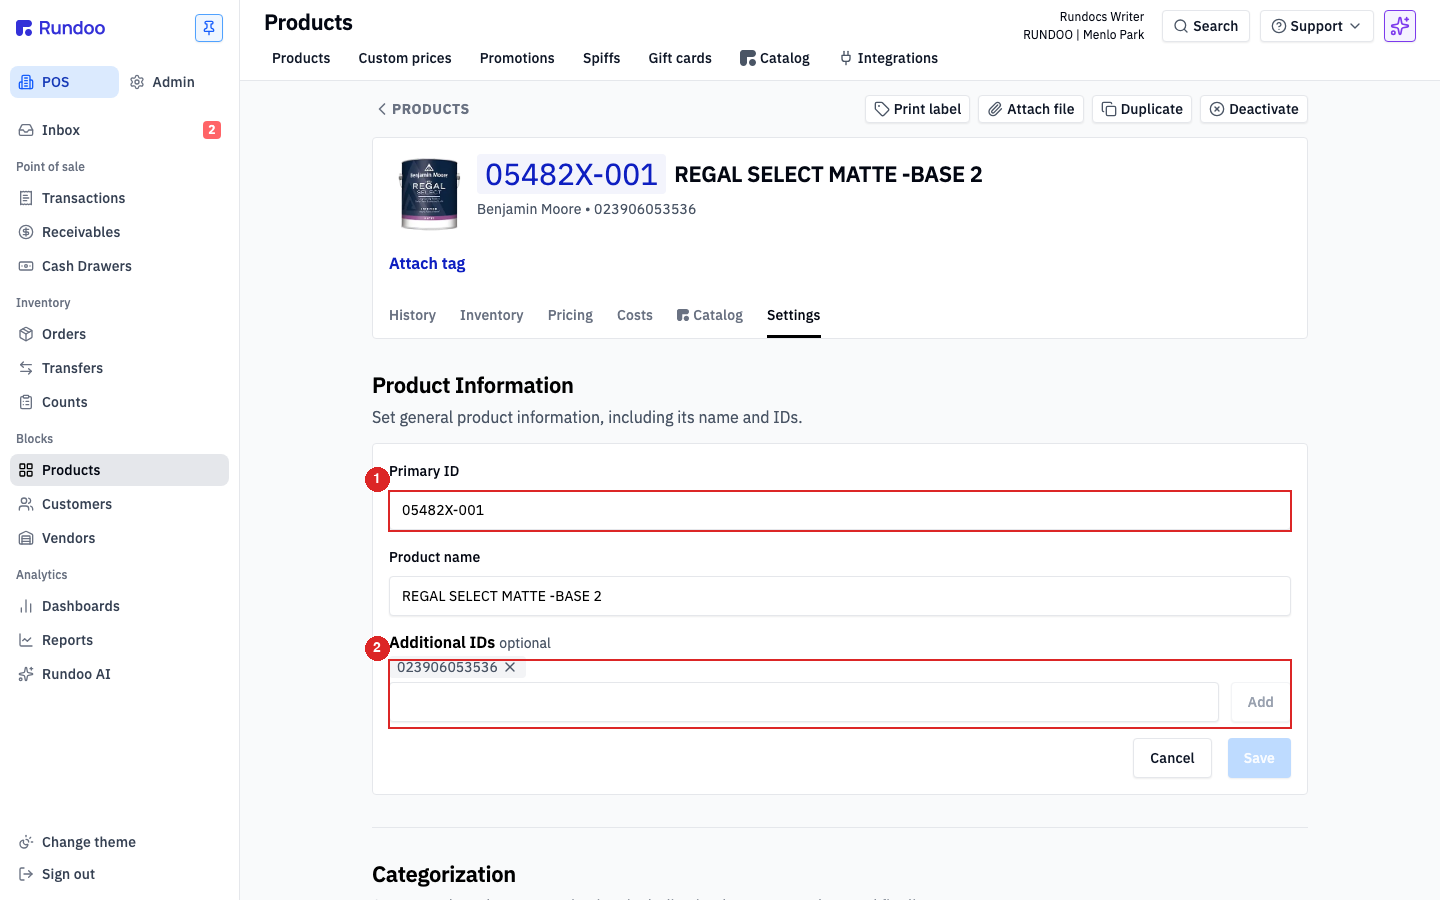
If the UPC isn't attached to a product yet, Rundoo will treat the scan as a brand-new product and try to add it. To attach a UPC to an existing product instead: open the product, go to its Settings tab, and scan the barcode while focused on the Additional IDs field. The number populates; click Save.
Using a non-DS2278 scanner
Any HID-mode scanner that can be configured to wrap each scan with | (pipe) on both sides works with Rundoo. The DS2278 is what we recommend and stock, but most scanners customers already own can be configured to match. Pull the model-specific config sheet below, print it (don't scan from a screen), scan its setup QR code, and confirm the wrap is working (Step 4 above).
Per-model config sheets:
-
Symbol LS4278 (discontinued, Bluetooth). Config sheet
-
Symbol LS2208 (config sheet)
-
Symbol LI4278, config sheet
-
Symbol LS1908T (config sheet)
-
Zebra DS8178 (config sheet)
-
Datalogic QuickScan QD2300 / QD2100 (shared config sheet)
-
Honeywell MS7625 (config sheet)
-
Honeywell 3800G14E (config sheet)
-
Honeywell Hyperion 1300g (config sheet)
-
Honeywell MS95xx, config sheet
-
Honeywell Voyager 1202G (config sheet)
-
Inateck BCST-73 (config sheet)
-
Nadamoo Bur3003 (config sheet)
-
Nadamoo Bur3105 (config sheet)
-
Eyoyo 1D barcode scanner (config sheet)
-
Eyoyo 2D barcode scanner (config sheet)
-
Socket Mobile (first-time setup), config sheet
-
Socket Mobile (already set up). Config sheet
-
Tera HW0001 (config sheet)
-
Tera HW0009 (config sheet)
-
Tera T5100c, config sheet
-
Realinn RL6200W, config sheet
-
Symcode 433/bt, config sheet
If your scanner isn't on this list, ask Rundoo Support. We can often dig up a config sheet, or you can fall through to manual config with 123Scan below.
Fallback: manual config with Zebra 123Scan
If the printed config sheet doesn't program the scanner (common with faded prints, off-brand paper, or older scanner firmware) Zebra's free 123Scan Windows utility pushes the same configuration directly over USB.
-
Download 123Scan from zebra.com/123scan-utility. Windows-only.
-
Install and open the utility. With the DS2278 (or your model) plugged into the computer via the USB cradle, the Data view tab should list it. If it shows "No scanner was found," try a different USB port, or test on another computer to rule out a bad port; click Refresh once the scanner appears.
-
From the Start tab, click Create new configuration file.
-
Pick My scanner is connected via USB cable.
-
Apply the same prefix/suffix wrap (
|on each side) and beeper volume settings, then write the configuration to the connected scanner. -
Confirm the wrap by scanning into Notepad (Step 4 in Configuring a new DS2278). The output should be
|0123456789|.
Loom walkthrough of the 123Scan manual config flow (older recording, DS2278 + LS4278): loom.com/share/d15a26864a8a4cdfa50e91c30fa4d51b.
Stripe card reader
If you're processing cards through Rundoo, you need a Stripe-compatible reader. Rundoo orders and configures these on your behalf as part of the standard terminal package. Two models ship today:
-
Stripe Reader S710, the current Stripe-made reader. Wifi-connected, touchscreen.
-
Stripe Reader S700 (the prior generation). Same Rundoo integration and pairing flow as the S710.
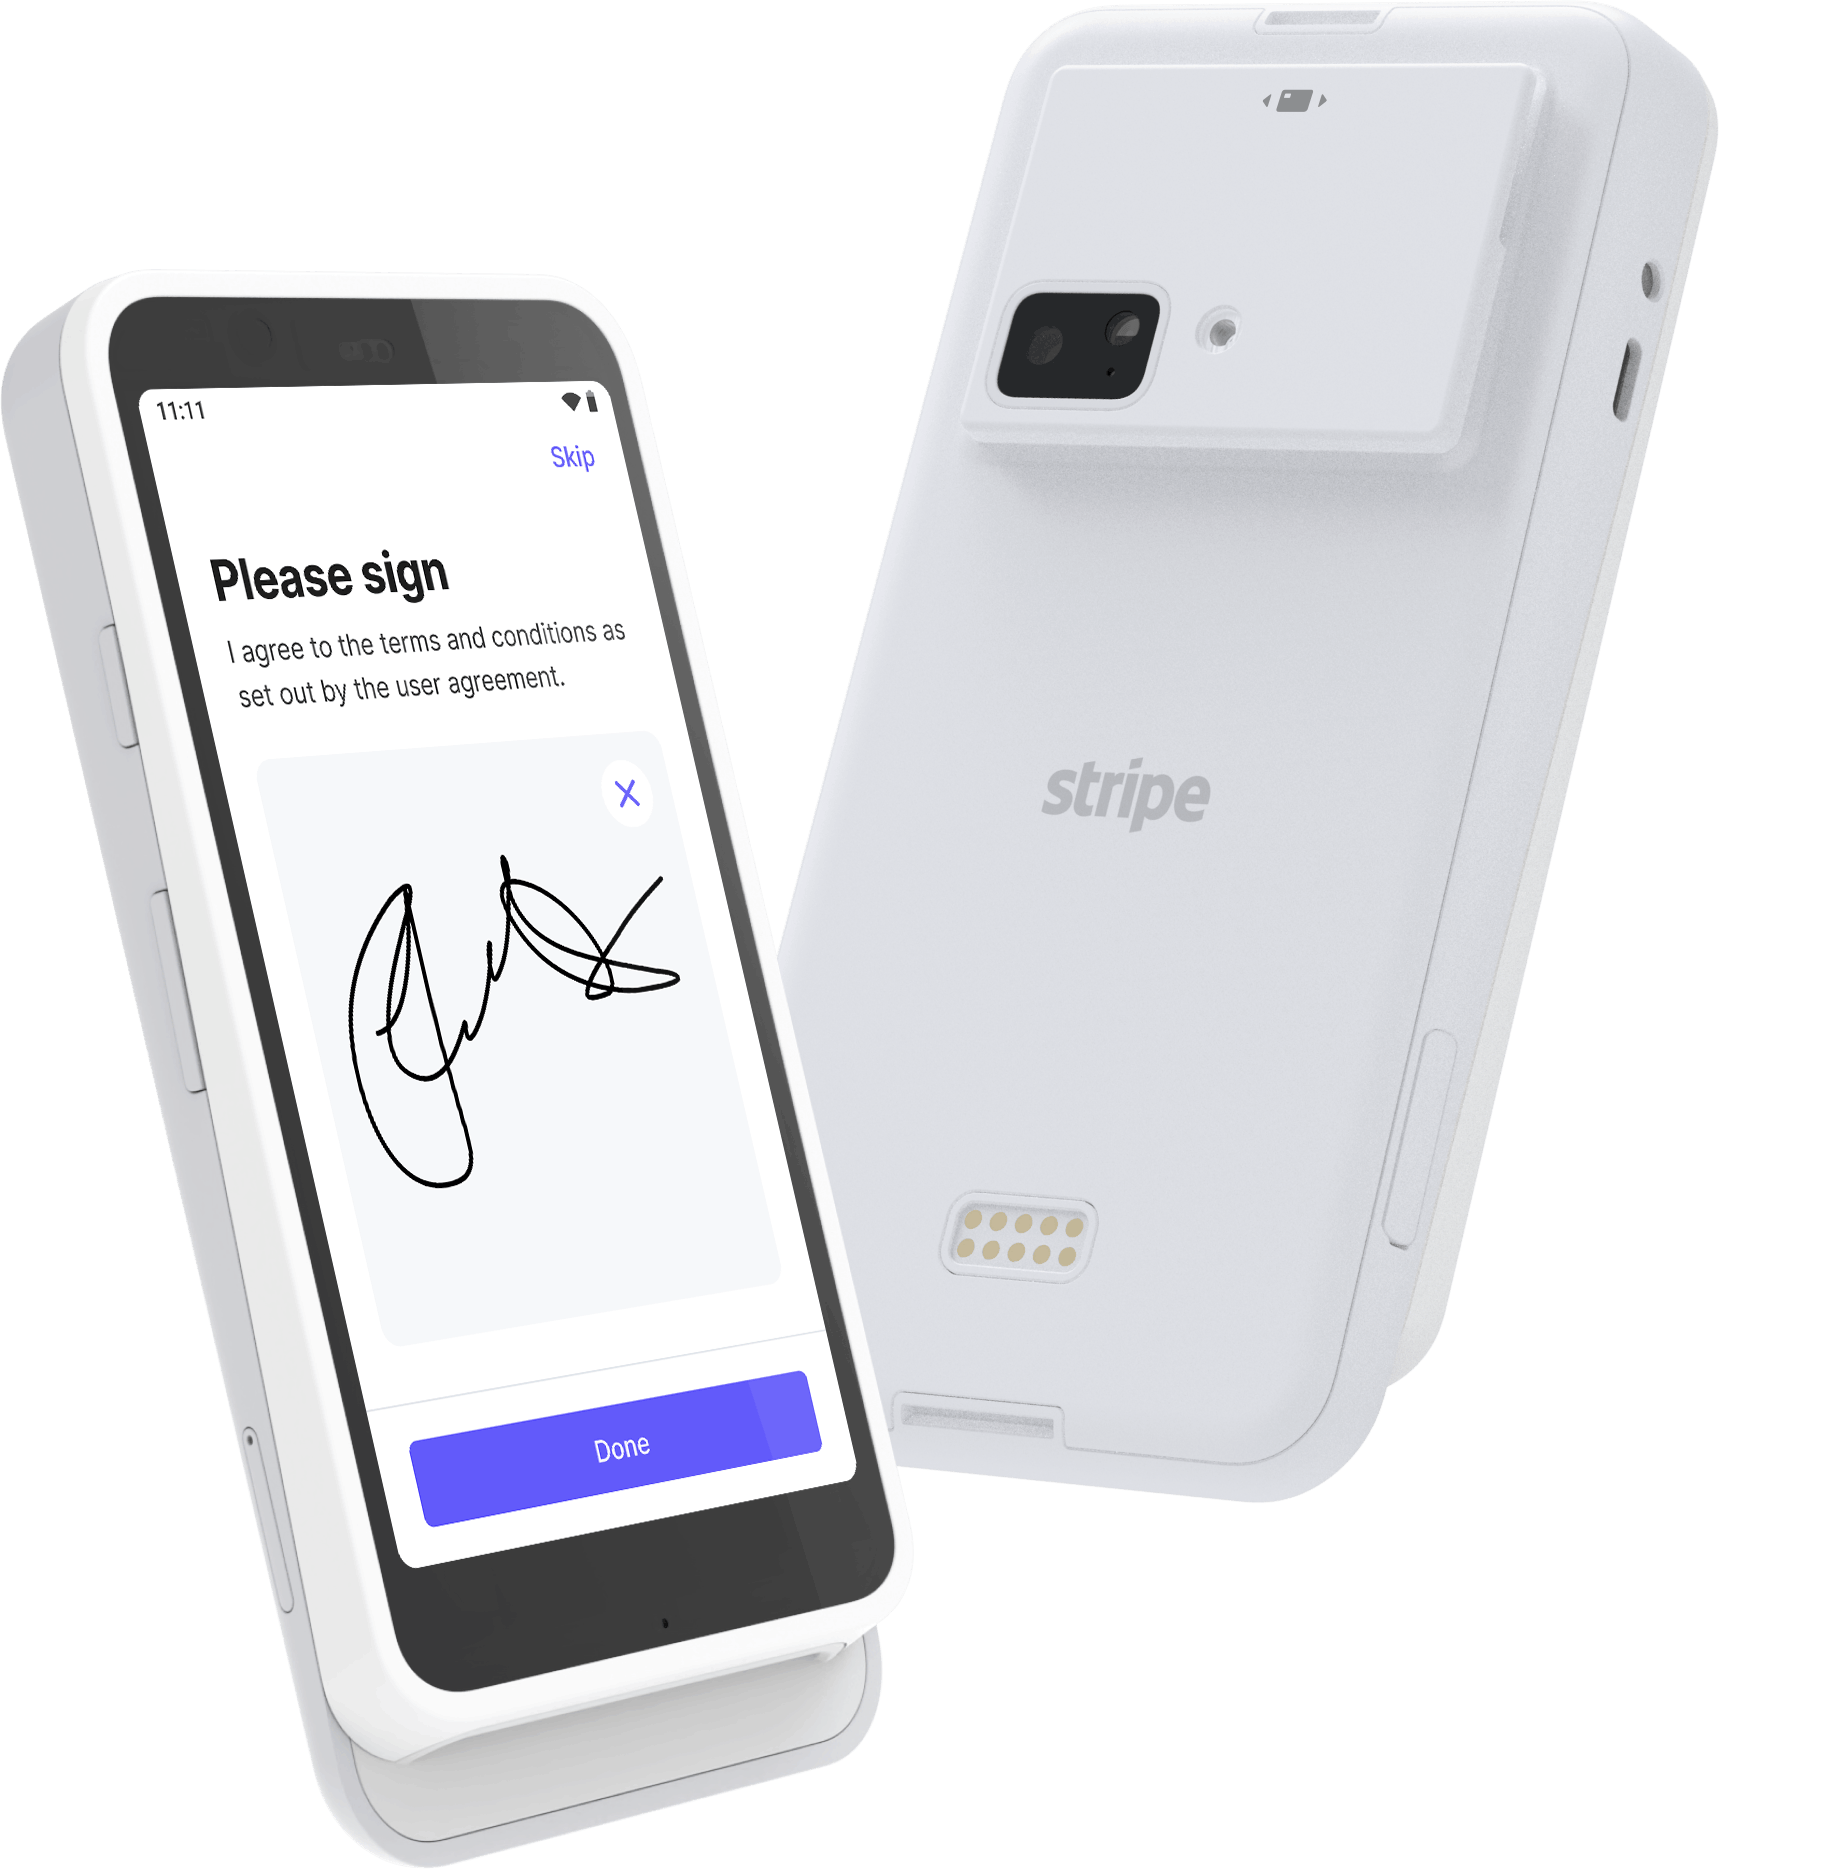
Rundoo's Stripe integration handles pairing and payment routing. See Stripe for how card processing is set up on the Rundoo side. For card-reader-specific issues (reader offline, charge stuck, reader won't pair), see Card reader troubleshooting.
Rundoo looks too big? Zoom your browser
Rundoo runs in your web browser, so if everything looks too big (the cart is cramped, the text is huge, buttons run off the edge of the screen) you make it smaller with your browser's zoom, not with a setting inside Rundoo. Zooming out to somewhere around 80% to 90% is the single best fix, and it works the same whether staff are complaining that "Rundoo is too big," "everything is huge," or they just want to fit more of the sale on screen.
Desktop (Mac or Windows)
-
Zoom out: hold Ctrl and press the minus key ( - ) on Windows, or hold Cmd and press minus on a Mac. Each press shrinks everything one step (80% to 90% is the sweet spot on a smaller monitor).
-
Back to normal: Ctrl and 0 (zero) on Windows, or Cmd and 0 on a Mac, snaps the page back to 100%.
-
Prefer the menu? In Chrome or Edge, open the three-dot menu at the top-right and use the minus and plus next to Zoom. In Safari, open the View menu and choose Zoom Out.
Your browser remembers the zoom level for each website, so once you set Rundoo to 90% on a computer it stays there every time you open it there (you only do this once per machine).
At 100% (left) the cart, totals, and customer panel crowd a small screen; at about 80% (right) the same screen fits more of the sale (and more of the tab row) at once.
Collapse the left sidebar for more room
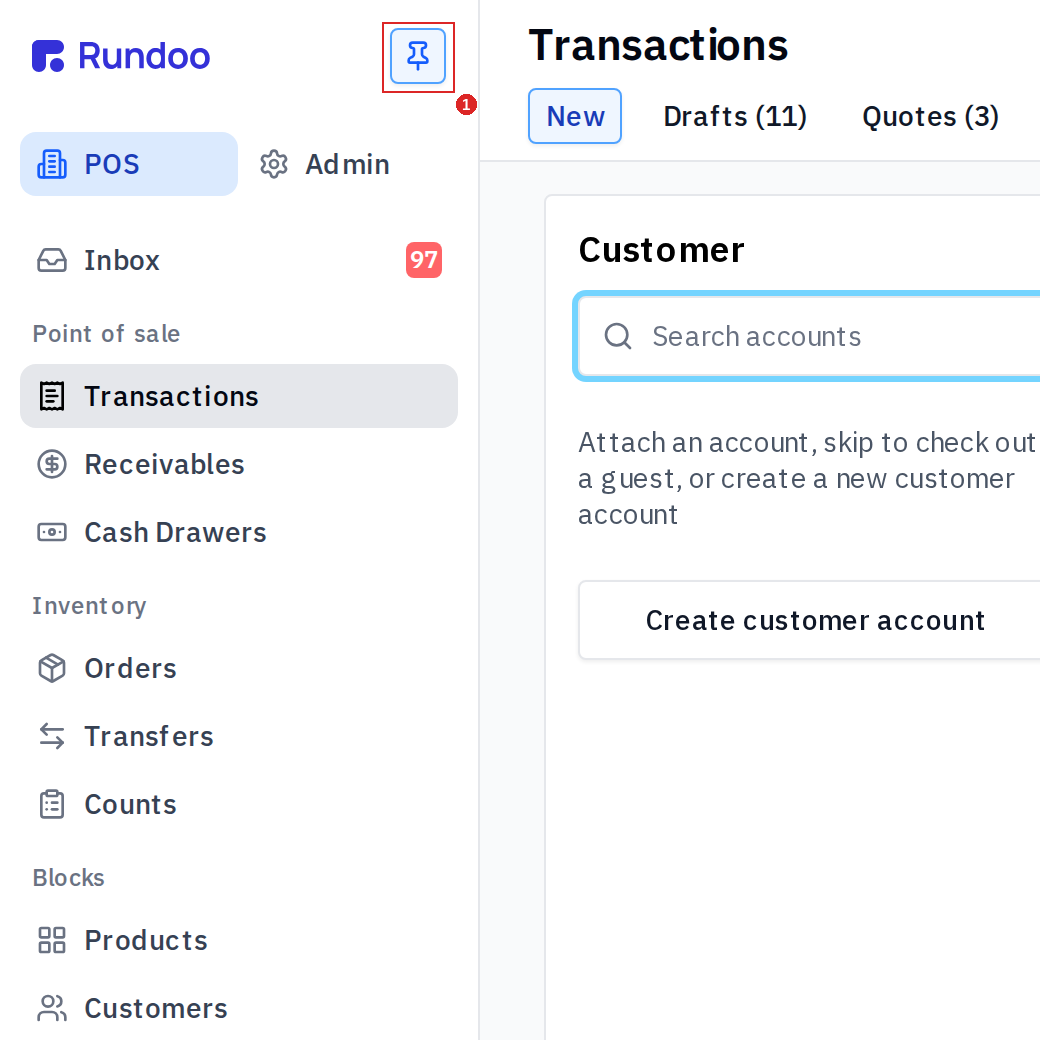
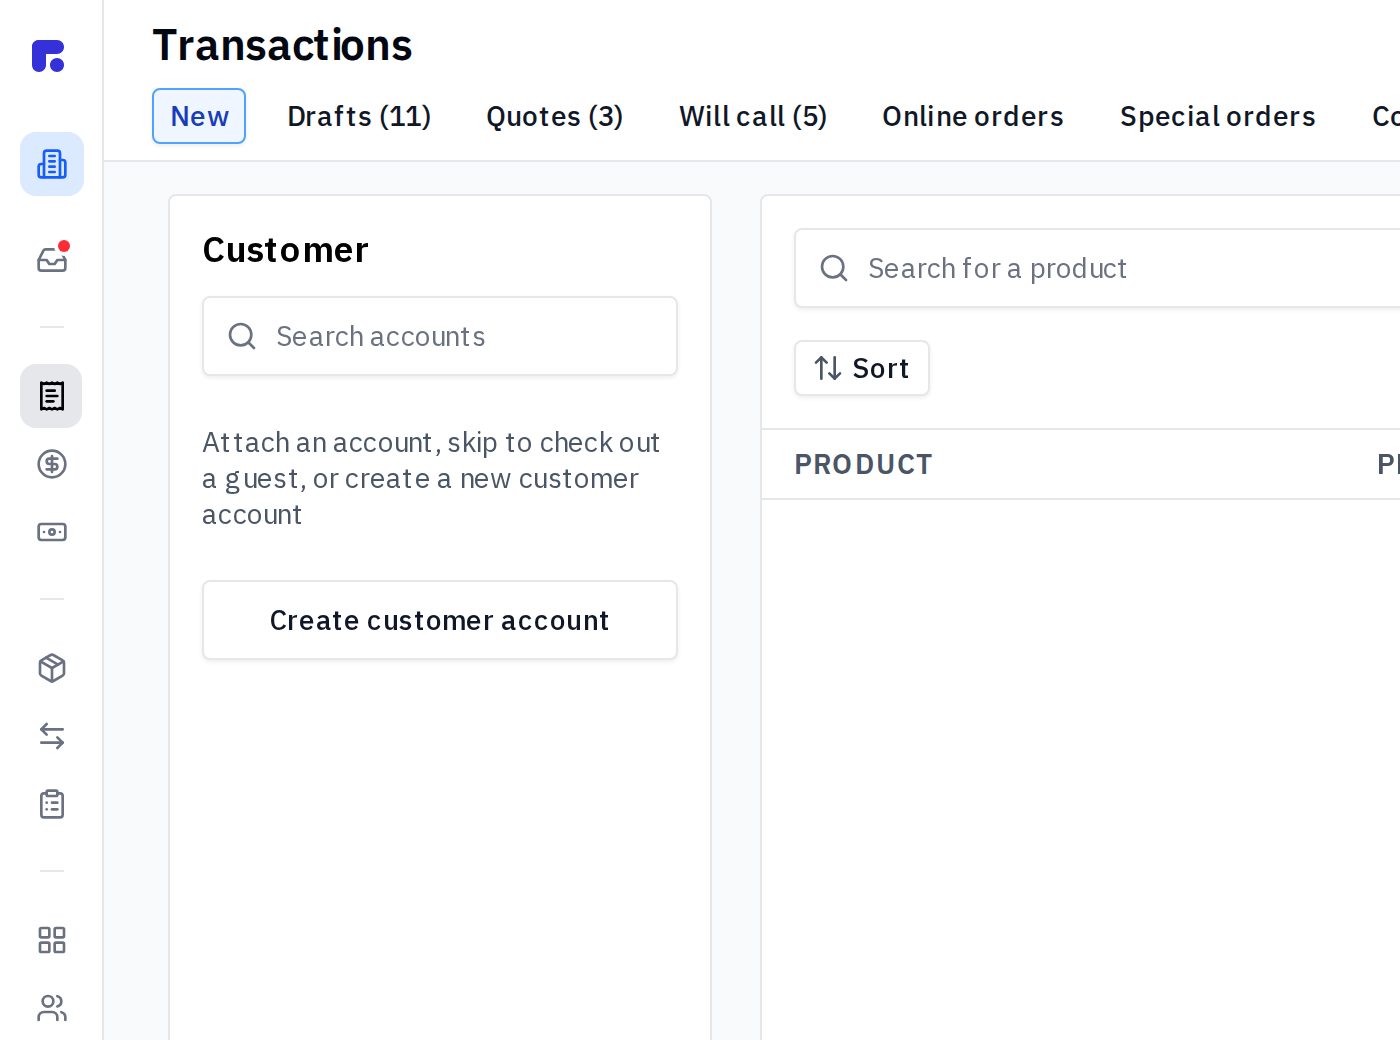
Click the pin icon next to the Rundoo logo, top-left, to unpin the left menu. It collapses to a slim icon rail and slides back out when you move your pointer to the left edge, handing the extra width to the cart, the totals, and the row of tabs across the top. Click the pin again to lock the menu open.
The pin sits just right of the Rundoo logo (left); unpinned, the sidebar shrinks to a narrow icon rail (right) and the tabs and cart gain the space.
Tablet (iPad or Android)
On a tablet, Rundoo runs in Safari (iPad) or Chrome (Android), so the browser controls the size the same way. There is no separate Rundoo setting to change.
-
iPad (Safari): tap the aA button at the left end of the address bar, then tap the small A to step the page size down. To shrink every site by default, open the Settings app, tap Safari, tap Page Zoom, and choose a level below 100%.
-
Android (Chrome): tap the three-dot menu, then Settings, then Accessibility. Drag Text scaling down to shrink the text, and turn on Force enable zoom so pinching works on every page.
-
Any tablet: put two fingers on the screen and pinch inward to zoom out on the page you're on; pinch outward to zoom back in.
Still cramped after zooming? Turn the tablet sideways into landscape. Rundoo's POS is built for a widescreen layout, and a landscape tablet gives it the room it expects.
Adding cash sales (thermal printer + cash drawer)
If you're ringing cash at the counter, you need two more pieces. These aren't in the standard terminal package, so plan on the added cost.
Thermal receipt printer
Rundoo is compatible with Star Micronics printers (the TSP100IV is the model most of our clients run). Thermal printers are fast, quiet, and don't use ink; they burn the receipt onto heat-sensitive paper.
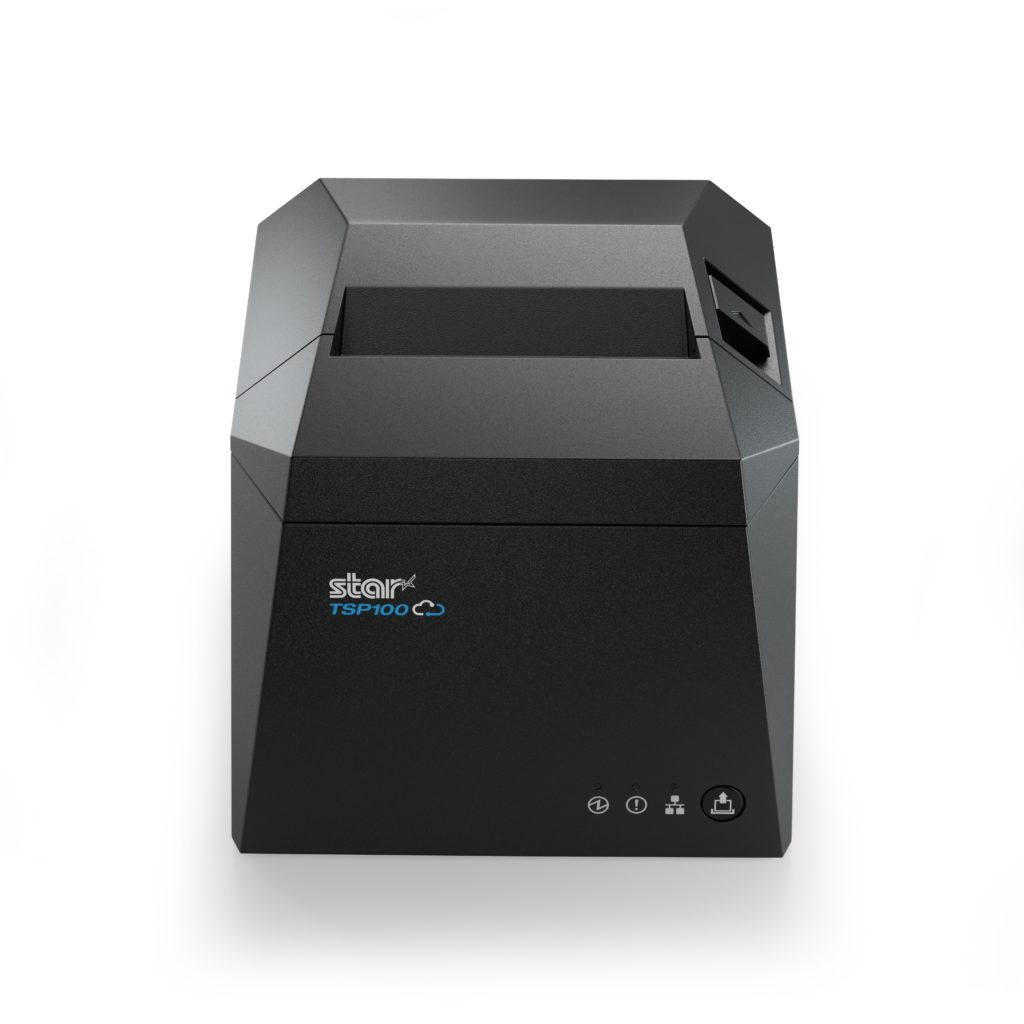
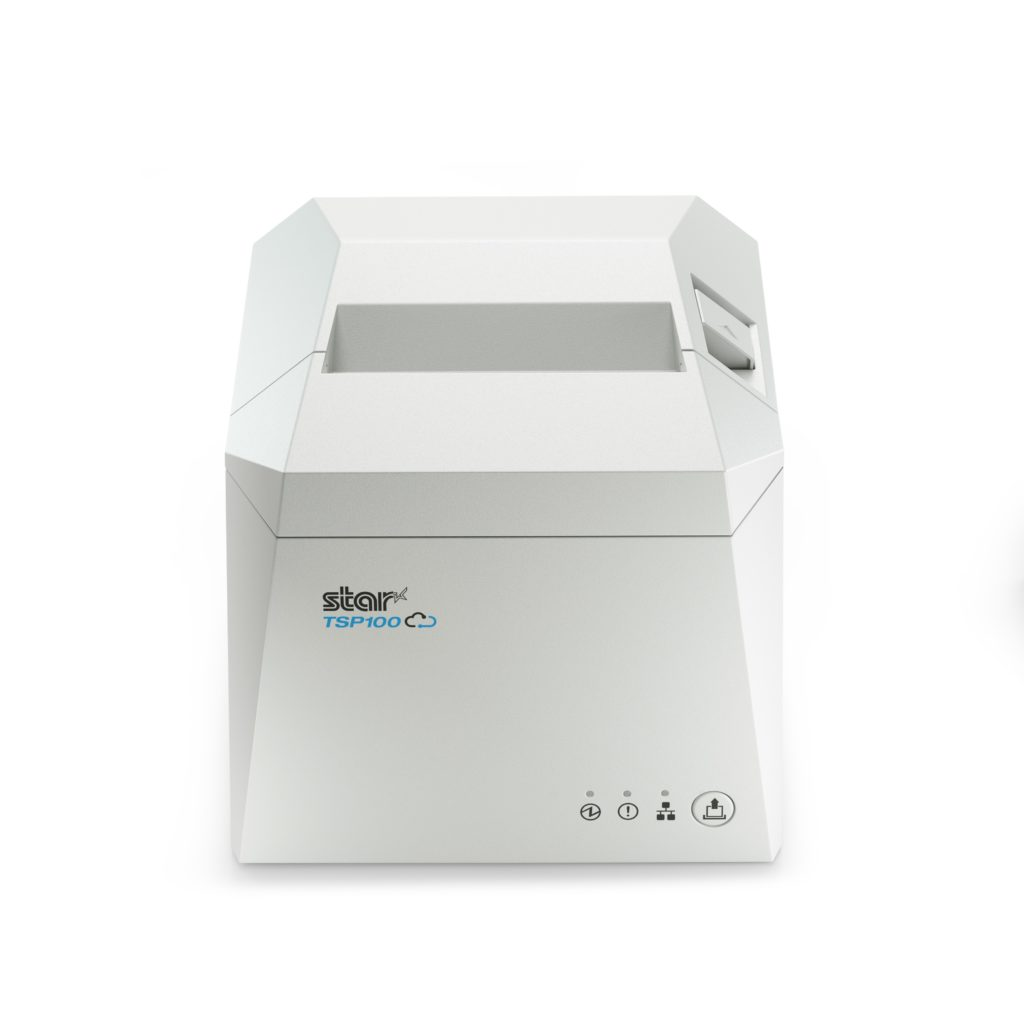
The TSP100IV comes in wired (Ethernet) and wireless (wifi) variants; both work with Rundoo's CloudPrint integration. Some older stores still run the MC-Print3. Compatible but being phased out. Ask Rundoo Support for the current model and accessories list, or see Printer troubleshooting when something's not printing right.
Star CloudPRNT is the compatibility gate, not the Star brand. Rundoo prints receipts through CloudPRNT, a polling protocol where the printer pulls receipt jobs from a Rundoo URL. Star printers without CloudPRNT, and any non-Star thermal printer, won't work with Rundoo, even if they look like a stock 80mm thermal. Before buying or repurposing an existing thermal printer, confirm it has CloudPRNT. That's the only compatibility check that matters.
Cash drawer
Passive hardware (no wifi, no computer connection, no driver). The drawer plugs into the thermal receipt printer via an RJ-12 (also called 6P6C) cable, and the printer pops it open using a pop-pulse signal every time a cash sale prints a receipt. Any standard RJ-12 cash drawer with a 24V port works. See Cash drawer for how Rundoo tracks the drawer ledger in-app.
Cash drawer cables can be directional. If you're connecting the drawer to the thermal receipt printer with a cable, check that the end designated for the cash drawer and the end designated for the printer are connected to the correct sources. Plug them in reversed and the drawer won't operate properly.
Printing labels
Shelf tags, product labels, price stickers, for anything that isn't a receipt, you need a label printer. The compatible, recommended desktop label printers are the Dymo LabelWriter models (the 450, 550, and 5XL are all common), Rundoo's Custom Label Designer ships with Dymo presets built in, so they're the path of least resistance. Pick a model based on the label width you print most, the 5XL handles wider shipping-style labels; the 450 and 550 are standard for 1×2" shelf tags. For a wireless label printer that prints product labels from a phone, use the Zebra ZQ521 or ZQ620 Plus (see Mobile add-ons below).
Label printers connect to the computer over USB. See Product labels for how label templates work in Rundoo.
Dymo labels are indoor shelf tags, not waterproof or outdoor labels. If you run a garden center or a yard and need waterproof labels that survive outside, a Dymo isn't the printer for it. The Dymo LabelWriter models are direct-thermal printers, they print on thermal-paper labels made for indoor shelf tags and price stickers. Thermal paper isn't rated for exterior use (it fades in sun, heat, and moisture), so a Dymo isn't the printer for waterproof, weatherproof, or outdoor tags: garden-center plants and nursery stock, yard stock, lumber that lives outside, anything out in the weather. Outdoor labels need weatherproof or synthetic label stock and a printer that can run it. For a store that needs exterior-rated labels, the desktop printer our CX team points to is the Zebra ZD421, which runs weatherproof and synthetic label stock a Dymo can't. One thing to confirm before you buy: label vendors call their stock "weatherproof," so check that a given roll's rating actually covers what "outdoor" means for your yard (sun, freeze, moisture) rather than assuming it does. Rundoo Support can spec a printer-and-stock pairing that fits, and that's the right move rather than upgrading a Dymo that can't do it.
Label size follows the roll you load, not the printer model. Rundoo prints whatever label size you've set in the template (see Product labels), so the size and style of tag you print is a question of which label stock you buy, not which Dymo model. If you can't find the exact size you've been running (a 2" × 1-1/4" tag, say) in a printer maker's own catalog, our hardware partner Centurion stocks label rolls in a range of sizes and materials, and Rundoo Support can point you to stock that fits both your printer and your template.
E-commerce order printer
When you sell online through Rundoo's e-commerce feature, incoming online orders print to an Order printer you choose in settings. That Order printer must be a Star thermal receipt printer that supports CloudPRNT, the same CloudPRNT gate that governs counter receipts. The models most clients run are the Star TSP100 and TSP143 series.
If a printer you have connected does not appear in the Order printer dropdown, it is because it is not a Star CloudPRNT printer. Only CloudPRNT-capable Star printers show up as order printers. Rundoo can still print to any printer your computer sees in the browser print dialog, but the e-commerce order printer specifically requires the Star CloudPRNT setup.
The e-commerce Order printer is not the same device as a label printer. Online orders print to a Star CloudPRNT receipt printer; product labels and shelf tags print to a Dymo (desktop, over USB) or Zebra ZQ521 / ZQ620 Plus (wireless, via the mobile app) label printer. Setting up online-order printing means you need the Star receipt printer, the Zebra mobile printer will not appear as an Order printer.
Authentication keys
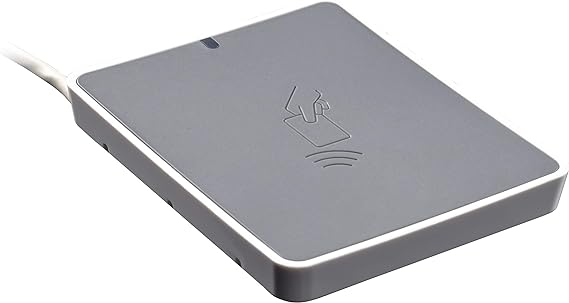
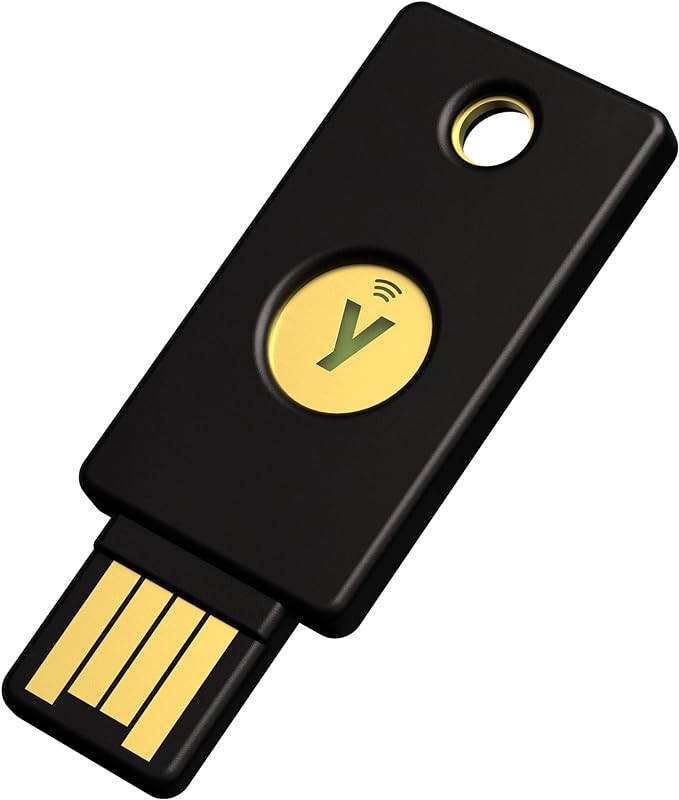
Rundoo supports hardware security keys (YubiKeys) as a sign-in method. Tap a registered key to an NFC reader or plug it into a USB port, and you're in. Fast at a counter, and harder to misplace than a phone. Totally optional. The default email and SMS sign-in paths work on any computer.
Two pieces of gear:
-
YubiKey (e.g. YubiKey 5 NFC). The physical key itself, small, keychain-sized, with a metal "Y" contact pad. Each staff member gets their own. Rundoo pairs the key to a Staff record; from then on, that key signs that staff in.
-
NFC reader (e.g. Identiv uTrust 3700 F). A small USB puck that lets a YubiKey tap rather than plug in. Optional (keys also work inserted directly into a computer's USB port), but a reader speeds up rotations at a busy counter since clerks can tap without unplugging between shifts.
For the full pairing flow (adding a key to a staff account, testing it, troubleshooting), see Login keys.
Mobile add-ons
A few hardware accessories pair with Rundoo's mobile (Android) app rather than the desktop POS, handy for on-the-shelf workflows like printing labels at a bin or scanning down an aisle. These don't replace the standard register-station kit; they extend it.
Zebra mobile printers (ZQ521, ZQ620 Plus)
The recommended, compatible wireless label printers for printing product labels with Rundoo are the Zebra ZQ521 and ZQ620 Plus, portable thermal label printers that pair to a phone running Rundoo's mobile app. Two compatible models:
-
Zebra ZQ521 (4" labels), the wider option, good for shipping-style labels.
-
Zebra ZQ620 Plus (3" labels), smaller, lighter, fine for shelf tags.
Source from posguys.com/rundoo.asp.
Two things trip up nearly every setup, and neither is on the printer’s box: the printer ships with Minimum Bluetooth Security Mode set to 3 (Rundoo can’t connect until it’s lowered to 1 in the Zebra setup app), and it needs black-mark, perforated, 0.75" core label stock in one of three preset sizes or it never calibrates. The full walkthrough, printer prep, the security change, the Android vs iPhone difference, and troubleshooting, lives on Zebra mobile printers.
Pair and print, in short:
-
Install the Zebra setup app (ZQ2 Zebra Printer Setup on Android, Zebra Printer Setup Utility on iPhone), connect to the printer, and lower Minimum Bluetooth Security Mode from
3to1. -
In the mobile app, open
More > Zebra label printer settingsand tapScan to connect. -
Tap the NFC logo on the printer (on a Zebra handheld tap the phone’s screen face, not the back; on iPhone use the top of the back).
-
Pick the location, then the label template that matches your roll.
-
Tap
Calibrate(required before the first print job), then open any product and tapPrint labelto confirm.
If pairing or printing isn't working: the Rundoo app connects over Bluetooth only, there is no USB path. Check that Minimum Bluetooth Security Mode is 1, that Bluetooth is on at the printer (hold the Feed button until the Bluetooth icon shows on its screen), and, on Android, that you picked the printer entry with the small LE badge. Full troubleshooting on Zebra mobile printers.
Zebra mobile computers (TC73, TC53)
Rugged Android handhelds with a built-in barcode scanner that work with Rundoo's mobile app. Two compatible models:
-
Zebra TC73 (6" screen), the rugged option for warehouse and yard use.
-
Zebra TC53 (6" screen), lighter, similar feature set.
Source from posguys.com/rundoo.asp.
Enable and use:
-
In the mobile app, open
More > Zebra scanner settingsand tapEnable built-in barcode scanner. -
In the scanner picker on a scan-capable screen, pick
Zebra scanner. -
Press the side scan button on the device to scan barcodes (it works the same way as a desktop scanner, just handheld).
Multiple stations in one store
Rundoo's cash drawer is virtual, a ledger that tracks what's in the physical till, not a driver that talks to hardware. The physical drawer pops open through the thermal receipt printer it's wired to: when a cash sale prints a receipt, the printer sends the pop signal to the drawer.
That means multiple checkout stations can share one physical cash drawer if they all print to the same thermal printer. One drawer per thermal printer; stations can share a printer by pointing their browser print setup at it. If you want each station to have its own drawer, give each station its own thermal printer.
See Cash drawer for the in-app ledger side of this.
Network
Rundoo runs entirely in the browser and talks to our servers constantly, so a reliable network is the backbone of every register. A few notes:
-
Wifi is primary. Most stores run Rundoo over store wifi. Anything above 5 Mbps down / 1 Mbps up is comfortable. Place the router close enough to the counter that every station has a strong signal.
-
Wired is more stable. If your counter has an Ethernet port nearby, a wired connection to the computer is more stable than wifi (worth doing if the option is there).
-
Cellular fallback is worth having. When store wifi drops, a phone hotspot or a dedicated mobile hotspot keeps you ringing. Cellular is more reliable than wifi in extreme weather. See Connectivity troubleshooting for specific hotspot recommendations and the full ladder on network issues.
The Stripe wifi card reader connects to the same network as the computer. If wifi drops, the reader drops with it. Tethering to cellular pulls both back up.
What to buy
Specific models shift over time (distributors stop carrying a SKU, a newer version lands, a reliable workhorse gets retired). Rather than bake model numbers into this page that'll go stale, ask Rundoo Support for current recommendations when you're buying new gear. We'll tell you what our other clients are running successfully right now, and where they source it.
If you're standing up a brand-new store, the standard terminal package is a computer you already own or a new mid-range Windows desktop, a Zebra DS2278 barcode scanner, and a Stripe Reader S710 for card payments. For cash sales, add a Star Micronics TSP100IV thermal receipt printer and an RJ-12 cash drawer. Layer on a Dymo LabelWriter if you print shelf tags, and per-clerk YubiKeys + an NFC reader if you want hardware-key sign-in.
Vendor partners. Two storefronts curate bundles for Rundoo customers: POSGuys (mobile computers, printers, scanners, cash drawers) and Centurion (thermal receipt paper, label stock, office supplies, envelopes). Their /rundoo storefronts only stock gear that's been tested against the live product, so compatibility is one less thing to second-guess.