
Rundocs › Accounting
Account mapping
Last updated 2026-09-17
Rundoo has a set of control accounts (Cash drawer, Cash deposits, Check deposits, Card deposits, Sales, Sales tax payable, Accounts receivable, Accounts payable, Inventory, Inventory COGS, and a handful more). Every time a transaction happens, Rundoo writes a journal entry against those control accounts. Account mapping is where you tell Rundoo which GL account (from your Chart of Accounts) each control account should post to.
In the Admin > Chart of Accounts > Mapping tab, you'll see one row per control account × location (plus an extra breakdown for Sales, Inventory, and Inventory COGS by department, and for a few asset control accounts by tender method). Each row says "this event at this store posts to this GL account."
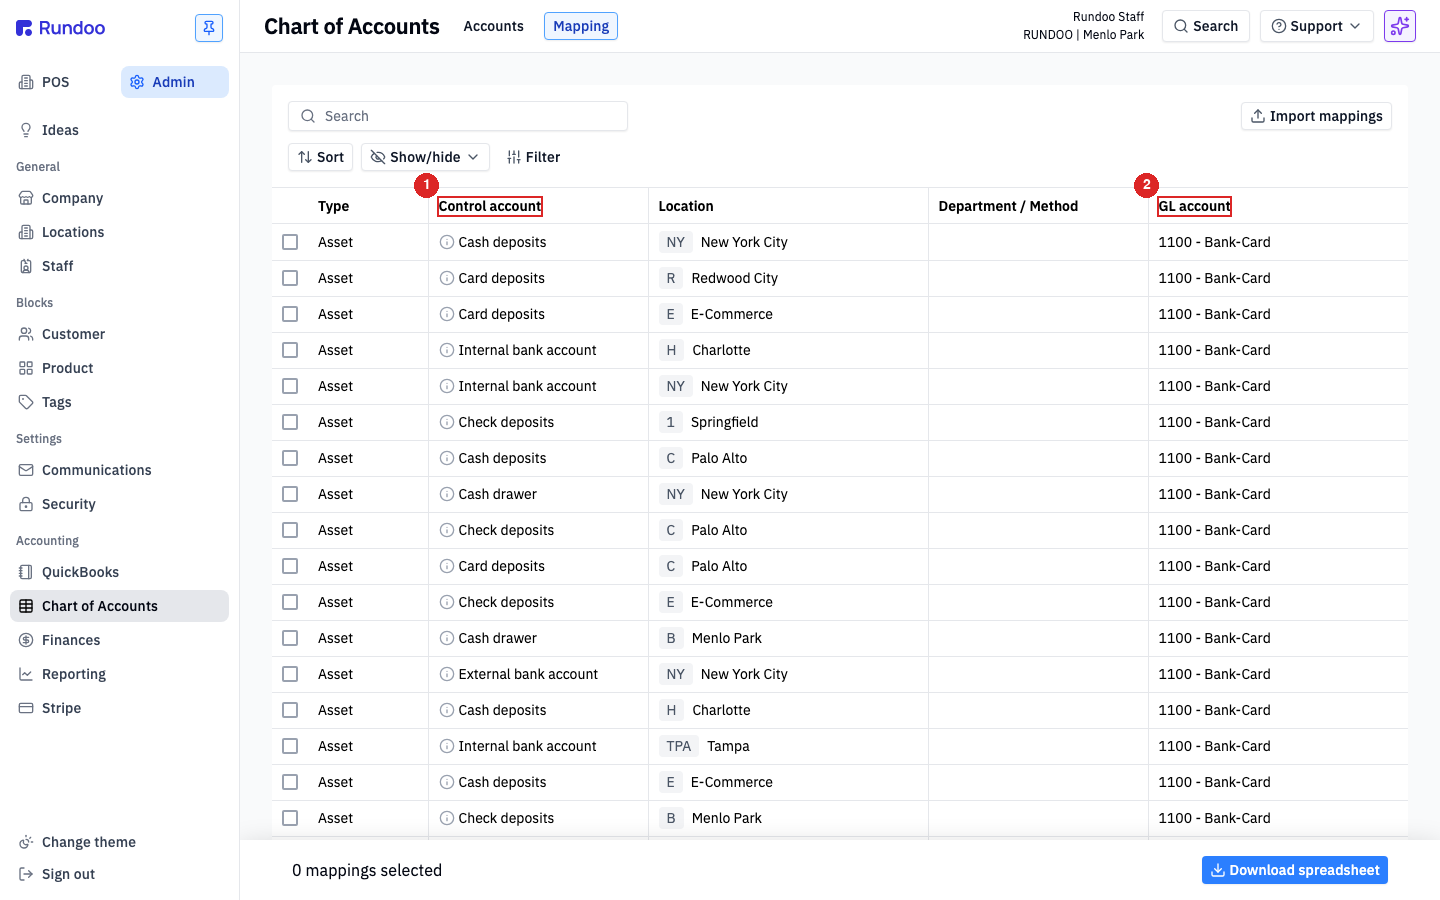
Control accounts, GL accounts, and what a journal entry looks like
The fastest way to get this is to ring up a sale and then read the journal entry it produces. Put a product in the cart at /pos/sales/new, pay with cash, and complete the sale. Then open Admin > Integrations > Journal Entries and click into today's Sales journal row.
Here's the top of a real Sales journal from the Menlo Park location. Rundoo aggregates a day of sales into one journal entry per location per transaction type, so you're looking at every cash sale, card sale, on-account sale, and inventory movement for the day, summed:
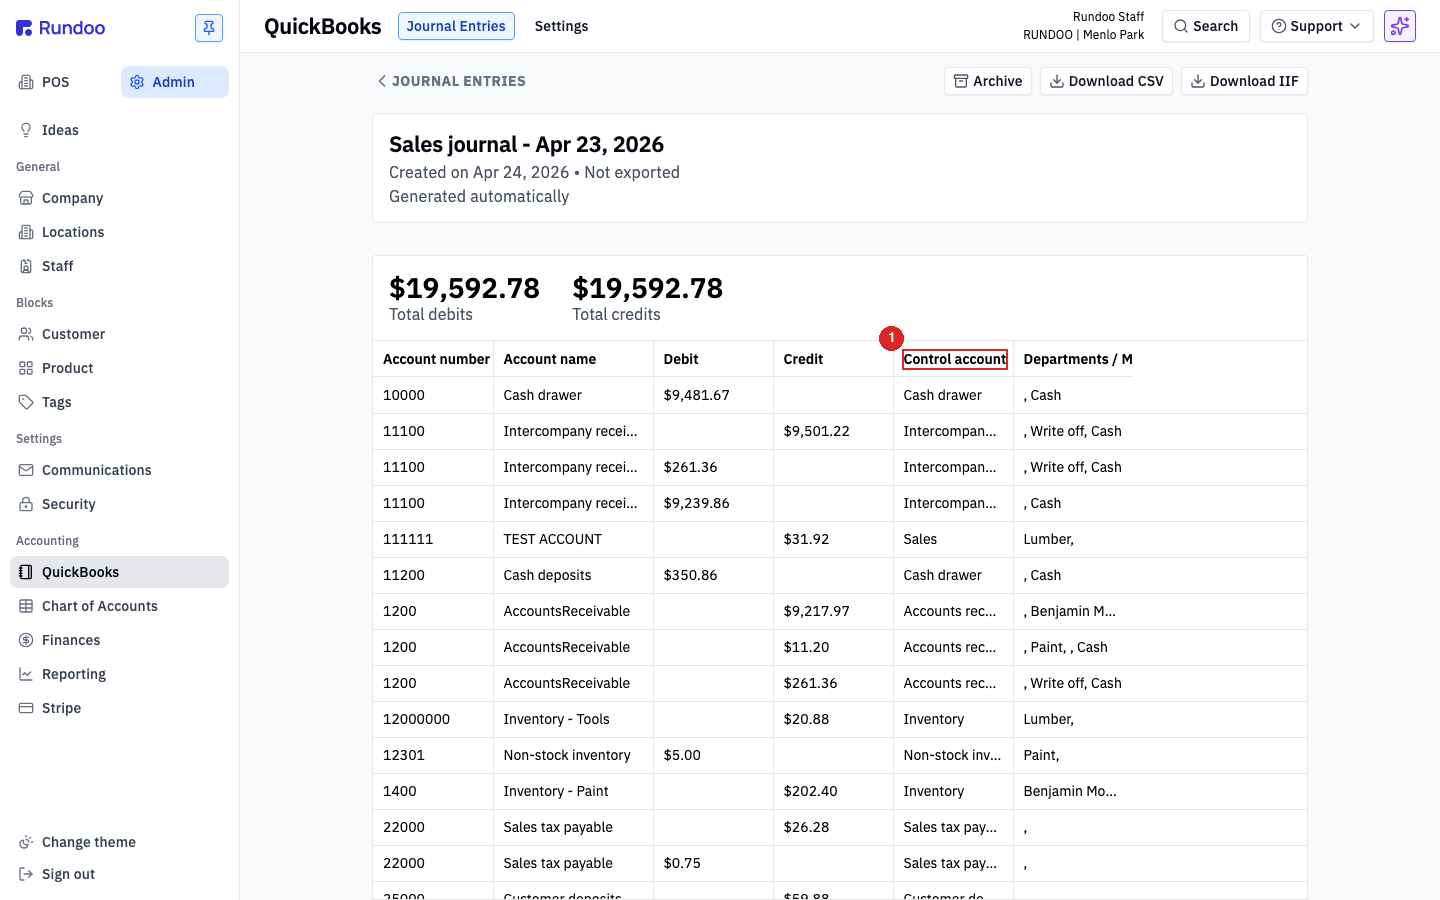
Read across any row: Account number · Account name · Debit · Credit · … · Control account · Departments / Methods / Fees. The Control account column on the right is the bridge. It tells you which Mapping row wrote this line.
A few lines from that journal, to make the bridge concrete. Each bullet reads as GL account (debit or credit $amount) ← Control account:
-
10000 - Cash drawerdebit $6.46 ←Cash drawer -
11200 - Cash depositsdebit $3,509.79 ←Cash drawer -
1100 - Bank-Carddebit $192.29 ←Check deposits -
1200 - AccountsReceivabledebit $32.31 ←Accounts receivable -
1400 - Inventory - Paintcredit $924.02 ←Inventory -
22000 - Sales tax payablecredit $167.33 ←Sales tax payable -
4000 - Salescredit $1,712.72 ←Sales -
5000 - COGSdebit $1,480.11 ←Inventory COGS
Every line's GL account is picked from one row on the Mapping tab. If you want the Sales control account at Menlo Park to post to a different GL (say, 4100 - Paint sales instead of 4000 - Sales), you change exactly one row on Mapping (the Sales row for Menlo Park, Paint department) and the next day's journal will credit the new account.
A different transaction type writes a different journal. Receiving a vendor PO produces a Purchase journal that hits only two control accounts:
-
12000000 - Inventory - Toolsdebit $95.76 ←Inventory -
1400 - Inventory - Paintdebit $322.85 ←Inventory -
2000 - AccountsPayablecredit $418.61 ←Accounts payable
Same lookup logic: Rundoo found the Inventory Mapping row for each department and posted the debits; it found the Accounts payable Mapping row and posted the credit.
The Mapping tab is that lookup table, one row at a time.
Splitting by location, department, and tender method
Every mapping row is scoped to a single Location. Same control account at two different stores can post to two different GL accounts, so Palo Alto's card deposits and Menlo Park's card deposits can land in separate bank accounts if your bookkeeping wants that. Adding a new location auto-spawns a full set of mapping rows for it, pointed at the same defaults.
A few control accounts split further:
-
Sales,Inventory, andInventory COGSsplit by department. One row perLocation × Department, so paint revenue at Menlo Park can post to a different GL from hardware revenue at Menlo Park, and independently at every other store. TheDepartment / Method / Feecolumn on the Mapping tab (shown asDepartments / Methods / Feeson the journal entry) shows which department each row covers. -
Some asset control accounts split by tender method. The
Check depositscontrol account shows one row perLocation × Check(andCash depositsbyCash), so you can point cash-drawer deposits and check deposits at different bank GLs at the same store. -
Sales tax is always per-location. Each location has its own
Sales tax payablerow that maps to the correct state/local tax GL. The tax rate lives onAdmin > Locations > Tax; the GL account the collected tax credits lives here on Mapping.
When you're auditing a mapping across a nine-location tenant, use the Filter button at the top of the Mapping tab to narrow to one Control account or Location at a time. That's how most accountants work through a reconciliation.
Do special orders and non-stock items post to different accounts?
No. A product's inventory type (whether it's a stocking product, Special orderable, or Non stock, set on the product's Settings > Checkout card) does not change which GL account its inventory movement posts to. Rundoo has a single Inventory control account and a single Inventory COGS control account, and both resolve their GL by Location × Department only, never by inventory type. So a special-order or non-stock item posts to the same Inventory and Inventory COGS accounts as any regular stocking product in that department. There is no separate "non-stock inventory" or "special-order inventory" account on the Mapping tab.
A special-order line still moves inventory the same way a stock item does: selling it drives On Hand negative, and receiving the vendor PO clears the negative and lands the cost in that department's Inventory account (see Special orders). The department is what decides the account, not how the product is flagged.
Want special orders or non-stock items in their own GL account? The lever is the department, not the inventory type. Put those products in a dedicated department (say Special orders), then point that department's Inventory and Inventory COGS mapping rows at the accounts you want. Every other department keeps posting to its normal inventory accounts.
Where a forfeited deposit posts
Customer deposits touch two control accounts on the Mapping tab. When you take a deposit on a will-call, quote, or special order, it posts to the Customer deposits control account (a Liability, money you're holding for the customer). When a customer cancels and your store keeps the deposit instead of refunding it, that's a forfeit, and the kept amount moves off the liability and books as income to the Forfeited deposits control account (defaults to 44000 Forfeited deposits, an Income account). Both have one mapping row per Location, so you can send forfeited-deposit income to whatever GL account your books use, and split it by store if you want.
You do the forfeit itself from the register, not here (void the order and leave the refund amount at $0). See Deposits and partial close-out for that flow. This page is only about which GL account the resulting income lands in.
Editing a mapping
Click any row on the Mapping tab to open the Edit mapping modal.
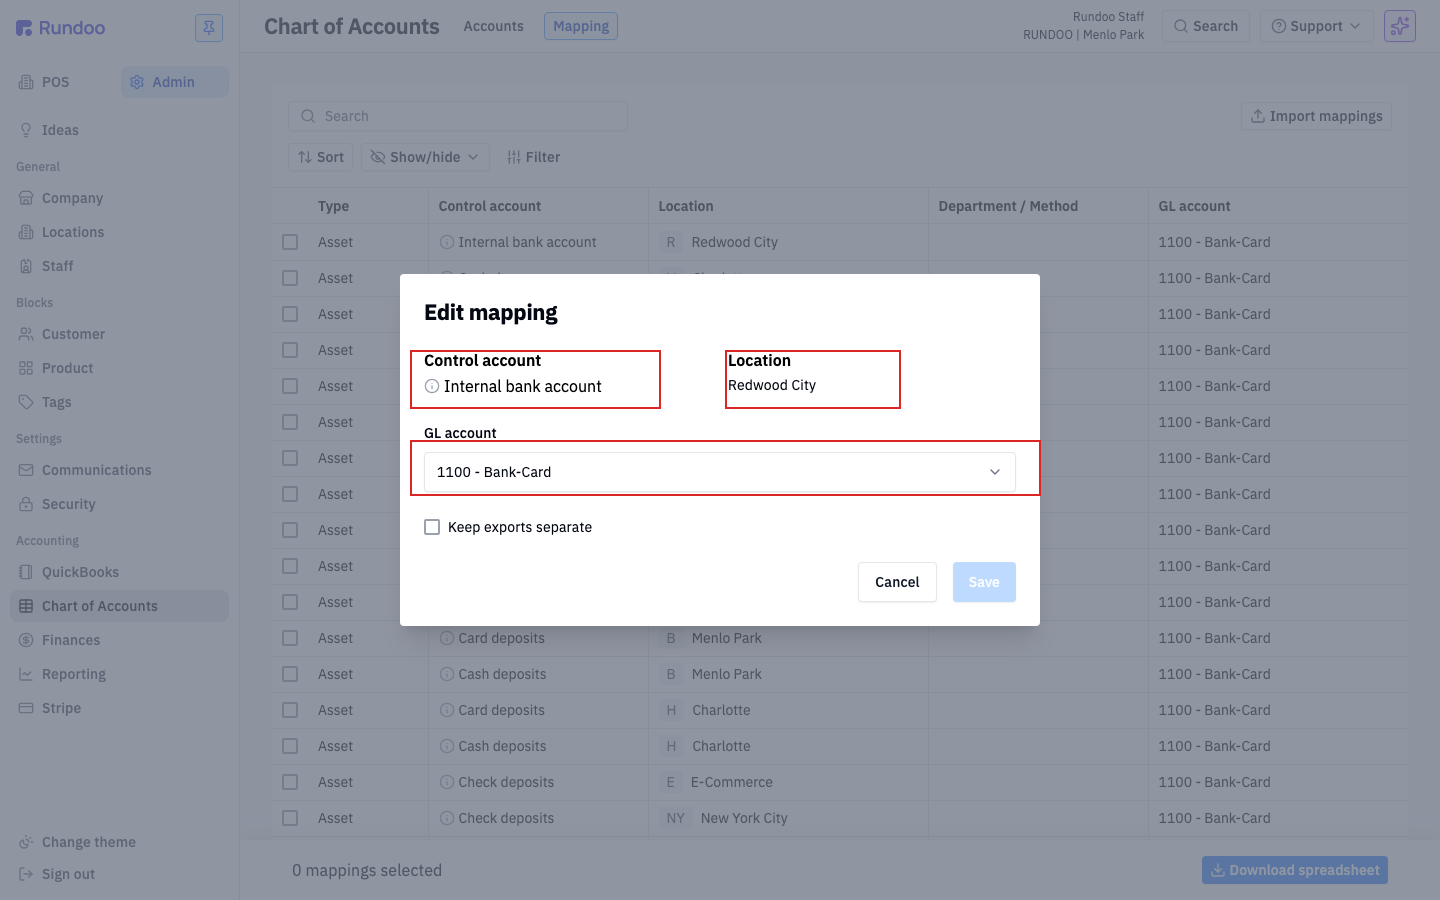
The Control account and Location at the top are read-only. They identify which row you're editing and can't be changed. The only field you edit is the GL account dropdown. Open it to see every account from your Chart of Accounts; type into the search box to filter. Pick the target account, then click Save.
-
Check
Keep exports separateif you want this mapping's journal lines kept broken out in the QuickBooks export rather than aggregated with the rest of the day's activity. Useful when a bookkeeper needs per-location or per-tender visibility inside QuickBooks. -
If the GL account you need isn't in the dropdown, add it on the Accounts top tab first (see Chart of Accounts). It'll appear in the picker immediately.
Changing a mapping only affects journal entries generated after the save (historical postings stay where they landed). If you changed a mapping to fix a months-old routing mistake, regenerate the affected journal entries from the QuickBooks page (Select type + Date + Generate) so they re-post against the corrected GL.
The pre-seeded mappings
Rundoo pre-seeds every new company with a full set of mapping rows (one row for every control account × location (× department or tender method where applicable)) pointed at a sensible default GL account. You can start posting journal entries on day one without editing anything.
Departments added later don't get mapping rows automatically. Pre-seeding only covers what existed at setup. A department you create afterward, including one introduced by a product import, starts with no mapping rows, so its sales and inventory lines have no GL account to resolve to. A journal entry with an unresolved line can save and export out of balance (total debits ≠ total credits). After adding a department or running a product import, come back to Mapping and confirm the new department has its Sales, Inventory, and Inventory COGS rows (the mechanic is in Splitting by location, department, and tender method above). If an entry has already come out unbalanced, see Common errors.
The default GL account names Rundoo uses (4000 - Sales, 5000 - COGS, 1400 - Inventory - Paint, 1100 - Bank-Card, 1200 - AccountsReceivable, 2000 - AccountsPayable, 22000 - Sales tax payable, 11200 - Cash deposits, etc.) come from the pre-seeded Chart of Accounts. If your QuickBooks company file uses different account numbers or names, mirror those names in Rundoo's Chart of Accounts first, the mapping rows will then already point at the right buckets and you rarely need to touch Mapping at all.
Bulk editing via import
If you're editing dozens of mappings at once (say, splitting 4000 - Sales into per-department revenue accounts across eight locations), use Import mappings in the top-right of the Mapping tab. Click Download spreadsheet, edit the GL account column in Excel or Google Sheets, then upload the file back through Import mappings. Same create-vs-update-by-token pattern as other Rundoo bulk imports.