
Rundocs › Customers & Jobs
Jobs
Last updated 2026-08-18
Jobs are named projects or project codes you tag sales to, so a customer can see their spend grouped by project. A painting contractor might have one job for the Smith residence and another for the Johnson office, every sale rings up against the customer, then gets stamped with a job so reports and statements split by project.
In the POS mode, open Customers in the left sidebar, then switch to the Jobs top tab.
What a job is
A job is a lightweight label attached to a Customer, a project name and an optional project ID, with its own address and status. Sales can be tagged to a job at checkout, and then every job-level report, statement line, and balance pivot uses that tag to group the customer's activity by project.
Jobs are customer-scoped. Every job belongs to exactly one customer. There's no global "Smith Residence" that two different customers share. If two of your customers are both working on the same address, each customer gets their own job for it.
Every customer has a default job for untagged sales, typically named Main Account (or whatever the first job on that customer is named, since the default is just "Job ID 1"). That's the bucket every untagged sale lands in, so you never lose history even if a cashier forgets to pick a job.
Two places to work with jobs:
-
The Customers > Jobs top tab (the flat, cross-customer list). Every job in every customer's account, with columns
Customer ID,Customer Name,Job ID,Job Name,Status,Balance. Good for scanning or searching by project name across the whole book. -
A customer's Jobs sub-tab on their detail page, the scoped list of jobs under that one customer. Good when you know the customer and want to see just their projects, or when you're about to add a job to them.
Adding a job
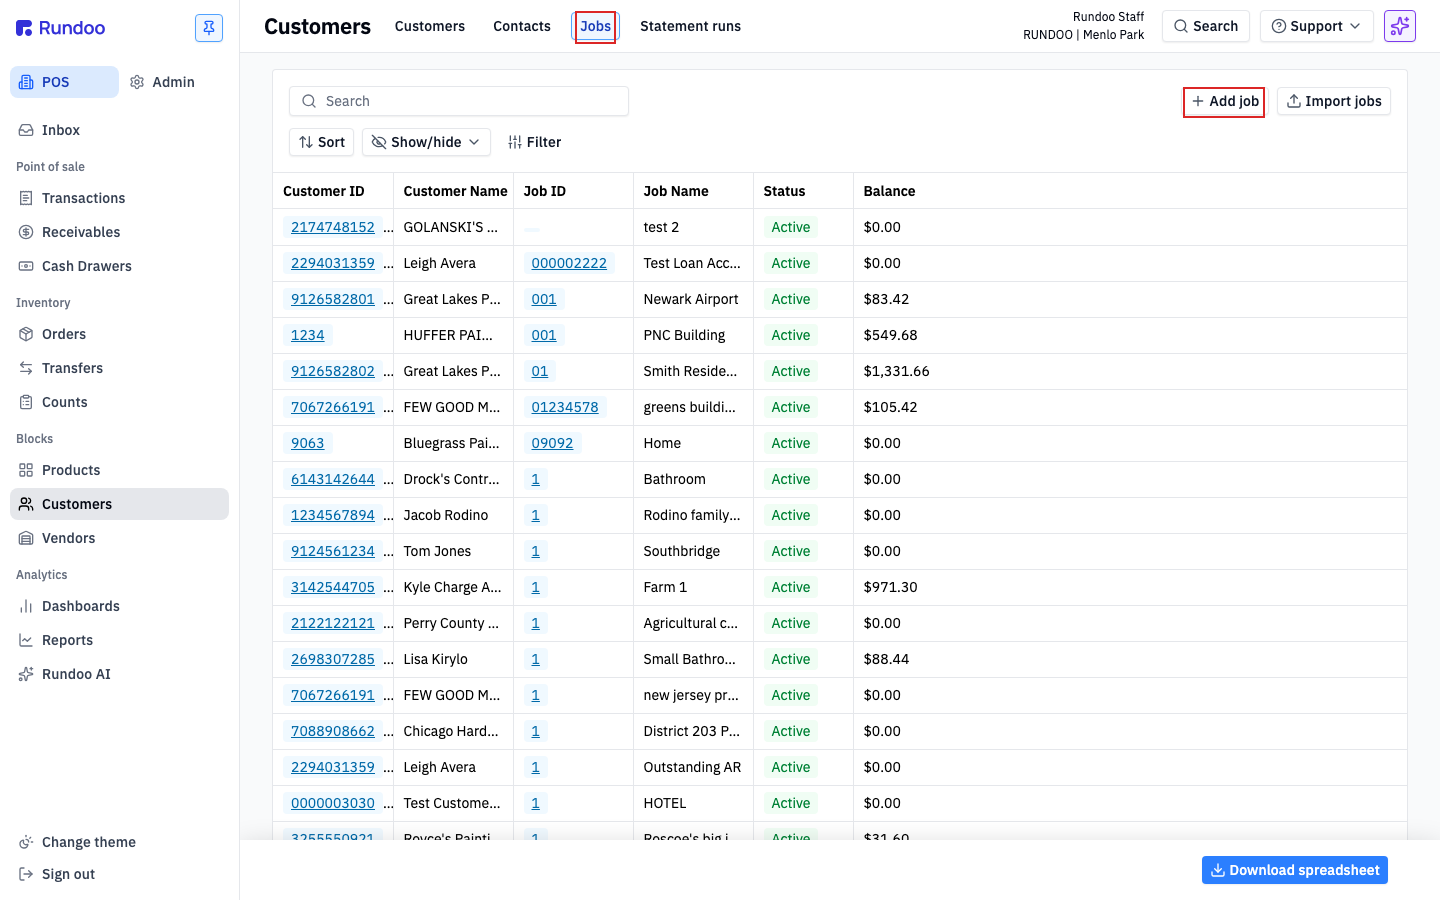
From the Customers > Jobs top tab, click Add job in the top-right. You can add a job from anywhere. You don't need to be on the customer's detail page, because the first field on the form is Customer and it applies to whichever one you pick.
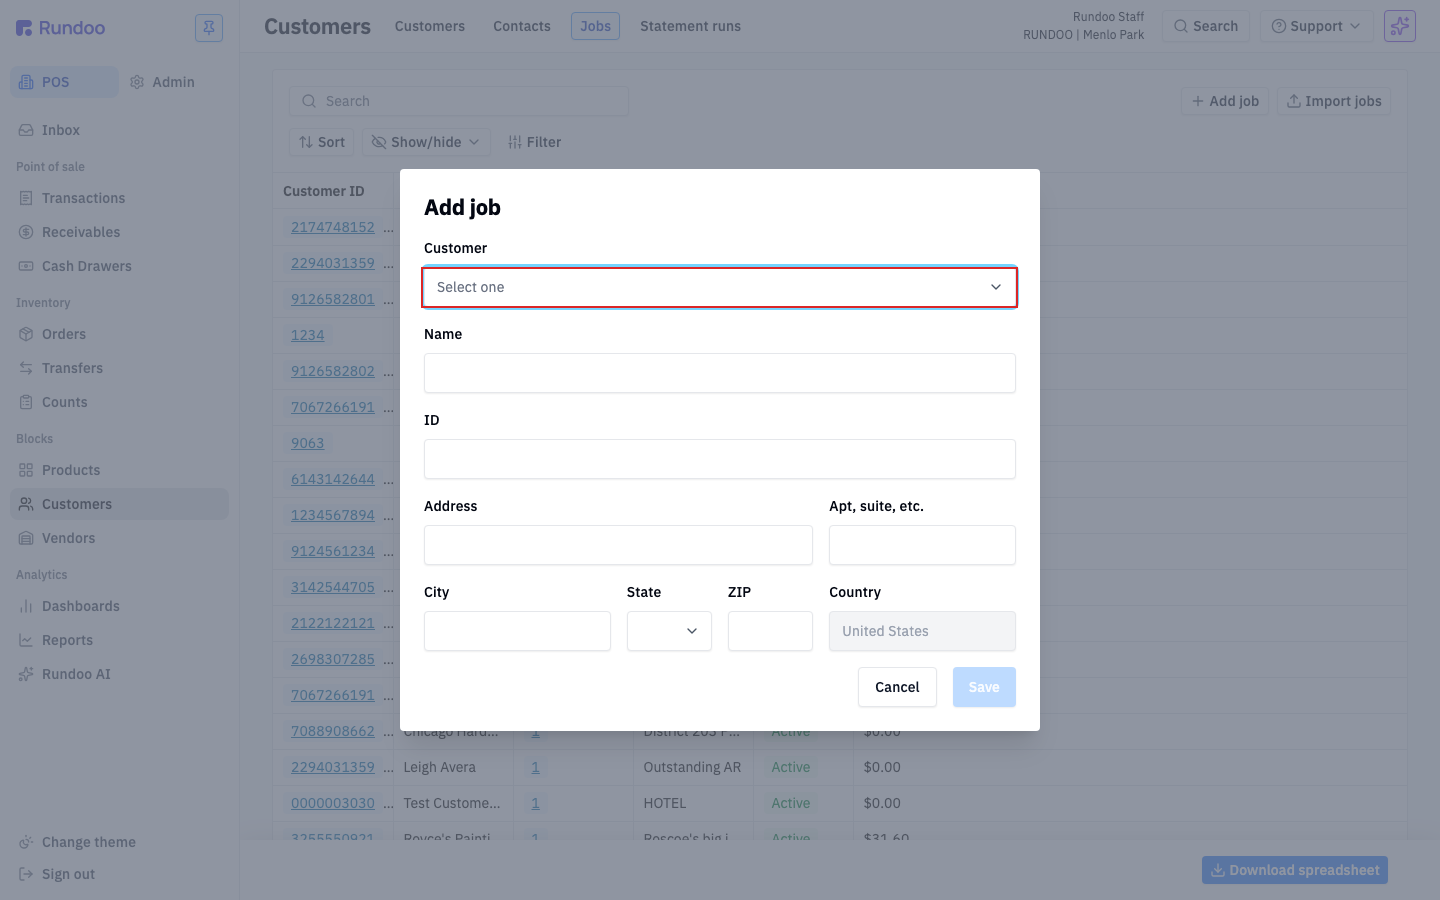
The Add job modal asks for the minimum to create the job:
| Field | What it does | Required? |
|---|---|---|
Customer |
Which customer this job belongs to. Jobs are customer-scoped, so this is the field that decides who owns the job. | Yes |
Name |
Human-readable project name shown at POS and on reports (e.g. Smith residence, Johnson office repaint). |
Yes |
ID |
Your project code, if you track one. Free-form text (leave blank to auto-number). | Optional |
Address, Apt, suite, etc., City, State, ZIP, Country |
Job-site address. Separate from the customer's billing address (helpful when the same customer has projects at multiple addresses). | Optional |
Save creates the job. It immediately becomes selectable as a job at POS for that customer.
You can also add a job straight from the customer's detail page. Open the customer, switch to the Jobs sub-tab, and click Add job there. Same modal, but Customer is pre-filled.
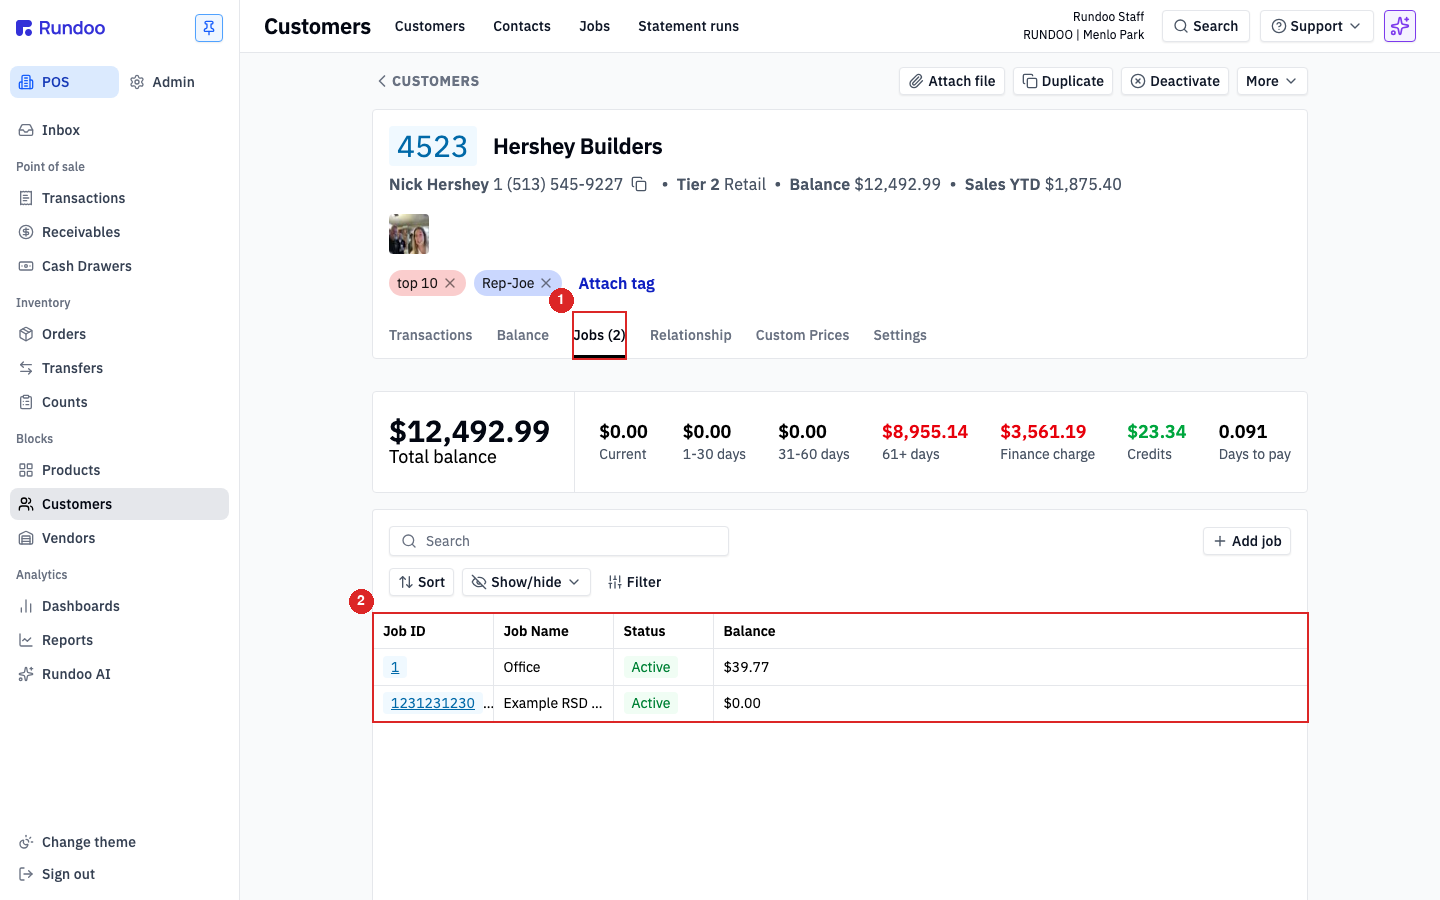
The customer detail Jobs sub-tab shows a count next to its label (Jobs (2) for Hershey Builders above), lists every job under that customer with its balance, and gives you a per-customer Add job button so you don't have to go back to the top tab.
What a job does NOT have
Jobs are lightweight tags, not sub-customers. Things that live on the customer don't live on the job:
-
No per-job finance term, credit limit, or finance charge. All financing is on the parent customer's account; jobs share the customer's terms and credit limit.
-
No per-job pricing tier or custom prices. Pricing rules apply to the customer; every job under that customer sees the same prices at the register.
-
No per-job credit balance. Customer credits live on the parent customer, not the job (covered above).
-
No per-job statement. Statements are issued per customer; the Include jobs toggle on the statement generator just groups a customer's activity by job inside one statement (see Statements).
-
No per-job tax exemption. Tax behavior is set on the customer.
The Add job modal asks only for Customer, Name, ID, and an optional Address for the job site. That's the entire schema. If a contractor needs different terms or pricing per project, the path is to create a separate customer record per project, not to bend a job into one.
Settings that live on the job, not the parent
Here's the catch that trips people up: while a job shares the parent's finance term, pricing, and credit (above), each job has its own Settings tab with the same per-account toggles a Customer has, including Hide prices on printed invoices and the checkout requirements (Require PO, Require Job, Require Buyer, Require Receipt Signature, and the sale-note toggles). Those settings are stored per job and do not inherit from the parent customer. Turning Hide prices on printed invoices on for the main account does not cascade to that customer's jobs.
So the classic surprise: your main account is set to hide prices on invoices, but a job account under it is still printing prices. The fix is to set the toggle on the job too. Open the job's detail page, click its Settings tab, and turn Hide prices on printed invoices on there (same tab, same toggle as on a customer).
Fixing (or auditing) many jobs at once. There's no single report that lines a customer's setting up against each of its jobs, and no button that copies a customer's toggles down to its jobs. To catch every job still printing prices while its parent hides them, export the Jobs list from the Customers > Jobs top tab, the export carries a Customer Name column alongside the Hide Prices On Printed Invoices column, so you can scan it in a spreadsheet, flip the ones that don't match, and re-import via the Customer imports template. (If the match-up gets hairy, support@rundoo.ai can help line the two exports up.)
Editing or closing a job
A job's name, ID, address, and Status can be edited from the job's detail page. Click the job's row from the Customers > Jobs top tab (or the customer's Jobs sub-tab) to open it.
Status is a small set of values. Active is the default for jobs that are currently in use, and Rundoo exposes additional values (like Inactive) to retire jobs that are wrapped up so they don't clutter the picker at POS. Closed-out jobs stay on the customer's record for history but can be filtered out of the everyday list. To deactivate a job (close it out / mark it inactive so it drops off the everyday POS picker), edit it from its detail page, change Status from Active to Inactive, and Save. The historical sales tagged to that job stay attached for reporting; only the picker behavior changes. There's no separate "deactivate" or "delete" button on a job; the Status field is the control.
Jobs can't be deleted once created (they're permanent records because real sales are tagged to them). Closing a job (changing Status) is the right way to retire one; deleting would orphan every sale that referenced it. If a job was created in error and has zero sales attached, message Rundoo Support for cleanup.
Duplicating a job
An existing job has a Duplicate button in the header of its detail page. Use it when a customer is starting a new project similar to an old one, so you don't have to retype the job's fields. Rundoo creates a new job on the same customer that you can rename and edit before it goes live.
Duplication is scoped to the job's customer (there's no bulk duplicate and no way to copy a job across customers). A duplicated job always belongs to the customer it was copied from.
Attaching a job to a sale
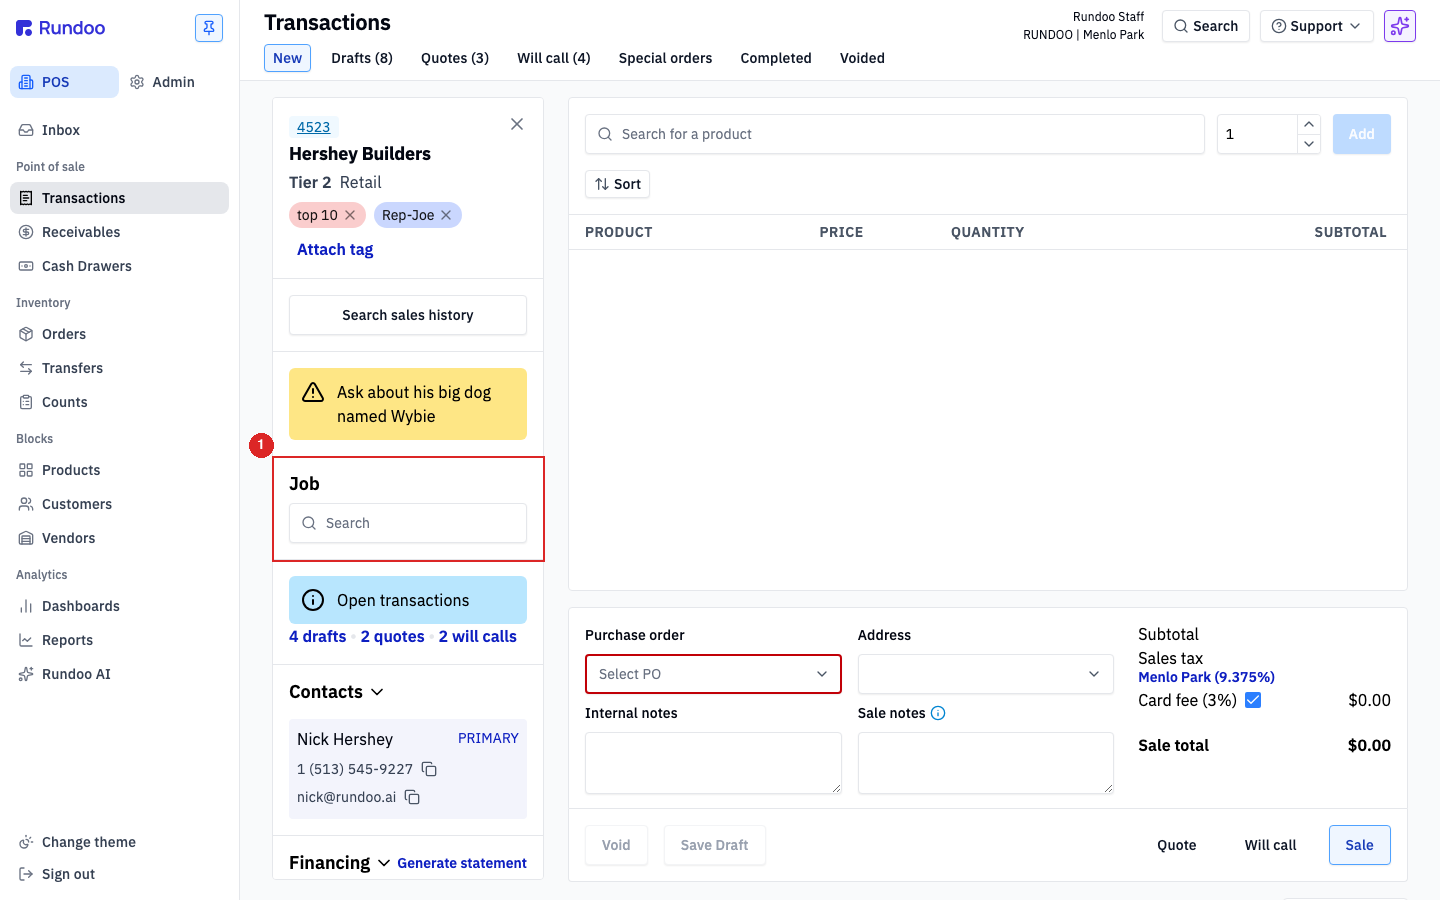
When you attach a customer to a new sale at POS, a Job section appears in the customer panel on the left side of the cart, with a Search input. Type the job's name or ID to filter the customer's jobs, then pick one. The sale is now tagged to that job, it'll show up under that project in job-level reports and on the customer's statement.
If you leave the Job field empty, the sale still goes through. It just lands on the customer's Main Account job.
The Job picker only shows jobs belonging to the attached customer. Swap the customer on a sale and the currently-selected job clears. Attach the customer first, then pick the job.
Job on a sale is set once at checkout (you pick it on the cart before completing the Sale). You can't re-tag a completed sale to a different job retroactively.
Viewing job-level spend
Every customer's detail page has a Balance summary at the top of the Jobs sub-tab (Total balance, Current, 1-30, 31-60, 61+, Finance charge, Credits, Days to pay) and the per-job balance table beneath, so you can see which project is driving the customer's open balance without running a report.
Credits live on the parent customer. Job-level invoices draw from the customer's shared credit pool. See Customer credits. There's no per-job credit balance.
Click a job's ID or name to open the job's own detail page, where you get its transaction history, a per-job balance, and the ability to edit the job's name, ID, status, or address.
For cross-customer job reporting (e.g. "show every job over $5K outstanding"), see the reports in Running Reports.
Untagged sales appear on job-level reports as the customer's Main Account job. If you're seeing unexpected volume on Main Account, it usually means a cashier is skipping the job picker. Worth reminding them, since re-tagging after the fact isn't possible.
Recommended Rundocs
-
Customers, creating and editing the customer records that jobs hang under.
-
Sales (ringing up the sale you're tagging to a job).
-
Statements, monthly statements split job-level activity by project.