
Rundocs › Returns & Exchanges
Returns
Last updated 2026-08-17
A customer brings something back. Rundoo returns let you pull up the original Sale, pick the lines coming back, set a quantity and reason, and refund to any tender method.
In the POS mode, open the Customers left tab, find the customer, then click the sale they're returning from. The Return button sits in the action cluster on the completed-sale detail.
Video walkthrough
Two ways to start a return
Most returns start from a past sale. Rundoo calls this a linked return, and it's the recommended path because the lines, prices, tax, and original tender all pre-fill from the original receipt. The cashier pulls up the sale and marks which lines are coming back.
If your store has no-receipt returns enabled in admin, the cashier can also ring up a return from a fresh cart by entering a negative quantity. No original sale required. Today's price is used (Rundoo has nothing to look up), and the cashier trusts what the customer says they paid.
Two reliable routes to find a past sale when the customer doesn't have their receipt:
-
Through the customer. In the POS mode, the Customers left tab, open the customer and scan the Transactions top tab. Every completed sale for that customer is listed with sale ID, job, PO, date, and total.
-
Through the sale directly. If you know the sale ID or the customer told you a specific date, use the global Search button in the header and search by sale ID or amount.
💡 If you can find the sale, use the linked path. Pricing and tender pre-fill correctly and the customer's books line up cleanly. The no-receipt path is for cases where you genuinely can't produce the original receipt.
No-receipt returns
When the customer doesn't have their receipt and you can't find the original sale, Rundoo has a second path: start a fresh transaction and enter a negative quantity. Rundoo flips the transaction into a return as soon as the totals go negative.
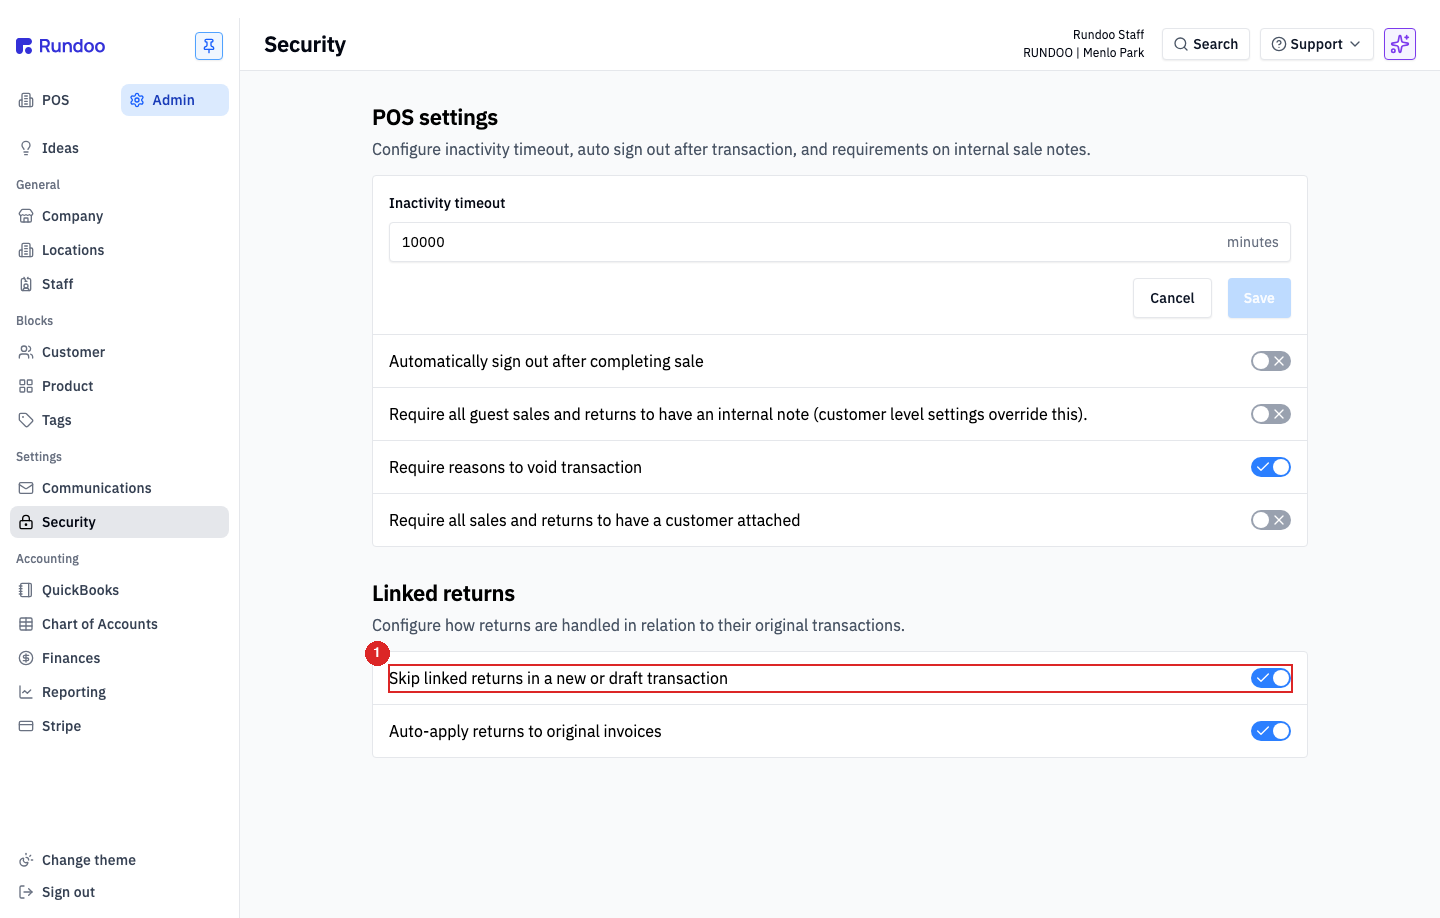
Admin setting that enables it. In the Admin mode, the Security left tab, under Returns, turn Skip linked returns in a new or draft transaction on. When it's off (Rundoo's default), every return has to start from an original sale (no negative-quantity shortcut). See Return policy for the full admin walkthrough.
Ringing one up. With the toggle on, in the POS mode, the Transactions left tab, start a new transaction, attach the customer if you know them, search for the product, and set the quantity to a negative number. The cart line shows a Return pill, the subtotal and sales tax flip negative, and the Sale button in the action cluster becomes Return.
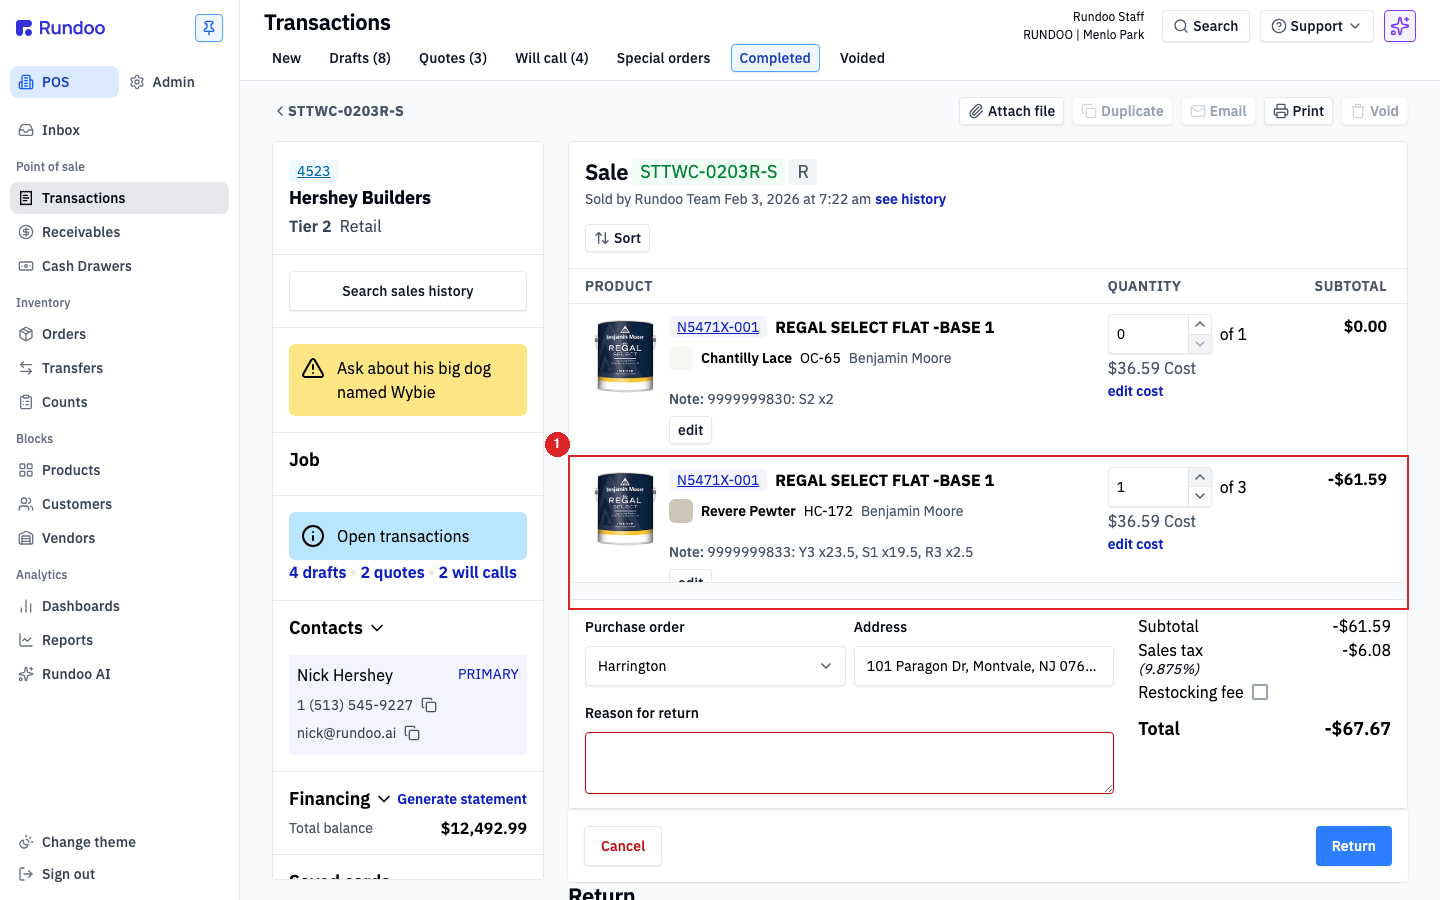
Pricing. No-receipt returns use today's price. Since there's no original sale to look up, Rundoo refunds the product at its current price (minus any active discount). If the price has changed since the customer bought, the linked path is the honest one; the no-receipt path is for when that's not possible.
Finishing up. Click Return to open the tender picker. The screen header switches from Sale to Return, and the primary button at the bottom reads Refund $X.XX instead of Charge $X.XX.
⚠️ Rundoo's no-receipt path is a trust exchange. The cashier is taking the customer's word for what they paid. Set a store policy for when it's OK (unopened item, known customer, under a dollar threshold, etc.) and brief cashiers to use the linked path whenever the sale can be found.
Linked returns: start from a past sale
The rest of this page walks the linked return flow, pulling up the original sale and processing the return from its detail page. This is the primary, recommended path.
The Returns-section admin toggles (see Return policy) control whether the cashier can bypass the link with a no-receipt return (see above) and whether the Reason for return sale note is required to complete the refund. Four toggles under Admin > Security > Returns: Skip linked returns in a new or draft transaction, Auto-apply returns to original invoices, Hide return confirmation popup, and Allow returns without a sale note.
Step 1: Find the past sale
From the Customers left tab, open the customer and stay on the Transactions top tab. Each row shows the sale ID (like KMJTG-0420RALG-S), the status pill (Completed), the job and PO, who rang it up, the date, and the total. Click the row for the sale coming back.
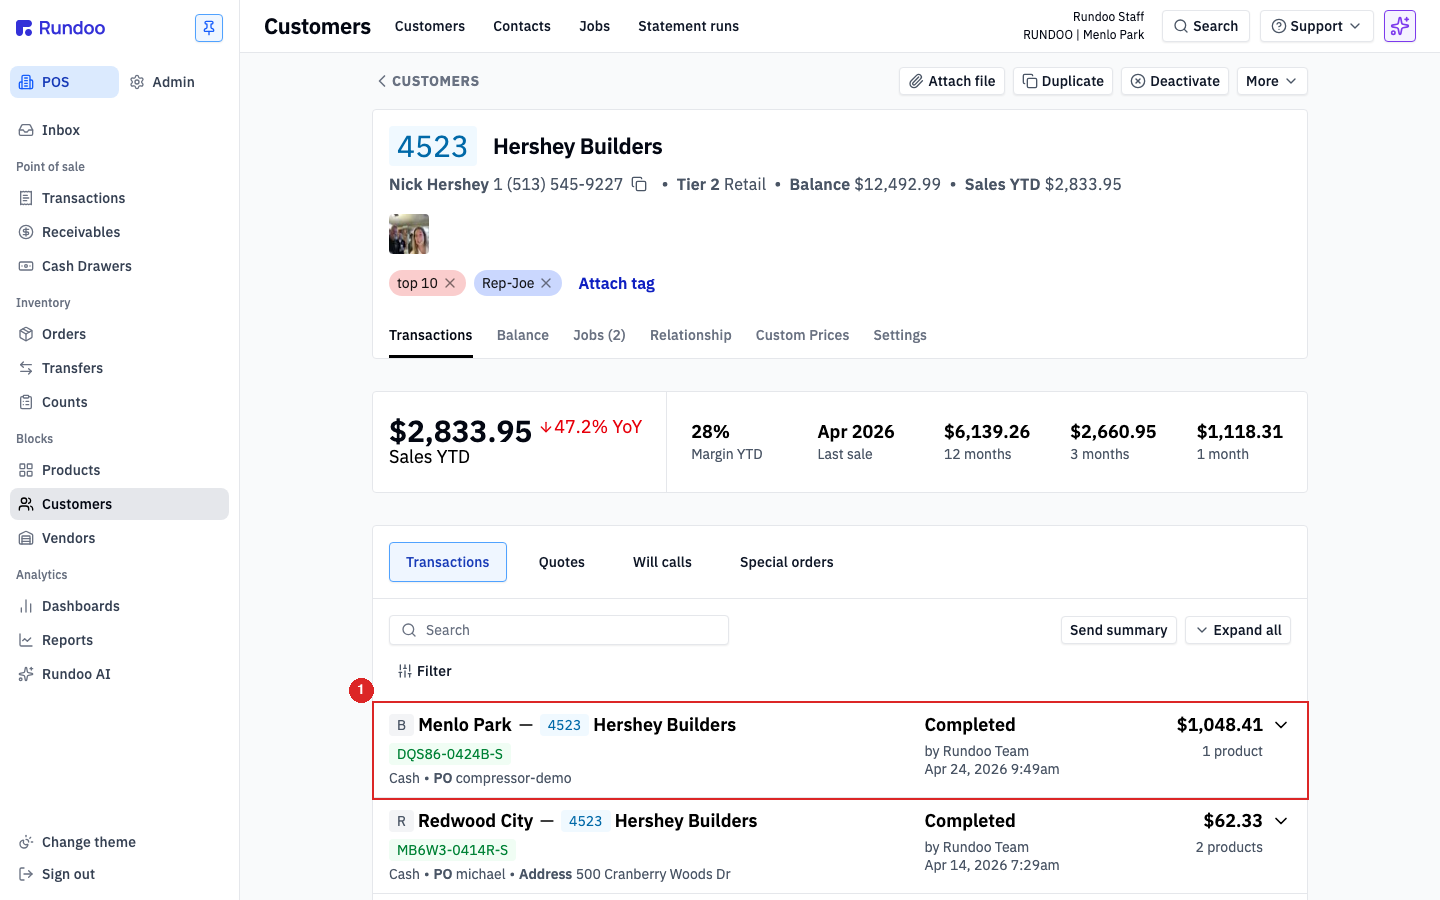
💡 Can't find the sale under the customer? The Search sales history button on the customer's left panel opens a broader search across their jobs and historical data.
Step 2: Start the return
On the completed sale's detail page, the top-right action cluster has Attach file, Duplicate, Email, Print, Return, and Void. Click Return, Rundoo opens the return builder with the sale's lines pre-loaded in the center panel.
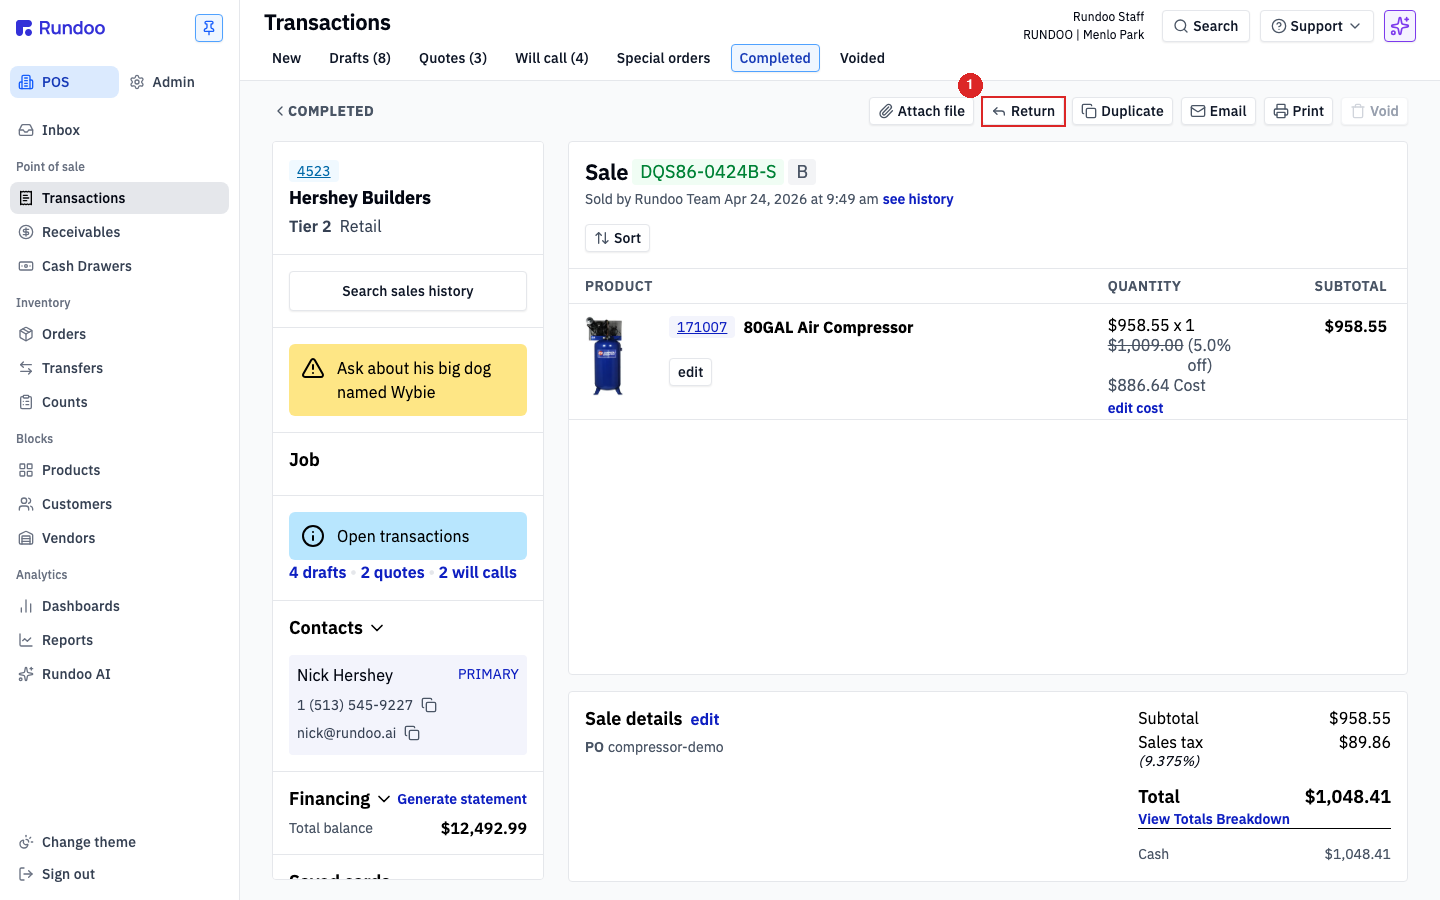
💡 The return builder lives at the same route as the sale, with
&action=issue_returnappended. Closing the tab and reopening the sale doesn't lose your work; reclick Return and the in-flight state is still there.
Step 3: Set quantity and reason
Each line from the sale shows up in the PRODUCT | QUANTITY | SUBTOTAL table with a stepper next to its original quantity (1 of 1, 5 of 12, etc.). Bump the stepper up to the amount coming back. Rundoo updates Subtotal, Sales tax, and Total live as negative values.
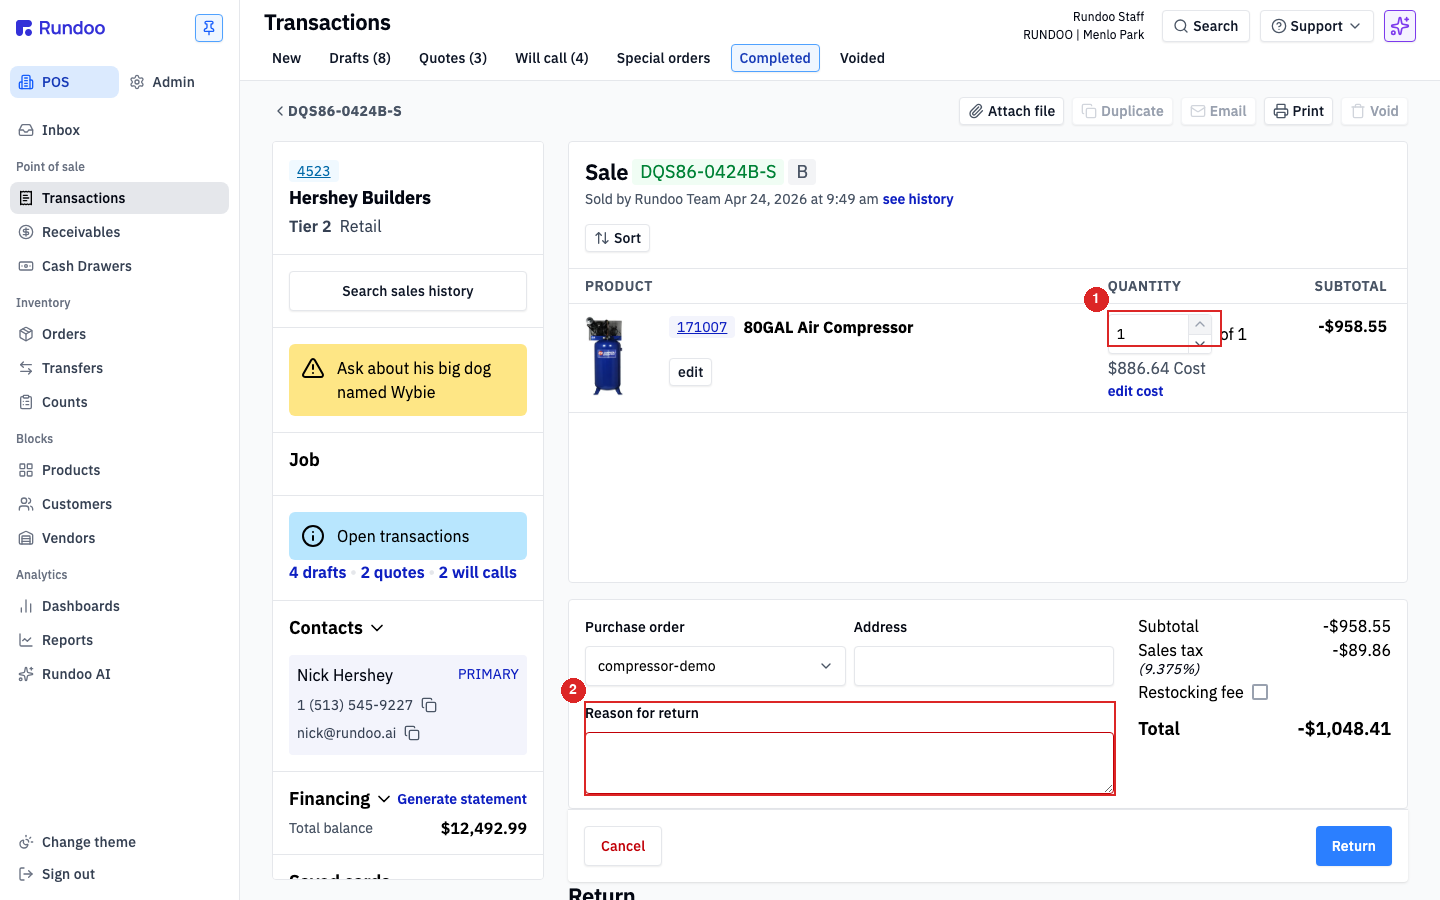
Scroll to the fields below the line table and fill:
-
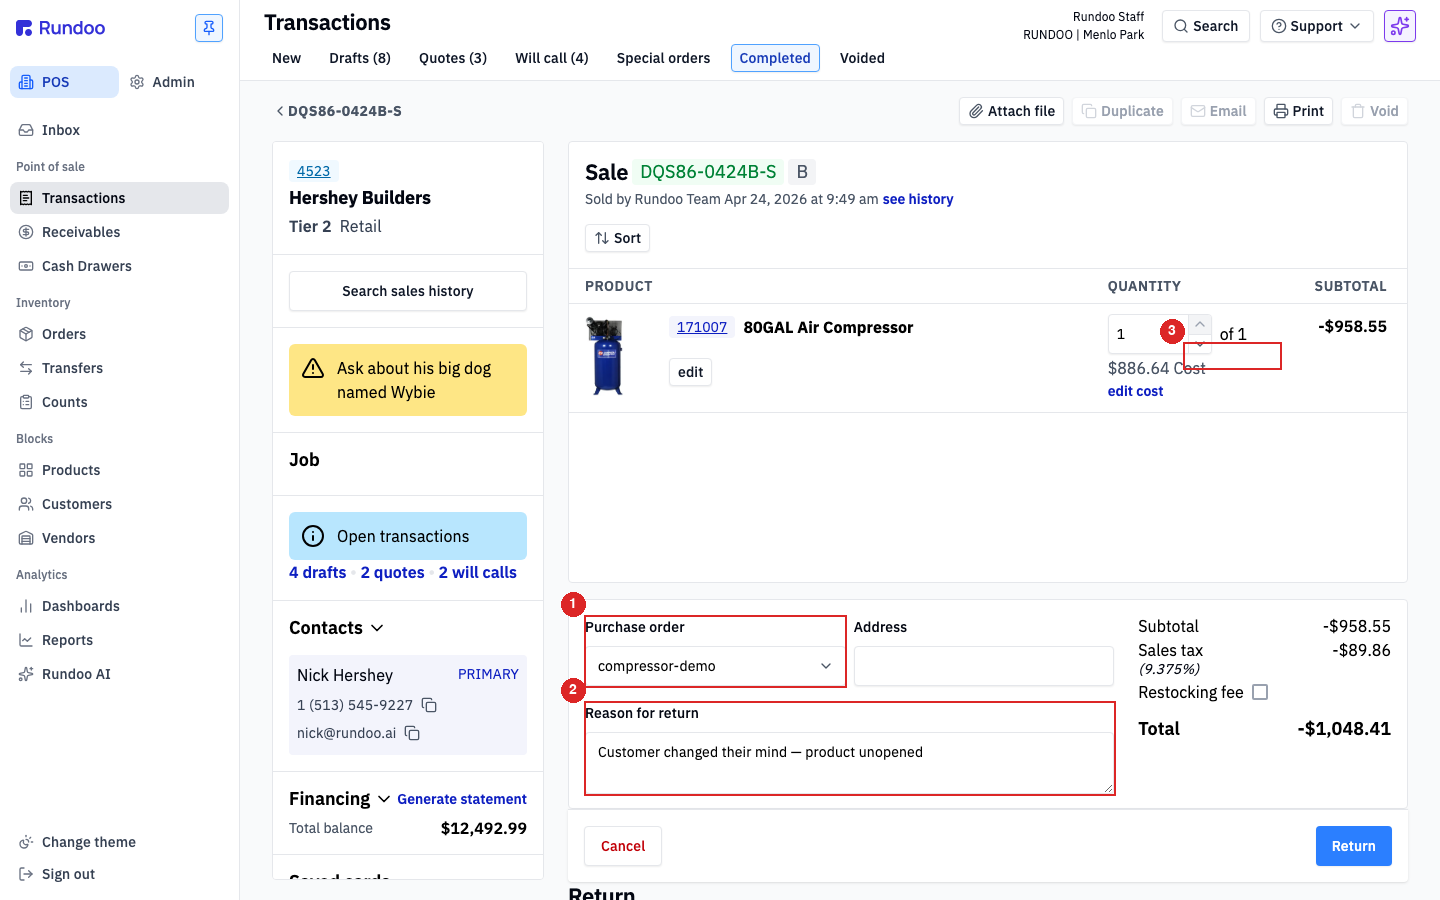
Purchase order (defaults to the original sale's PO; change or pick another existing PO, or click New PO to create one).
-
Authorized buyer. Required only when the customer's profile has
Require an Authorized buyer on every saleenabled in their Point-of-Sale settings (red border means it's a hard stop on this customer). When the customer doesn't require an authorized buyer, the field is optional. Pick the contact under the customer who's authorizing the return. -
Reason for return. Free-text. Write what's coming back and why ("Customer changed their mind, product unopened" / "Color didn't match the swatch" / "Damaged on pickup"). This text prints on the return receipt and saves against the sale for reporting. It's required by default; if your store has Allow returns without a sale note on in Admin > Security > Returns (see Return policy), it's optional.
-
Restocking fee. Checkbox in the right totals panel. Ticking it marks the return as subject to your store's restocking fee. That's it. Rundoo doesn't prompt for a dollar amount or a percent, and the checkbox doesn't change
Subtotal,Sales tax, orTotal. Your policy prose in Return policy states the rule. Heads up: the checkbox is a flag for your records, not a math operator. To actually collect a restocking fee in money, refund the return in full and ring up a separate sale for the fee amount on a fee SKU your store carries (e.g.RESTOCKING-FEE).
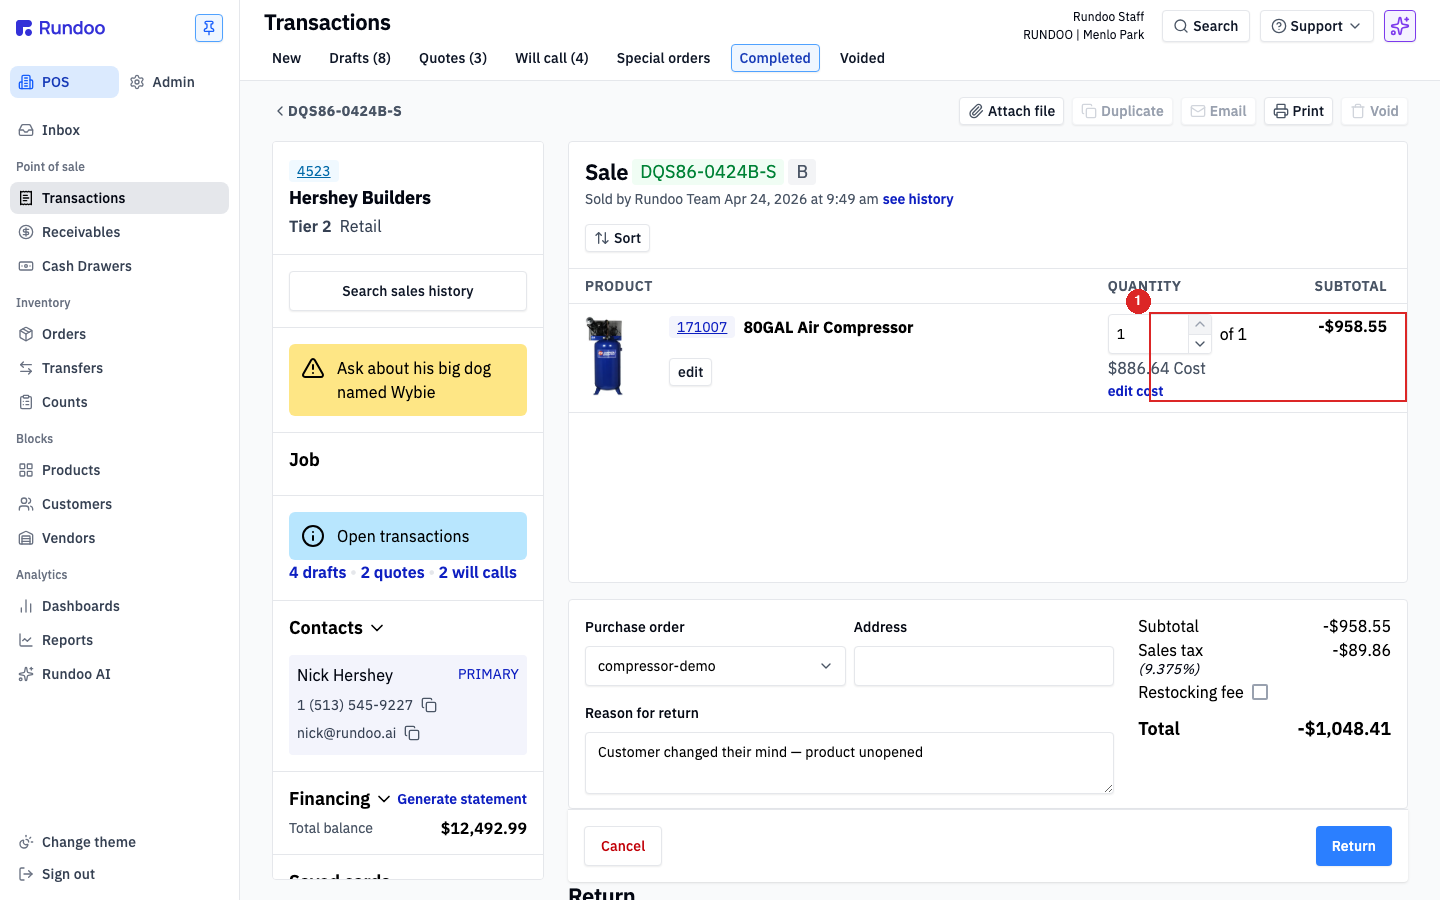
⚠️ Rundoo's return builder uses a single Reason for return free-text field. There's no dropdown of canned reason codes (
Damaged,Wrong size,Buyer's remorse). Cashiers write what happened. Consistent reason copy matters for reporting later. Consider a short internal convention for your store.💡 Receipt-linked returns price each line at the original sale's price, even if the product's price has changed since. That's the whole point of linking. Rundoo already knows what the customer paid.
💡 Restocked stock goes back into inventory automatically (at the location where the return is being rung). There's no "damaged" checkbox on the line itself. If the product came back broken and can't be resold, route it through an inventory adjustment after the return (see Inventory counts) rather than trying to express the condition on the return line.
Step 4: Pick the refund tender
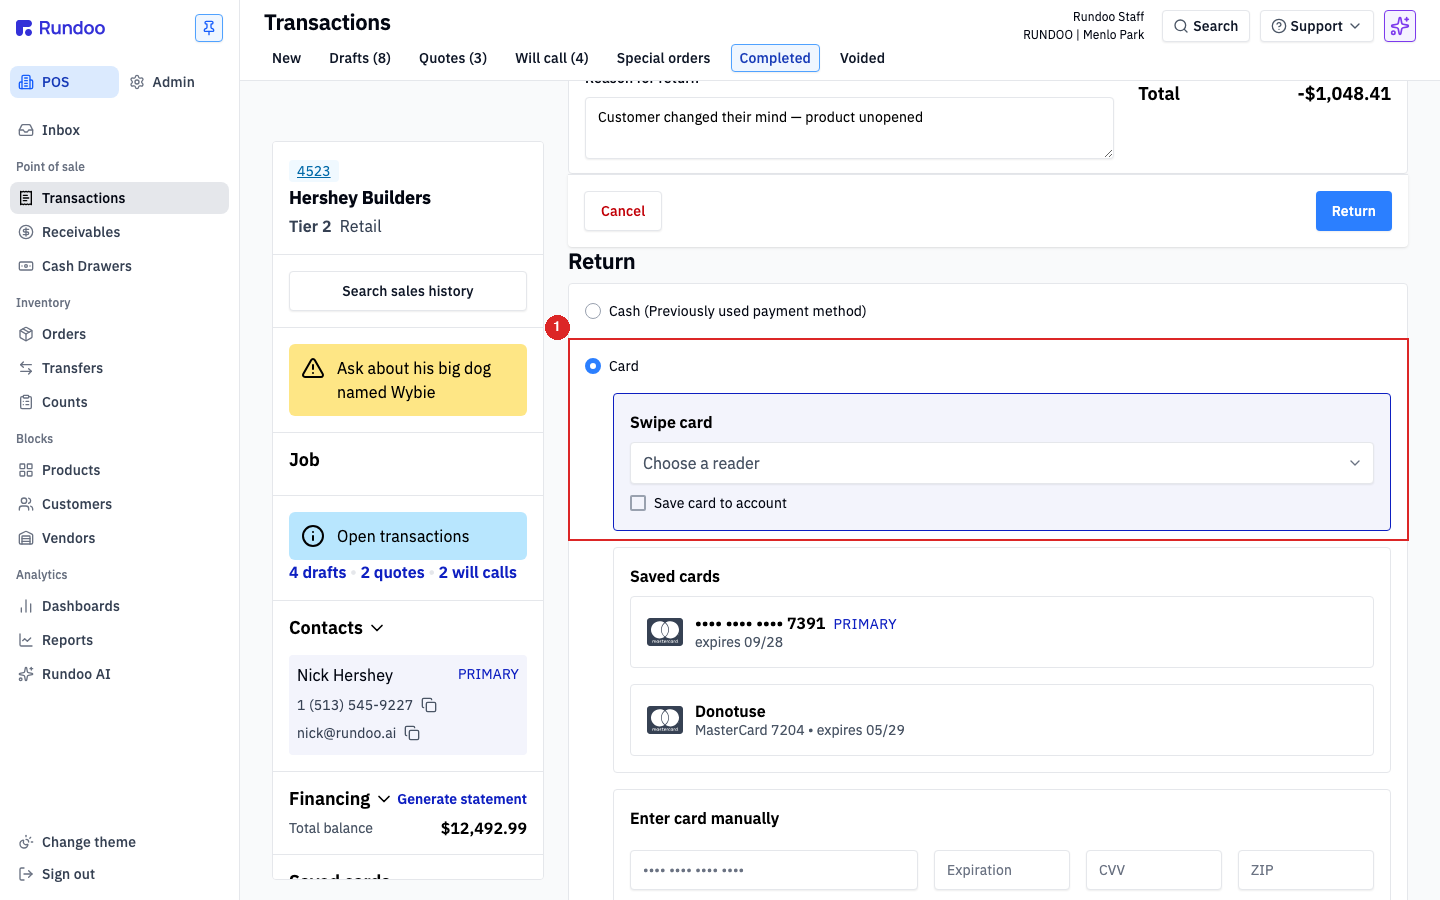
Below the return form, the Return section lists every tender method enabled for your company. The original tender is preselected. If the sale was Cash, Cash (Previously used payment method) is already checked with the default cash drawer. You can switch to a different tender (Card, Charge account, Check, Gift card, etc.). See Tender methods for the full list.
-
Cash. Picks the default cash drawer. Use Change drawer to refund from a different drawer (end-of-day on a different register, for example).
-
Card. Refunds to the original card on file, or enter a new card for manual refund. Stripe refund minimum:
$0.50. -
Charge account. Credits the amount back to the customer's AR balance. Use this when the sale used
Charge accountand you want the refund to reduce what they owe rather than cut cash. Shows up on their next statement. -
Check / Gift card / other tenders. Each tender's refund mechanics match its sale mechanics. See the per-tender notes in Sales and Tender methods.
⚠️ A tender missing from the return list isn't enabled. If you want to issue store credit on a gift card and
Gift cardisn't showing as a return tender (or any other tender you expect is missing), that tender isn't turned on for your company. Enable it in Tender methods and it appears here.💡 Want to issue store credit instead of a card or cash refund? Refunding to
Charge accountdoesn't put cash in the customer's pocket, it reduces their balance owed. If the customer wants store credit they can spend later without needing a charge account, refund to a Customer credit instead (see Customer credits).
Step 5: Complete the refund
Click Refund $X.XX on the selected tender row (the big blue button updates live with the refund amount). Rundoo processes the refund to that tender, marks the original sale lines returned, and drops you onto the completed-return view with Print and Email actions for the return receipt.
If you need to walk away without finalizing, the Cancel button above the tender list drops the in-flight return without saving.
⚠️ Once Refund fires, the return is final. Reversing it means running a new sale for the returned lines to put them back on the customer's books.
💡 For a swap (customer brings back one gallon of paint and wants a different one in exchange), don't run a return and then a separate sale. Use Exchanges instead. Exchanges handle the return + new sale in one transaction and avoid the weird accounting of "$0 net cash but real inventory movement."
Recommended Rundocs
-
Exchanges (trading a returned item for a different one on the same transaction).
-
Customer credits, store-credit balance that spends like a tender at checkout, including the store-credit variant of a refund.
-
Return policy (the admin settings for receipt-printed policy text and the Linked-returns toggles that control no-receipt returns).
-
Refunds, the tender-back mechanics for each method (card reversals, check refunds, charge-account credits).