
Rundocs › Pricing
Pricing tiers
Last updated 2026-07-08
Pricing tiers are the named price lists each customer sees at POS, Retail, Painter, Contractor, Employee, MSRP, whatever your store needs. Every customer is assigned exactly one tier, and when they're on a sale, Rundoo rings each line at that tier's price.
In the Admin mode, open Customer in the left sidebar (the Pricing tiers section sits at the top of the page).
How pricing tiers work
A tier is a named column of prices that attaches to a customer. Your MSRP tier might have REGAL SELECT MATTE -BASE 2 at $59.99; your Painter tier might price the same gallon at $49.99. When Nebo's Painting Service is attached to a sale, every line rings at Painter prices automatically. No one has to remember the discount.
Tier names surface everywhere a price does. On the Edit price modal on a cart line, you'll see every tier listed with its current price (Tier 1 Msrp, Tier 5 Painter, etc.). On a product's edit form, each tier has its own price field (Tier 1 price, Tier 5 price, and so on). Rename a tier and the label updates in all of those places.
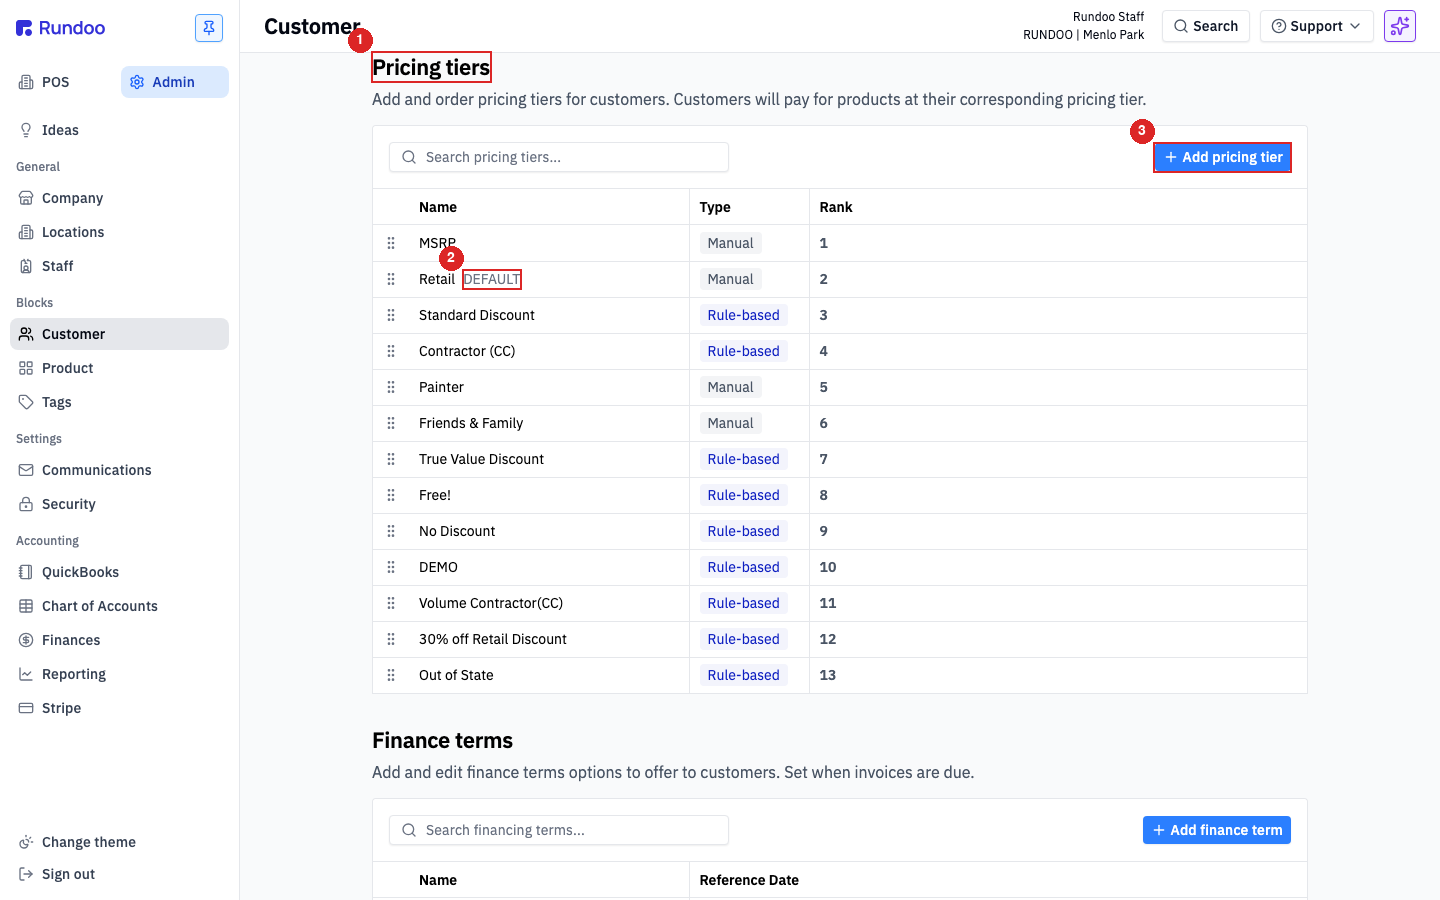
Tiers come in two types:
| Type | How prices are set | Good for |
|---|---|---|
| Manual | You type in a price per product per tier. Full control; full maintenance. | Your flagship list prices (MSRP, Retail), small named lists you want to hand-curate. |
| Rule-based | Prices are derived from a reference tier plus a rule ("10% off MSRP," "cost plus 25%," etc.). Rundoo recomputes as source prices or costs change. | Discount tiers tied to another list (Standard Discount, Contractor, True Value Discount), margin-locked tiers. |
One tier is marked DEFAULT. Any new customer created without an explicit tier pick inherits it (on the Add customer modal and on Customer imports). Change which tier is default by editing a tier and toggling Set as default.
Tier 1 is the fallback price. When a rule-based tier has rules that don't cover a particular product, that product rings at the Tier 1 price for that tier. So Tier 1 effectively backs every other tier, if you have a SKU that no rule on Tier 3 Standard Discount touches, Tier 3 customers pay the Tier 1 price on it. Worth a sanity-check whenever you debug "why did this customer pay full MSRP on this one weird product." If instead a customer's price is ringing lower than their tier (down near cost, or ignoring the tier entirely), the culprit is usually a custom price rather than the tier, see Why a custom price isn't applying at POS.
Adding a tier
From the Pricing tiers section, click + Add pricing tier in the top-right of the table. The New pricing tier modal opens.
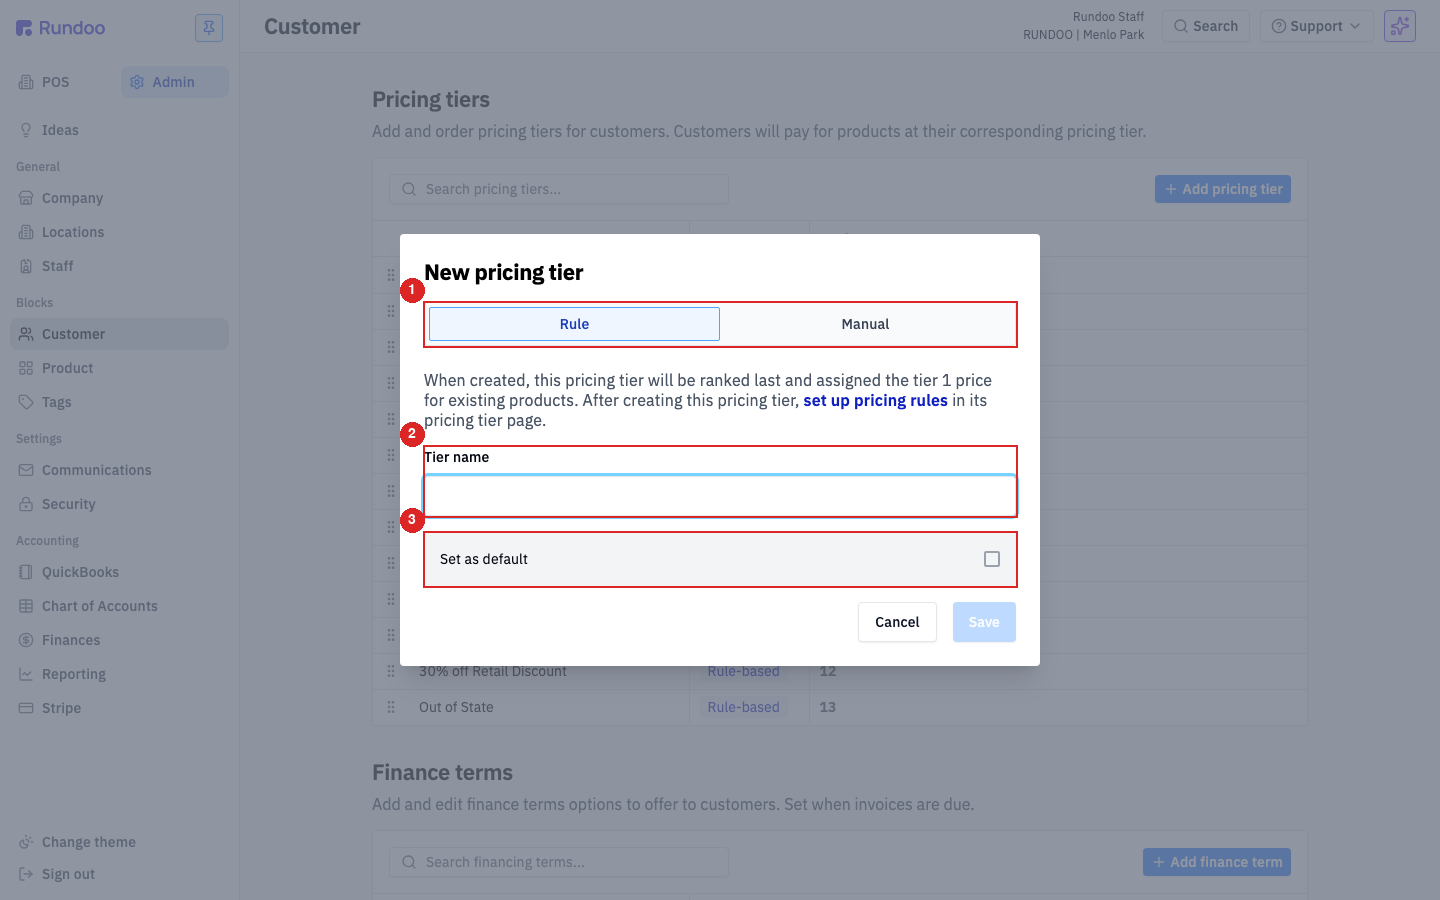
| Field | What it does | Default |
|---|---|---|
| Rule / Manual toggle | Pick the tier type. Rule-based tiers derive their prices from another tier plus rules; manual tiers hold a typed-in price per product. You can't change this after creation. | Rule |
Tier name |
What this tier shows up as, in the list, on the product edit form (Tier N price), on the Edit Price modal, and on customer detail pages. Use something recognizable at the counter. |
() |
Set as default |
Checkbox. If on, this tier becomes the new default, new customers inherit it. Only one tier is default at a time; setting this flips it off on the prior default. | Unchecked |
Click Save. The new tier lands at the bottom of the rank order, and (per Rundoo's note in the modal) every existing product gets the tier 1 price as its starting price in this tier. Go set up rules (for rule-based) or type in prices (for manual) to make it do something different.
Tier type is locked after creation, for every tier, not just Tier 1. Whether you set it Rule or Manual at create-time, that's the type for the lifetime of the tier. There's no flip later. If you want to switch, delete the tier and recreate it. Pick deliberately.
Adding a tier can take a while on a big catalog. Saving a new tier writes a price row for every product in your catalog, a few hundred SKUs is instant; tens of thousands can take a minute or two. Don't refresh; let the save finish.
Editing a tier
Click a tier's row in the list to open its detail page. The back-link at the top-left says ‹ PRICING TIERS; DELETE sits at the top-right.
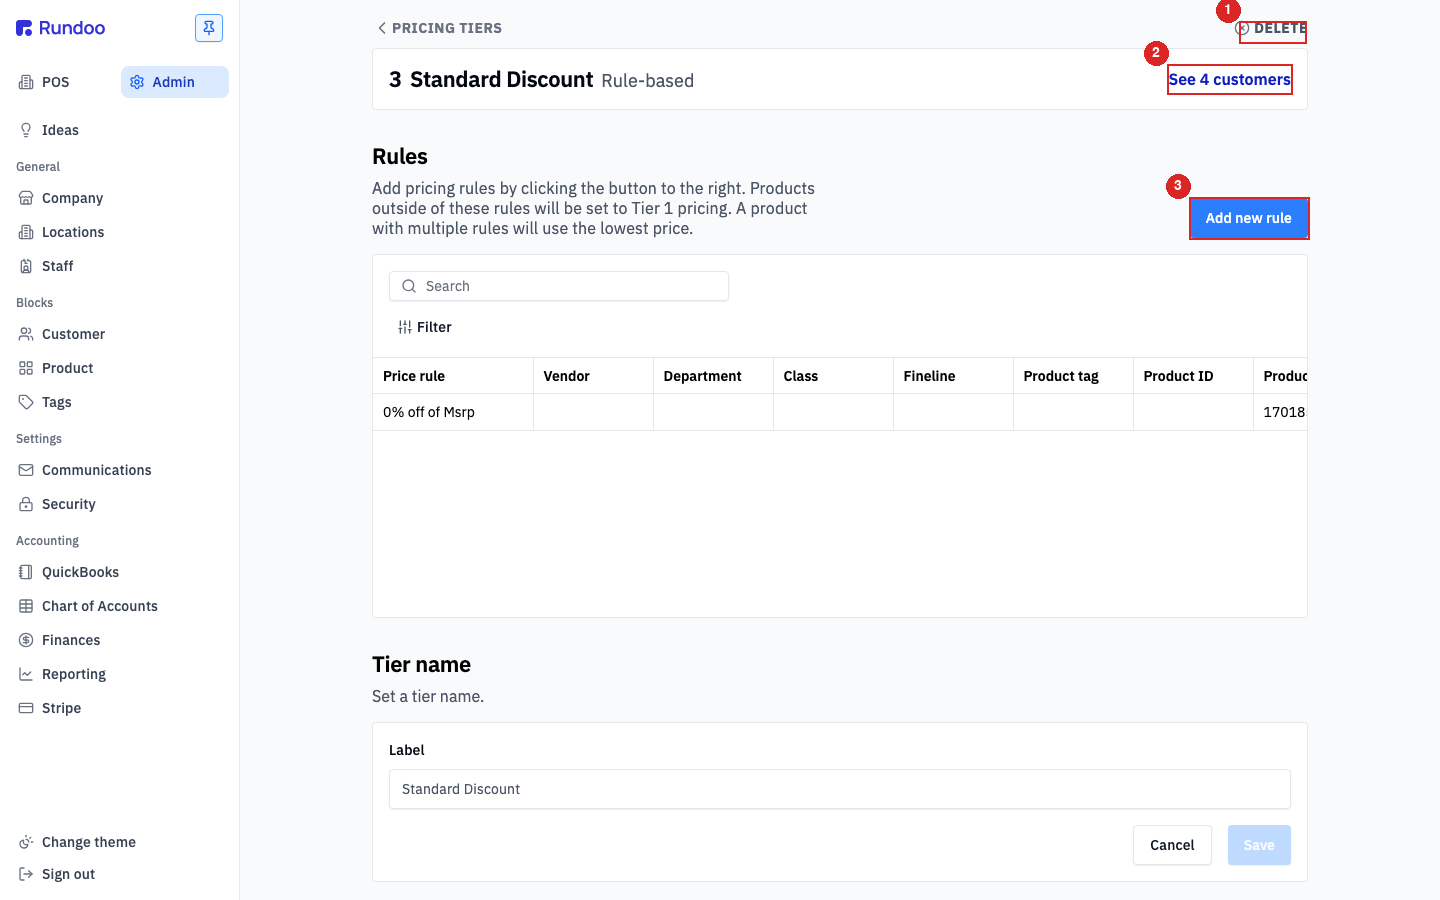
What you can edit depends on the type:
-
Rule-based tiers show a Rules section. Each rule says "price this slice of the catalog at
{strategy}of{reference tier}" (for example,0% off of MSRPon everything). Click + Add new rule to add one; click an existing rule to edit it. Rules can be scoped byVendor,Department,Class,Fineline,Product tag,Product ID, or a specificProduct. Products outside every rule fall back to the Tier 1 price. That's the note at the top of the Rules section, and it's easy to miss when you're debugging why one SKU looks wrong. -
All tiers show a Tier name section at the bottom with a
Labelinput. Rename the tier here. Save commits. -
The header strip shows the tier's rank number, name, type, and a See N customers link (click it to jump to every customer currently on this tier).
Rank controls precedence only when you're reordering. Rank doesn't change pricing, each customer pays their assigned tier's price regardless of rank. The rank exists so drag-and-drop on the list surface is deterministic and so the product edit form shows tiers in a consistent order.
Assigning a tier to a customer
Every customer has exactly one pricing tier. The assignment lives on the customer's detail page, not on the tier.
In the POS mode, open Customers in the left sidebar, click the customer's row, then open the Settings tab. Scroll to the Pricing tier section.
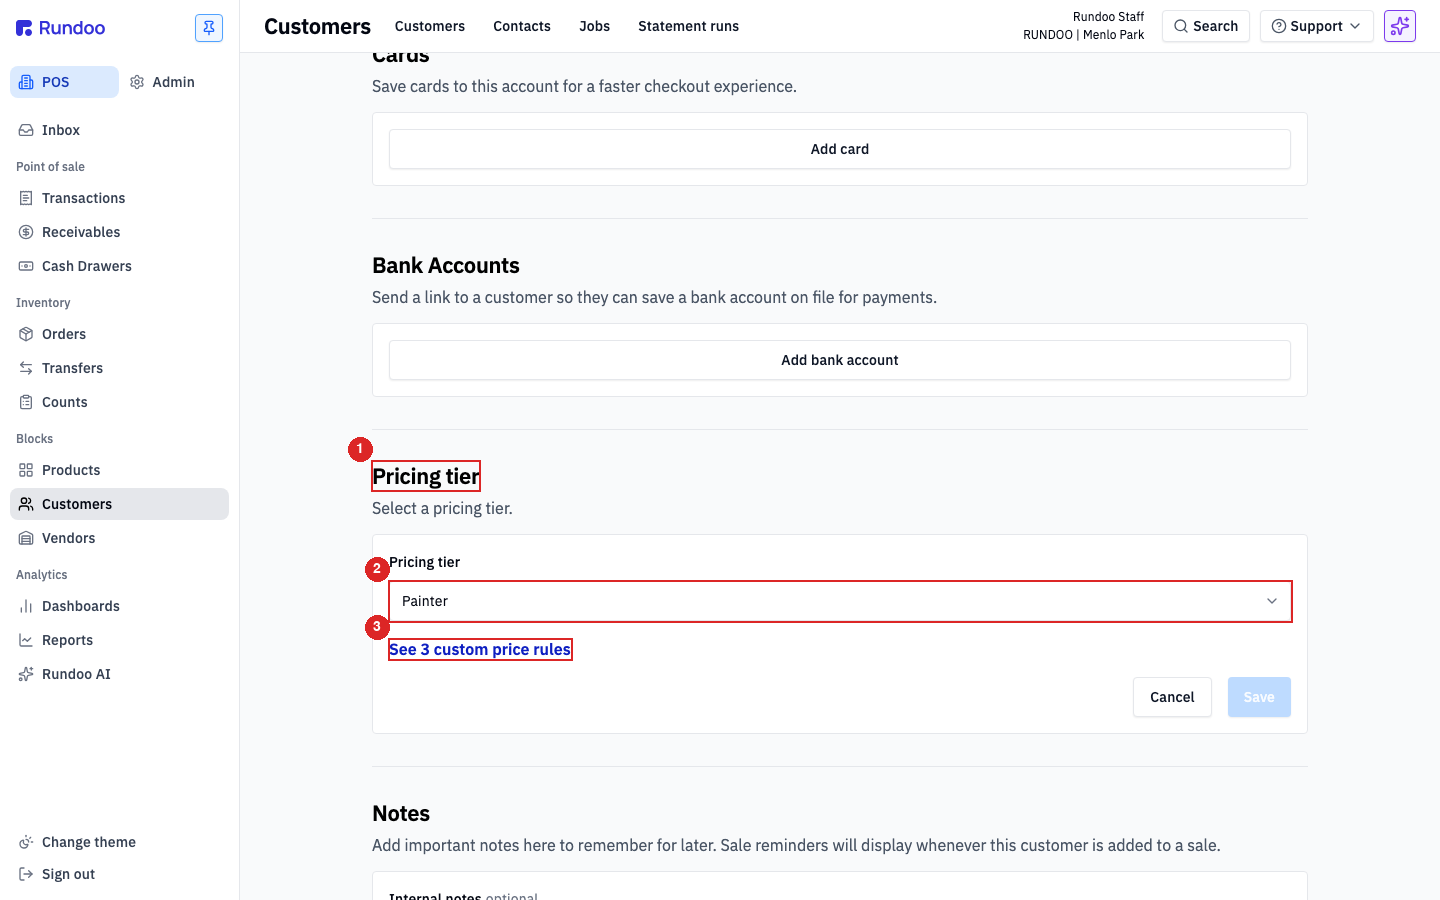
The Pricing tier dropdown lists every tier in the system. Pick one, click Save, and every sale attached to this customer from now on rings at that tier's prices.
The See N custom price rules link shows any per-customer overrides layered on top of their tier. Those are managed through Custom prices. Tier gives them the list; custom prices lets you nudge specific items.
New customers inherit the default tier automatically at the time of creation. See Customers for how that fits into adding a customer.
Changing a customer's tier is immediate. Their next sale rings at the new prices. It doesn't retroactively reprice past sales.
Deleting a tier
From a tier's detail page, click DELETE at the top-right. A confirmation dialog opens. What it says depends on whether the tier has customers on it and whether it's the default.
-
Normal delete. Dialog reads: "All customers assigned to {tier name} tier will be will be reassigned to your default pricing tier: {default name}." Confirm and Rundoo reassigns every customer on this tier to the default in one move. The tier's price column on every product is also removed.
-
No customers on the tier. Dialog reads: "There are no customers currently assigned to {tier name}." Confirm and the tier is deleted; nothing else moves.
-
Trying to delete the default tier. Dialog title reads: "Cannot delete {tier name}" with the banner "{name} tier cannot be deleted because it is the default." Set another tier as default first, then come back.
You can't delete the default tier. Set another tier as default first, then come back and delete the original. The confirmation dialog refuses otherwise.
If rules reference the tier being deleted (e.g., a rule-based tier priced at 10% off of Retail when you're trying to delete Retail), Rundoo blocks the delete and lists the dependent tiers. Update or remove those rules first.
Recommended Rundocs
-
Customers, attaching a tier to a customer, along with their Finance term, credit limit, and contact info.
-
Products, where the
Tier N pricefields on a product's edit form come from. -
Custom prices (per-customer overrides that layer on top of a tier).
-
Creating Promotions (time-bounded discounts that reference a tier as their baseline).