
Rundocs › Inventory
Product labels
Last updated 2026-07-27
Product labels are the price stickers, barcode tags, and shelf labels you print for your Products (a Dymo-style label for a paint can, a shelf tag for a hardware SKU, a reprint when a price changes). This page covers printing one product's label from its detail page, bulk-printing and resetting labels from the Products list, reprinting or resetting labels after a price change, designing the templates those prints come off of, and getting your label printer talking to Rundoo.
In the POS mode, open Products in the left sidebar. Single-product printing lives in the action cluster on the product's detail page; bulk printing lives in the bulk-action row at the bottom of the Products list; template design lives in the Admin mode, under Product.
Printing a single product's label
Open the product from the Products list, then click Print label in the action cluster at the top-right of the detail page. Handy at the counter when a customer asks for a fresh shelf tag, when a new SKU lands and you want a sticker on the bottle, or when you've reshuffled a display and need a tag for the new slot.
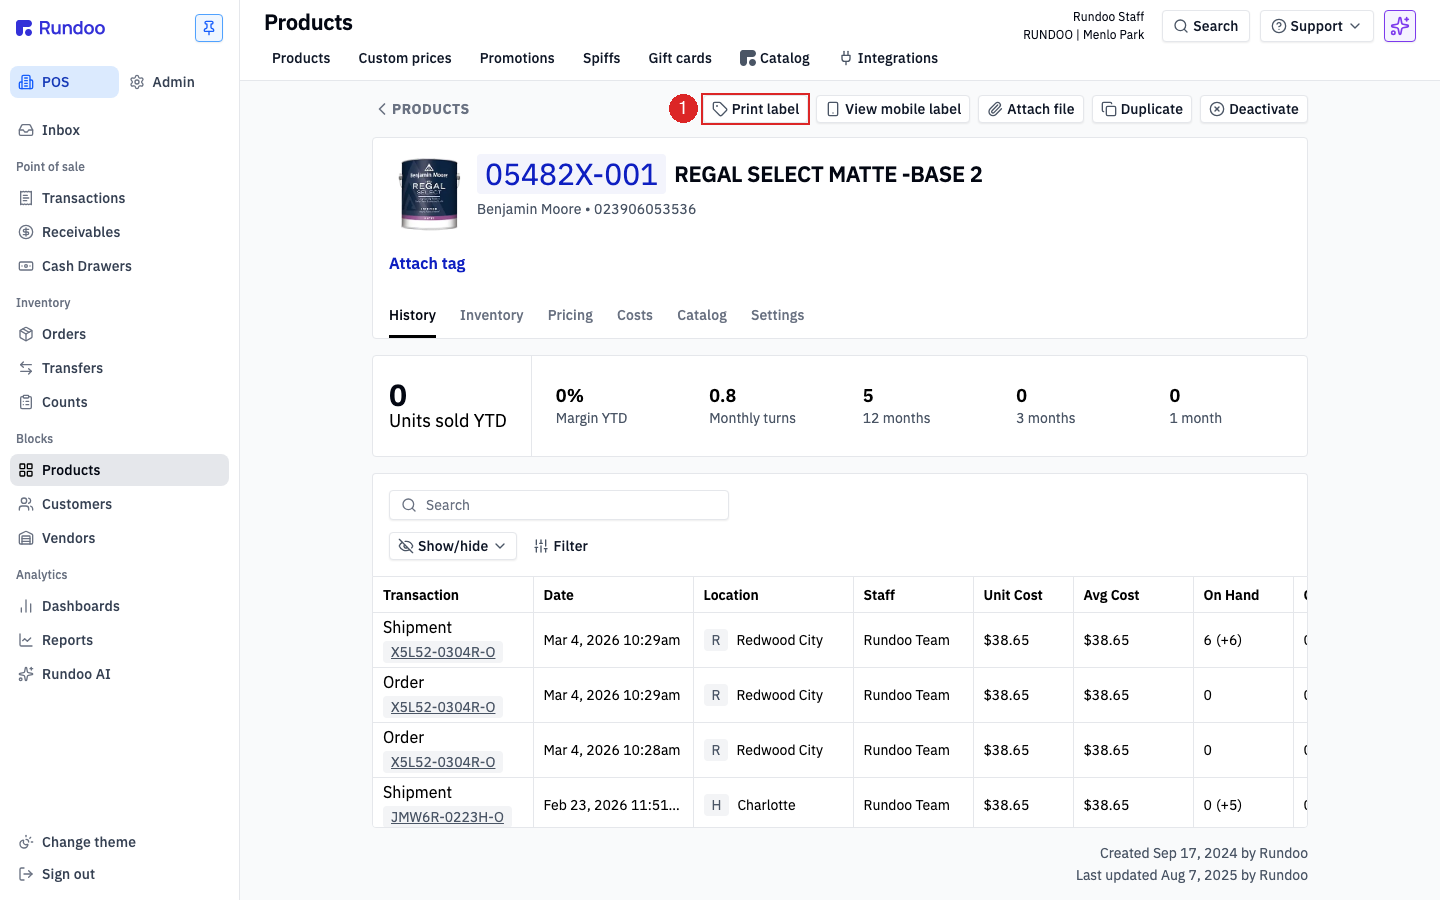
Print label opens a small Print label dialog with three fields.
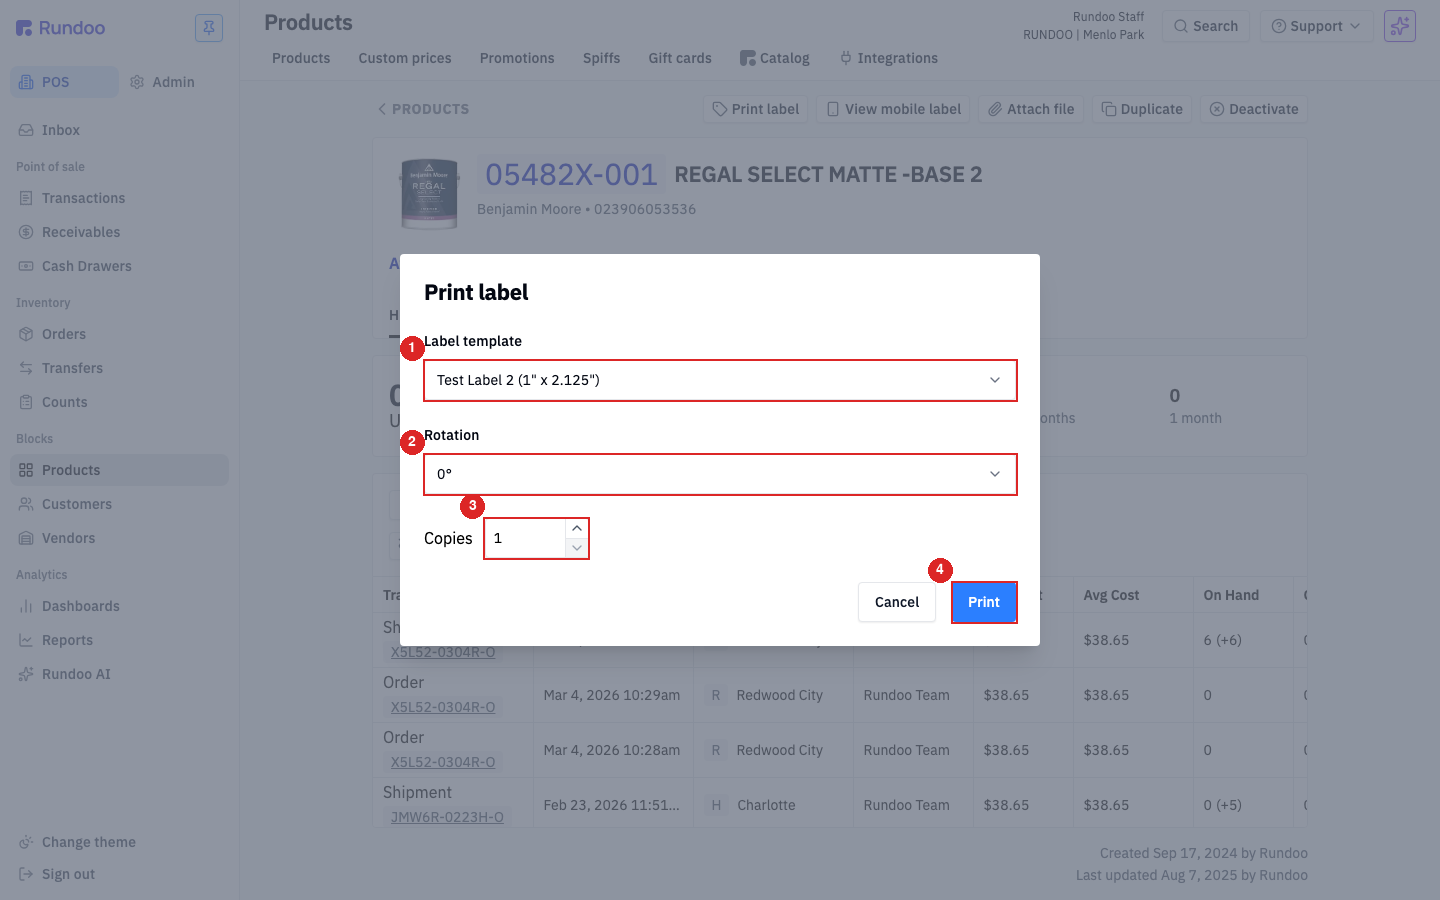
| Field | What it does | Default |
|---|---|---|
Label template |
Which saved label design to use. The dropdown lists every label template saved in the Custom Label Designer (see below). Each entry shows its name and size, e.g. Test Label 2 (1" x 2.125"). |
The most recently used template. |
Rotation |
Rotates the print in 90° increments, useful when your roll feeds sideways. | 0° |
Copies |
How many identical labels to print. Stepper up/down or type a number. | 1 |
Click Print to send the job to the label printer configured on this workstation. The dialog closes; the printer starts spitting labels within a second or two.
The View mobile label button right next to Print label in the action cluster shows the same label as a QR you can scan with a phone (handy when a staff member is doing a floor walk on an iPhone or iPad and doesn't have a label printer nearby).
Bulk printing labels
Printing one label at a time is fine at the counter; bringing in a new vendor catalog or refreshing shelf tags across a department calls for the bulk flow.
In the POS > Products tab, check the boxes at the left of the rows you want labels for. The row checkbox turns blue; a bulk-action row appears at the bottom of the table showing N products selected on the left and a cluster of bulk actions on the right: Print labels, Reset labels, Add to, Download spreadsheet.
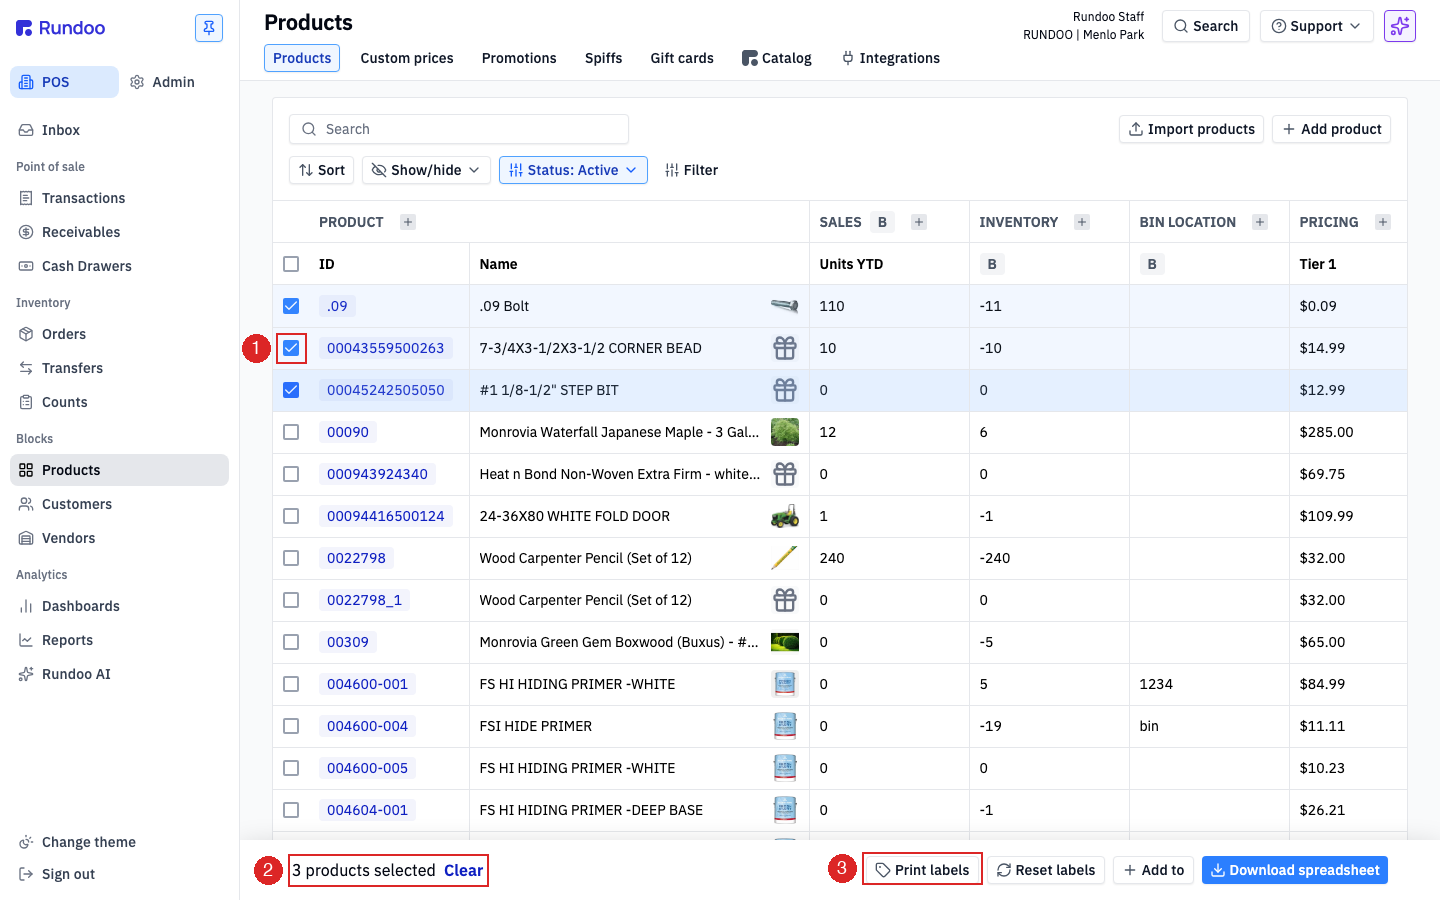
Click Print labels to open the same Print label dialog (template, rotation, copies) but this time Copies is the per-product count (set it to 1 to print one label each for the selected products, 2 for two each, and so on). Click Print and Rundoo sends the whole batch to the label printer in one job.
Reset labels isn't "clear selection". It's a second bulk action that reprints the selected products' labels using the last template and quantity you used on each, without reopening the dialog. Useful when a shelf move means you need to reprint yesterday's batch with the same settings; risky if you meant to change the template first. If you want to clear the selection, click Clear next to the N products selected count instead.
If you want labels for a filtered slice of the catalog (e.g. every product in a fineline, or everything below a reorder point), use the Products list's Filter + column sorts first, then Select all in the bulk-action row to grab the whole filtered result. Pair with a custom column layout (Show/hide) to scope your selection tighter than scrolling by hand.
What the printed label looks like
The Print label dialog sends the job to the configured printer; what comes off the roll is a sticker like this (a typical paint shelf-tag template at 2” × 1”, product name + tint info + vendor + barcode + price, with the price on the right):
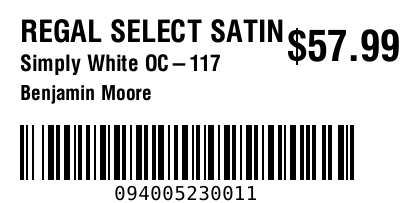
The specific fields, font sizes, and layout come from whichever Label template you picked in the dialog above. The next section is where you design those.
Label formats and templates
The label templates you see in the Label template dropdown aren't baked into Rundoo (you design and save them yourself in the Custom Label Designer), and every location in your company shares the same set.
In the Admin mode, open Product in the left sidebar, scroll to the bottom of the page, and you'll find the Custom Label Designer section. It's a side-by-side editor: template settings on the left, a live preview on the right.
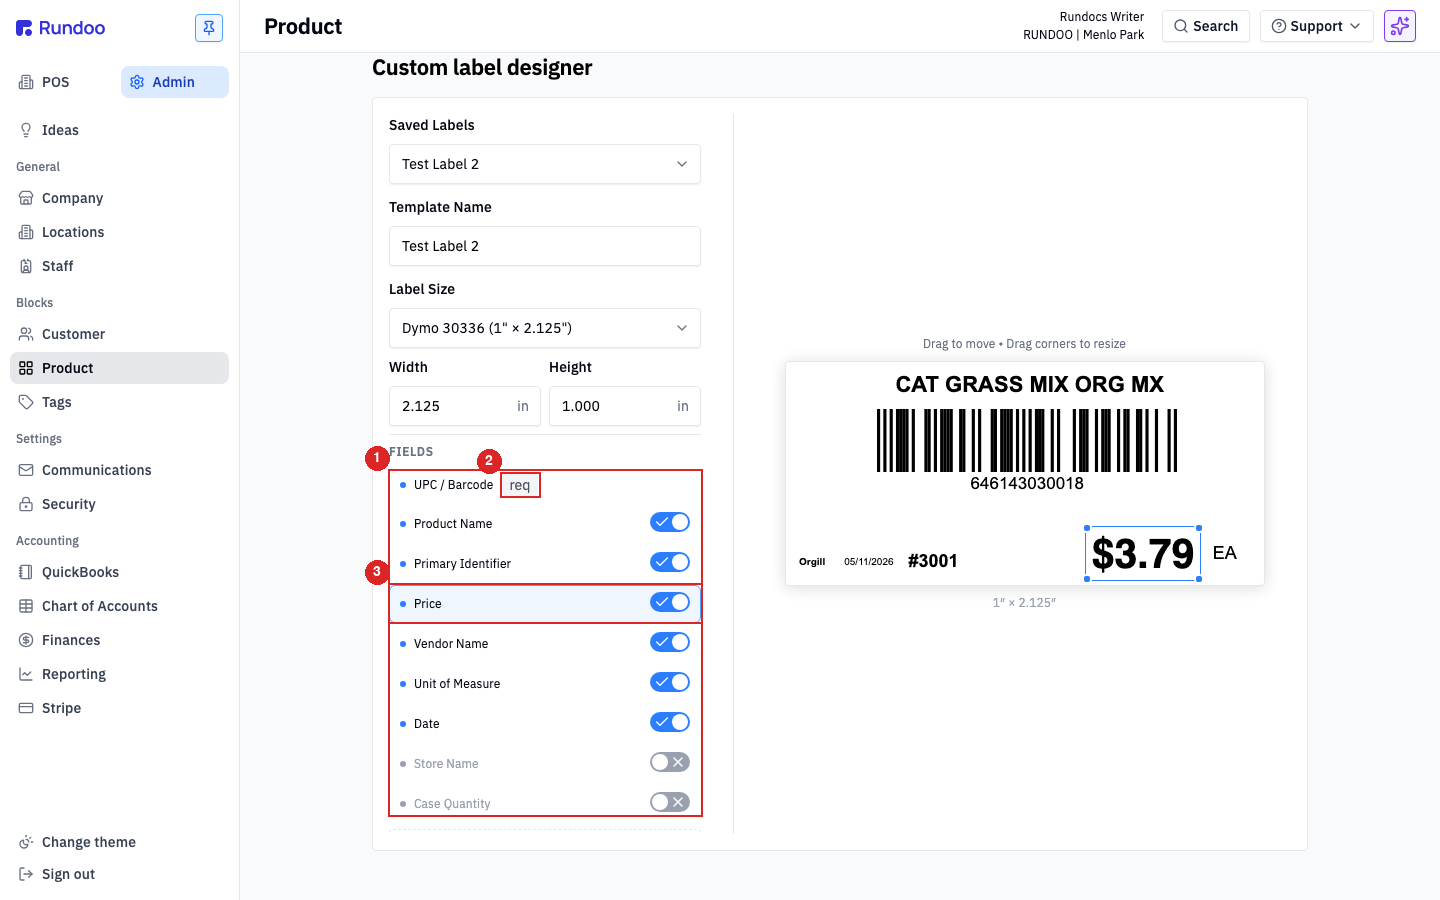
The controls, top to bottom:
-
Saved Labels, a dropdown listing every label template already designed. Pick one to edit it; pick another to start from scratch. -
Template Name, the human-readable name that shows in the Print label dropdown (Test Label 2,Paint Can Front,Aisle Tag, etc.). -
Label Size, the physical sticker format. Pick a preset from the dropdown (defaults toAvery 5160 (1" × 2.625");Dymo 30336 (1" × 2.125")is the most common shelf-tag size) and Rundoo fills in Width and Height for you. Set Width and Height manually if you're on non-standard stock. -
FIELDS(the data fields available for the label). Each row is a toggle: flip a field on and it appears on the preview live; flip it off and it disappears. The nine fields:UPC / Barcode,Product Name,Primary Identifier,Price,Vendor Name,Unit of Measure,Date,Store Name,Case Quantity.UPC / Barcodecarries areqpill. Its toggle is locked on, so every label includes a barcode. Click any row (or the field on the preview) to select it for editing; the styling panel appears below the FIELDS list with Size, Bold,$ Symbol(for Price), Font, and a POSITION block (Anchor, Align, and R/B percentage offsets) for fine placement. Once selected, the field on the preview can also be nudged by dragging. The tag line above the preview readsDrag to move • Drag corners to resize. -
Add Static Field. Drop fixed text onto the label (store slogan, "Made in USA," a promo line). Unlike the data fields above, static text doesn't change per product. -
Font controls (below the preview),
Arialfont dropdown,↔ Hhorizontal alignment,↕ Vvertical alignment, size stepper. Select a field in the preview first, then tweak. -
Save / reset / delete. At the bottom:
Save Designcommits the label template (new or edited);Reset to Defaultwipes your layout back to Rundoo's starter layout for that size;Delete Designremoves the label template entirely from the Saved Labels list.
Once saved, the label template shows up in every cashier's Print label dropdown immediately. No republish step.
Most stores end up with two or three label templates: a small shelf tag for display (barcode + product name + price), a larger tag for paint cans or heavy stock (product name + vendor + price), and occasionally a dedicated promo or date-stamped sticker. Keep the template names short, the Print label dropdown shows the full string.
Reprinting or resetting labels after a price change
When you bump prices (a Benjamin Moore tier reset, a vendor cost change, a department-wide markup) the bulk-print flow above is the cleanest reprint path:
-
In POS > Products, filter or sort to the products whose prices changed (use Filter, or sort by a recently-edited column).
-
Check the row checkboxes for the products you want fresh labels for. The bulk-action row appears at the bottom of the table.
-
Click Print labels, pick your shelf-tag template, and click Print.
If you've already done one price-change reprint with the same template, Reset labels (right next to Print labels) reprints the selected products' labels using their last-used template and quantity. No dialog. Convenient when the only thing that changed is the price.
"Reset my labels" is this button. When you need to reset or reprint your labels (for one location or the whole shop), that's the Reset labels bulk action above, not a back-office request. Labels aren't scoped to a store on their own, so you reset them by picking the products you want: filter the Products list down to the ones you're after (by department, tag, or the Price change since print filter), check the rows, then click Reset labels.
Custom prices and per-customer pricing tiers don't affect printed shelf labels. Labels always show the product's base Price (the retail price set on the product), not a customer-tier price. Painter-tier and custom prices surface on the cart and the receipt, not on the shelf tag.
Hiding price or cost on labels
Two questions come up a lot at the counter: "Can I print this without the price?" and "Can I print without the barcode?" The answers split:
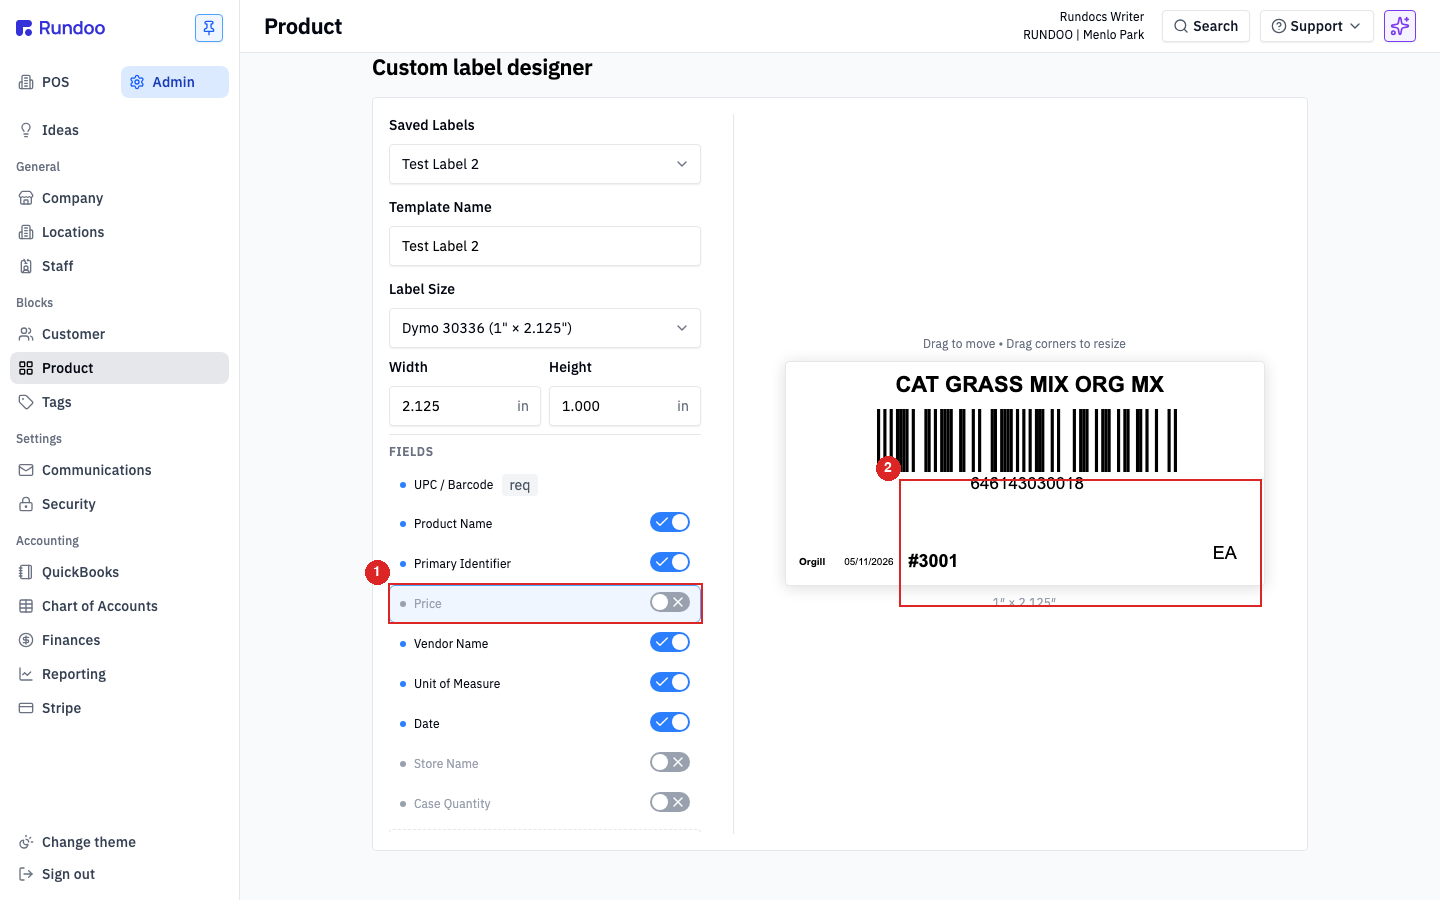
- To print without the price, design a label template with the
Pricetoggle turned OFF. Open the Custom Label Designer, flip thePricerow's toggle off (it disappears from the preview live) then save the template under a distinct name (e.g.Shelf Tag (no price)). Cashiers can pick that template from the Print label dropdown whenever a customer asks for a price-less sticker.
-
You can't print without a barcode. The
UPC / Barcoderow carries areqpill and its toggle is locked on. Every Rundoo label includes a barcode by design. It's how the product is later scanned at the register or counted in inventory. If a sticker genuinely needs to be barcode-less (a hand-written shelf talker, a promo card), that lives outside Rundoo (a hand-written tag or your label printer's own software). -
Cost never appears on printed labels. The
Costfield (what you pay the vendor) isn't in the designer'sFIELDSlist (there's no toggle for it). Printed labels only ever show the nine fields above, andPriceis your retail price, not cost. So cost is safe by default.
Keep a No price template alongside your standard one instead of editing the default. It's faster to switch templates in the Print label dialog than to re-edit a saved design every time.
Label printer setup
Rundoo prints labels through the Rundoo Print Service (the same small app that handles receipt printing). If the print service is running on the workstation and the label printer is plugged in (USB for Dymo, network for Zebra), Rundoo will see it automatically and Print label just works.
When it doesn't, start with the usual suspects: print service running, printer powered on, the right label size loaded. The full checklist (including which drivers Dymo and Zebra need, how to re-pair a printer, and what to do when a job sits in the queue) lives in Printer troubleshooting.
Label size in the label template must match the roll you've loaded. Rundoo happily sends a 1" × 2.125" job to a printer loaded with 1.125" × 3.5" stock and vice-versa. The printer prints exactly what you asked for, just onto the wrong paper. If labels come out truncated or shifted, check Label Size in the label template before blaming the driver.
Use Chrome (or another Chromium-based browser) for the label designer and the Print label dialog. Other browsers can drop the Rotation setting, selecting 90° on a 1×2 Dymo label can still print vertically, or rotate further than asked. If rotation is coming out wrong on Dymo stock, switch to Chrome first (see Internet, Computer, Monitor, and Printer Compatibility for the full browser checklist) before re-editing the template.
Recommended Rundocs
-
Products, the detail page every single-label print starts from.
-
Printer troubleshooting, diagnosing a label printer that isn't printing.
-
Product imports, bulk-creating products so you have rows to bulk-print labels for.