
Rundocs › Admin & Settings
Sale forms
Last updated 2026-05-22
Sale forms are reusable mini-forms that pop up at POS when certain products land in the cart, a prompt for DOB when an age-restricted item is rung up, room dimensions for a carpet sale, blade count for a sharpening service. You build them once under Admin > Product, attach them to specific Products, and the cashier sees them automatically during checkout.
In the Admin mode, open Product in the left sidebar and scroll to the Sale forms section (it sits below Product categories and above Deposits).
What a sale form is
A sale form is a small structured data-capture form attached to a Product. When a cashier adds that product to a cart, Rundoo opens the form and asks them to fill it in. The answers attach to the sale and show on the sale record, the receipt, and (for age-restricted goods) any compliance audit trail.
Two things sit on every form:
-
A form name, what the form is called in the picker on the product's Settings tab. Most stores name the form after the product or use-case:
Age Restricted Item,Blade sharpening,Carpet install measurements,Extension Ladders. -
One or more fields, each field has a
Field name(what the cashier sees as a prompt) and aField type(how it's captured, a plain text field by default).
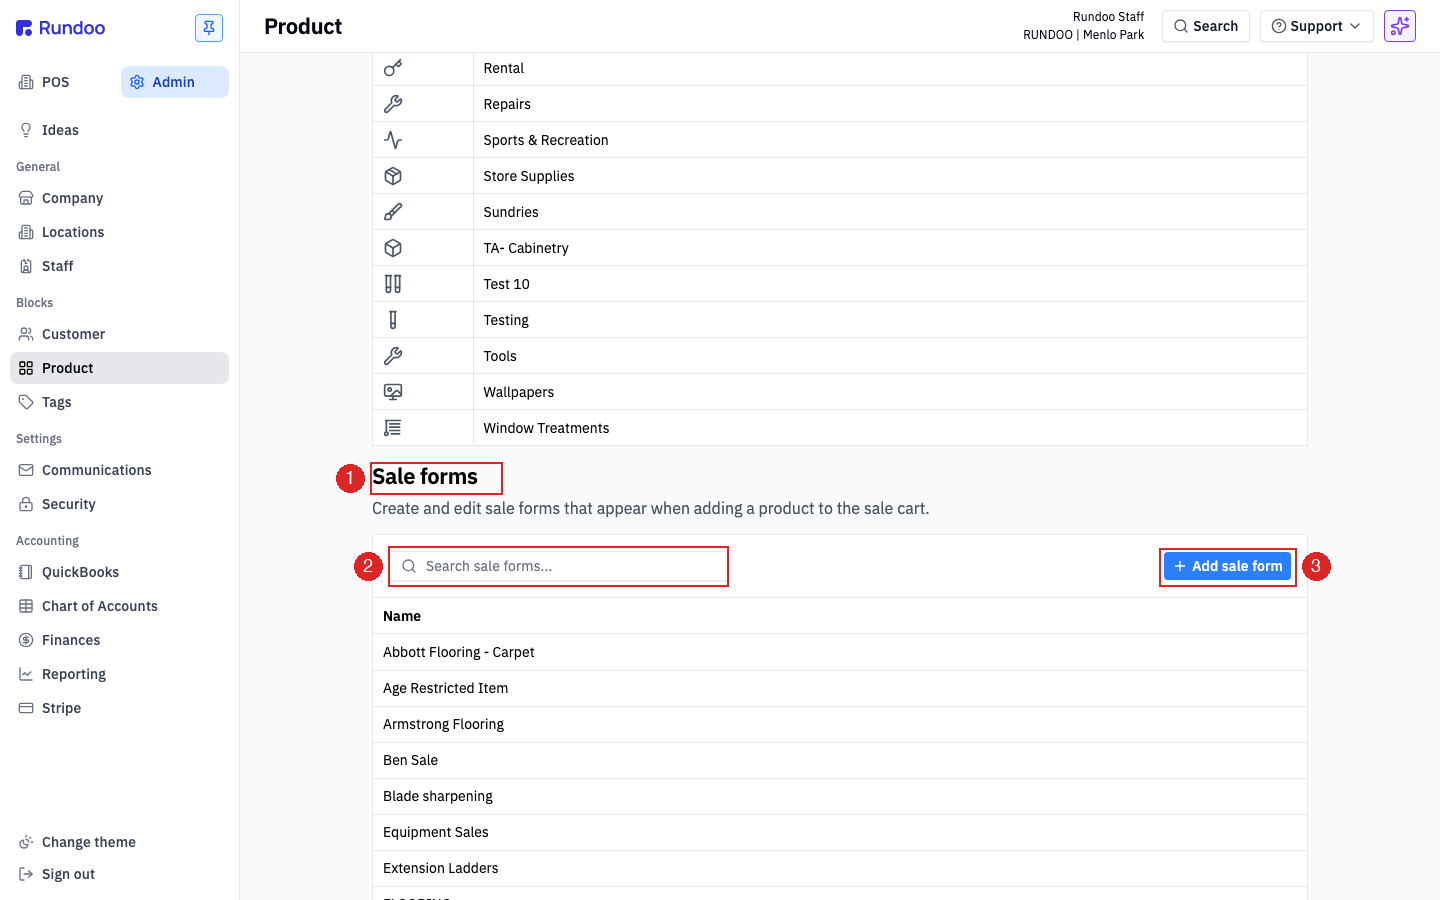
Every form also gets a Notes field for free. The modal explains this: "A notes field will by default be part of the form." Don't add a second notes field of your own. Use the built-in one for free-form context the cashier jots down at the counter.
Adding a sale form
Click Add sale form at the top-right of the section. The New sale form modal opens with the Form name input and one empty field row.
-
Type a Form name. Keep it short and recognizable. It's what you'll pick from a dropdown on the
Product's Settings tab. -
Fill in Field name with the prompt you want the cashier to see (
Room size (sq ft),DOB,Blade count,Height,Duty rating). -
Pick a Field type. The default is
Text field, a free-form string input. Use that unless your version of Rundoo exposes other types. -
Click Add another field to stack on more fields. There's no cap; keep it short. This is a cashier filling it in at the register, not an intake form.
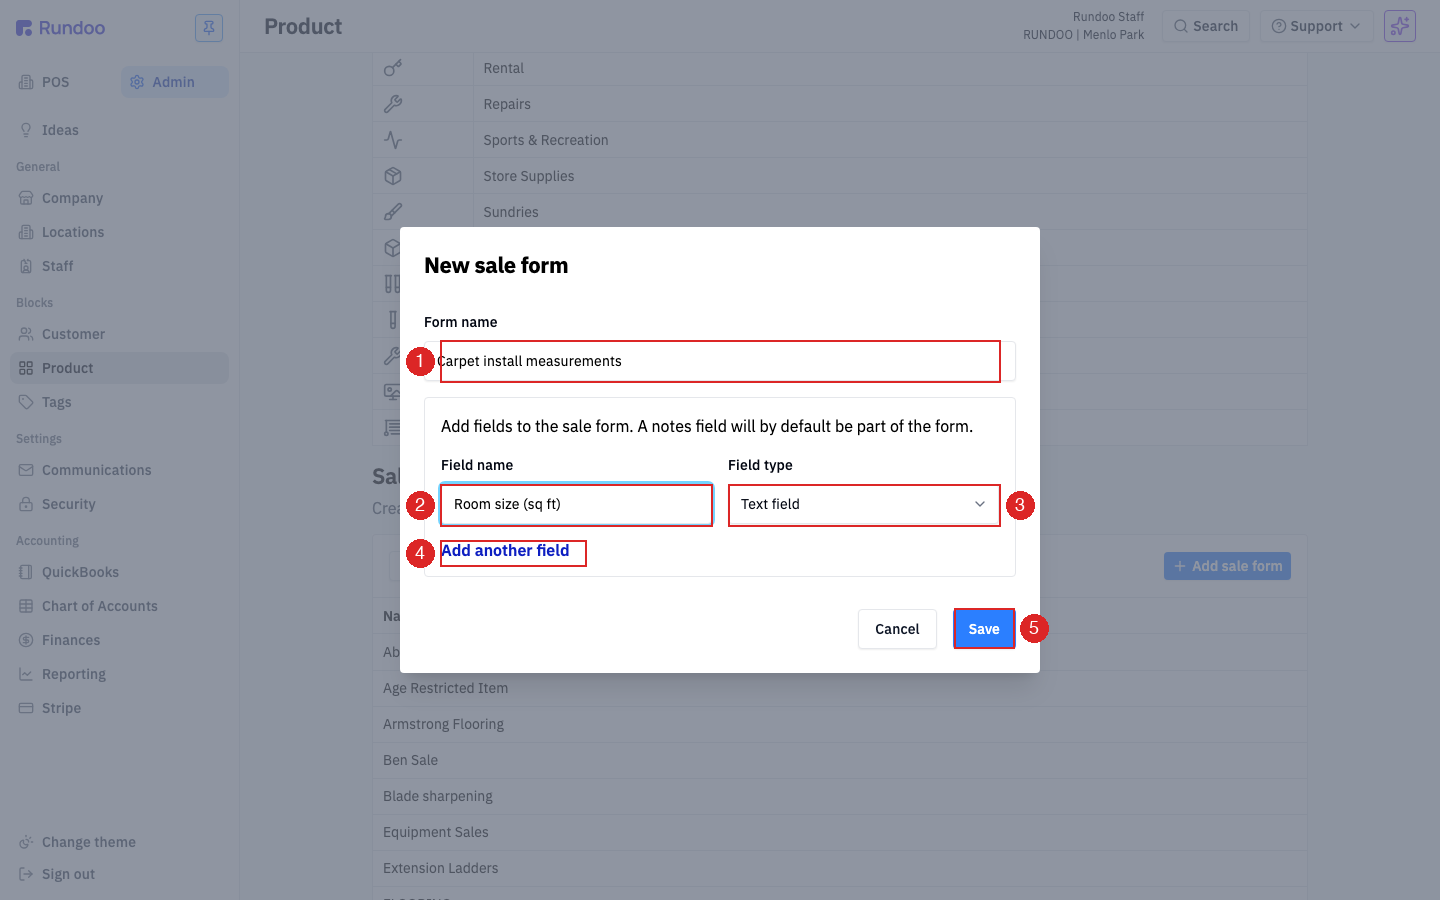
Click Save to commit. The form shows up in the list right away, and it's available on the product's Settings tab for you to attach immediately.
⚠️ Sale forms are product-level, not transaction-level. There is no "switch form on this sale" control at POS (the form fires because of the product in the cart). If a form needs to fire for two different products, attach the same form to both from their Settings tabs; you don't duplicate the form.
Editing or deleting an existing form
Click a row in the Sale forms list to open the Edit sale form modal. Same shape as the new form, plus a Delete button at the bottom-left.
-
Rename or rework fields. Update the
Form name, rename existing fields, add new ones, change field types. Click Save to commit. -
Delete a form. Click Delete to remove it from the list and detach it from every product it was set on. Past sales that already captured the form's data keep it on the sale record. Delete only removes it going forward.
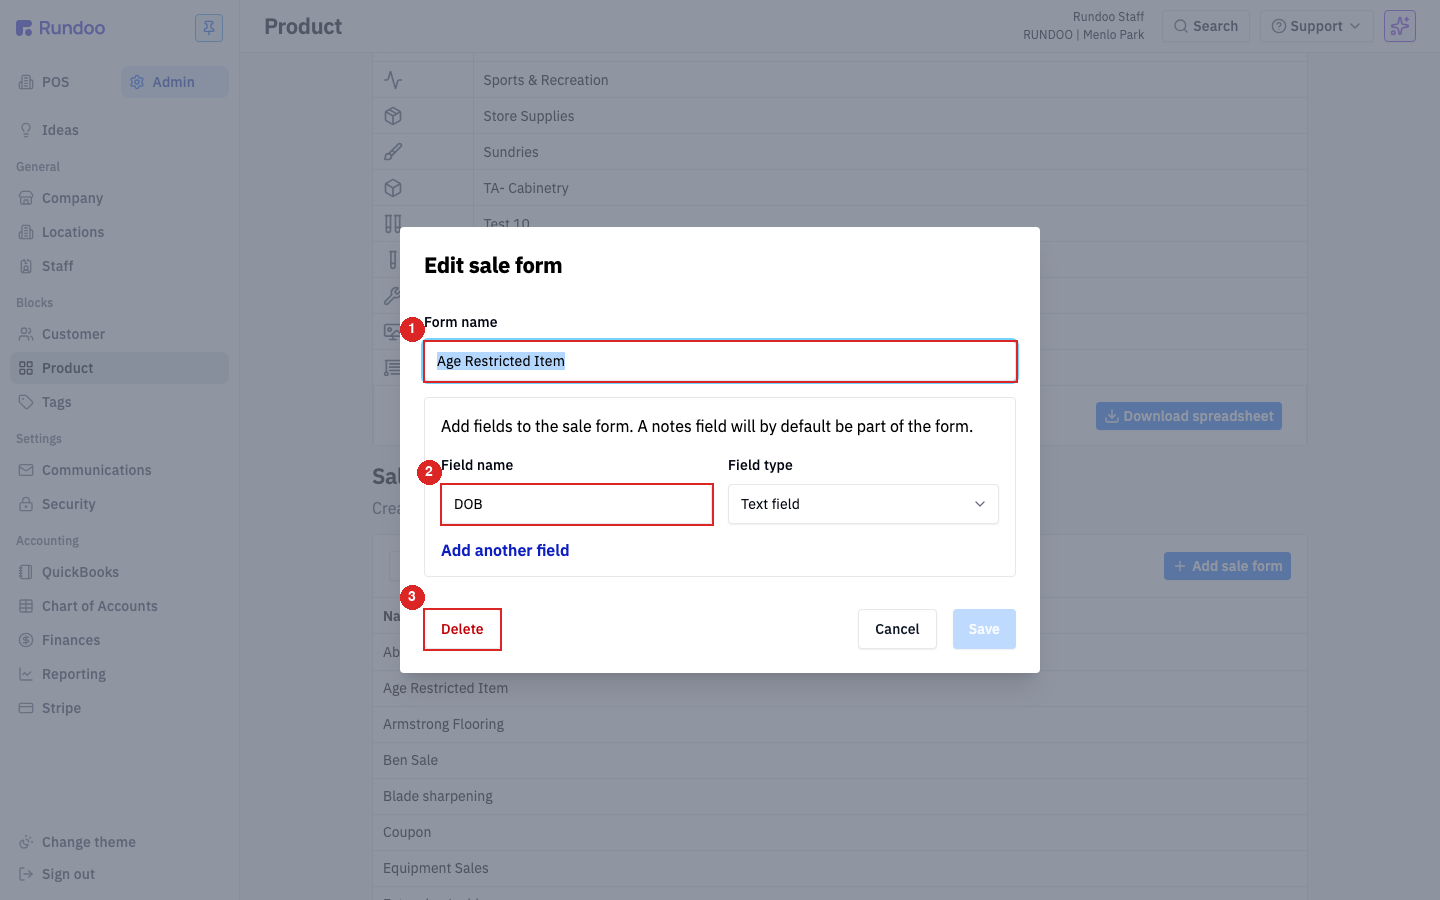
💡 Editing a form's fields changes the prompts for future sales of any product the form is attached to. Historical sale records keep the old field names and the answers that were captured at the time, nothing retroactively rewrites.
Attaching a form to a product
A form sitting in the Sale forms list does nothing until you wire it to a product.
In the POS mode, open Products in the left sidebar, open the product you want to attach the form to, and click the Settings top tab. Scroll to the Checkout section. The Sale form dropdown lists every saved form. Pick one and it's attached (the page autosaves, no separate save button).
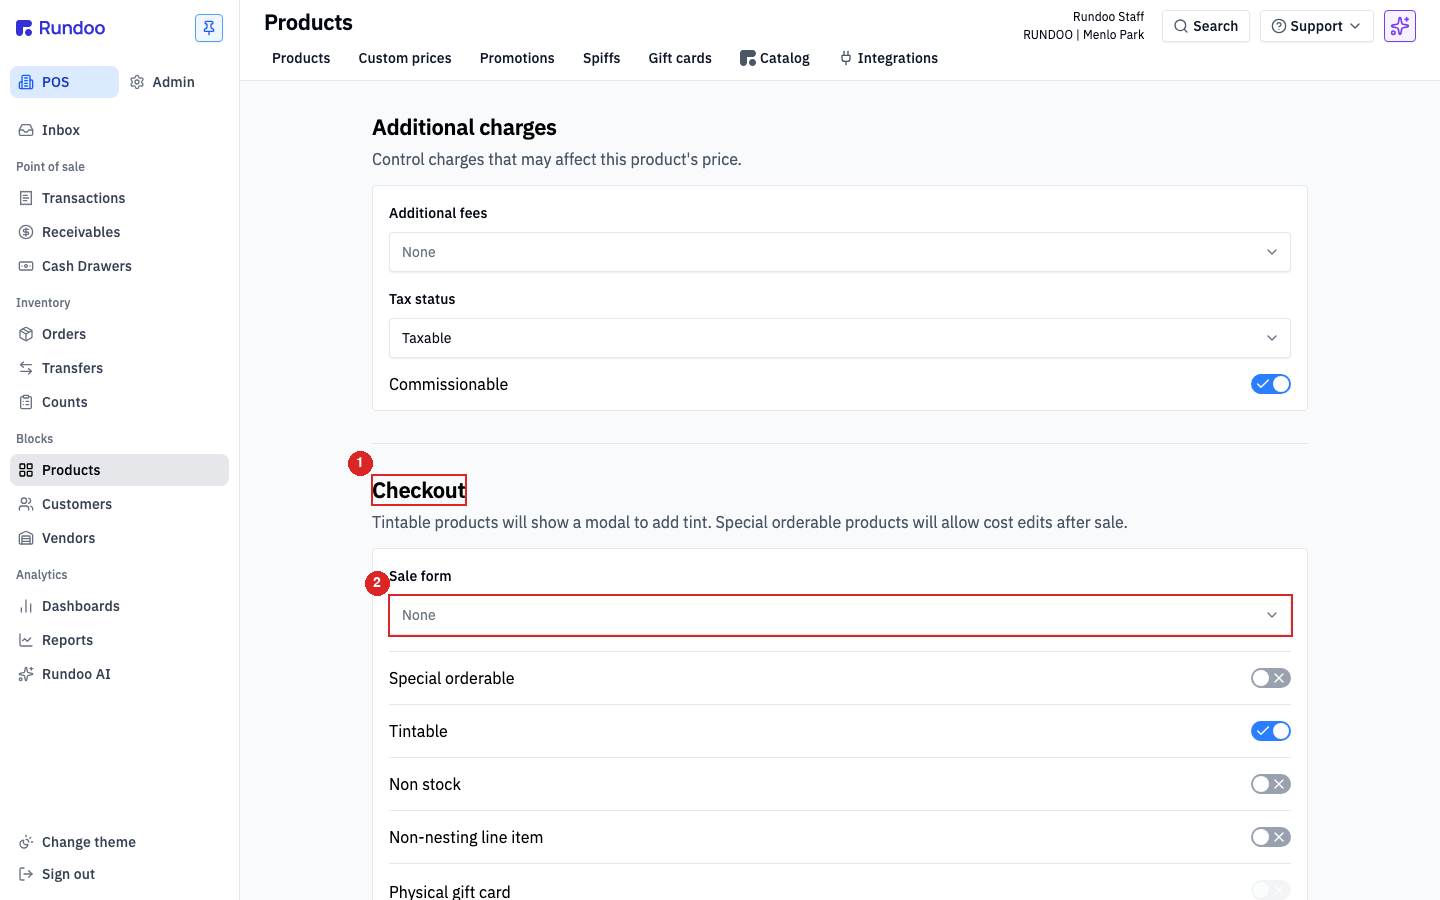
From that point on, every time a cashier adds this product to a cart, Rundoo opens the form and prompts for the fields you configured. No form attached? The product rings up normally with no prompt.
💡 Use the same form on multiple products by picking it from each product's dropdown. Paints that share a color-match workflow, every age-restricted SKU in your store, every service line you sharpen. One form, many products.
Where sale form answers show up
Once the cashier fills in and saves the form, the captured values stay attached to the line on the sale:
-
On the sale detail page under
Completed, the answers show alongside the line item. -
On printed and emailed receipts, the prompts and answers print under the line. The carpet size or the
DOBshows right where the customer can see it. -
Any free-form text the cashier typed into the default Notes field also prints on the receipt as a line-item note (same place you'd see a paint-tint receipt note, see Sales for the tint-modal example).
Gotchas
⚠️ Sale forms are not printed-form templates. They're data-capture forms that fire at the cart. Rundoo doesn't let you design a custom printed-receipt or quote layout from this section. Receipt branding (logo, header, footer, return policy) lives in
Admin > Company, label layouts live in theCustom label designerat the bottom of this same page (see Product labels).⚠️ Form name changes propagate everywhere. The name you type is the name cashiers see in their product's Sale form dropdown and the name that shows on receipts. Renaming
Age Restricted ItemtoID Verificationchanges both at once. There's no separate display-name knob.
Recommended Rundocs
-
Products, where a sale form gets attached to a specific SKU.
-
Sales, the cart flow where the form actually fires when a configured product is added.
-
Product labels, the sibling template system (printed price stickers and barcode tags), also managed under
Admin > Product.