
Rundocs › Admin & Settings
Staff
Last updated 2026-07-29
Staff are the people who sign into Rundoo, cashiers, managers, admins, anyone with counter time. Each staff member has their own Staff ID, their own sign-in methods, and their own set of permissions. This page covers adding them, editing their details, tuning their permissions, setting up a hardware login key, and deactivating them when they move on.
In the Admin mode, open Staff in the left sidebar. That's the list of everyone with access to this company.
Video walkthrough
The Staff list
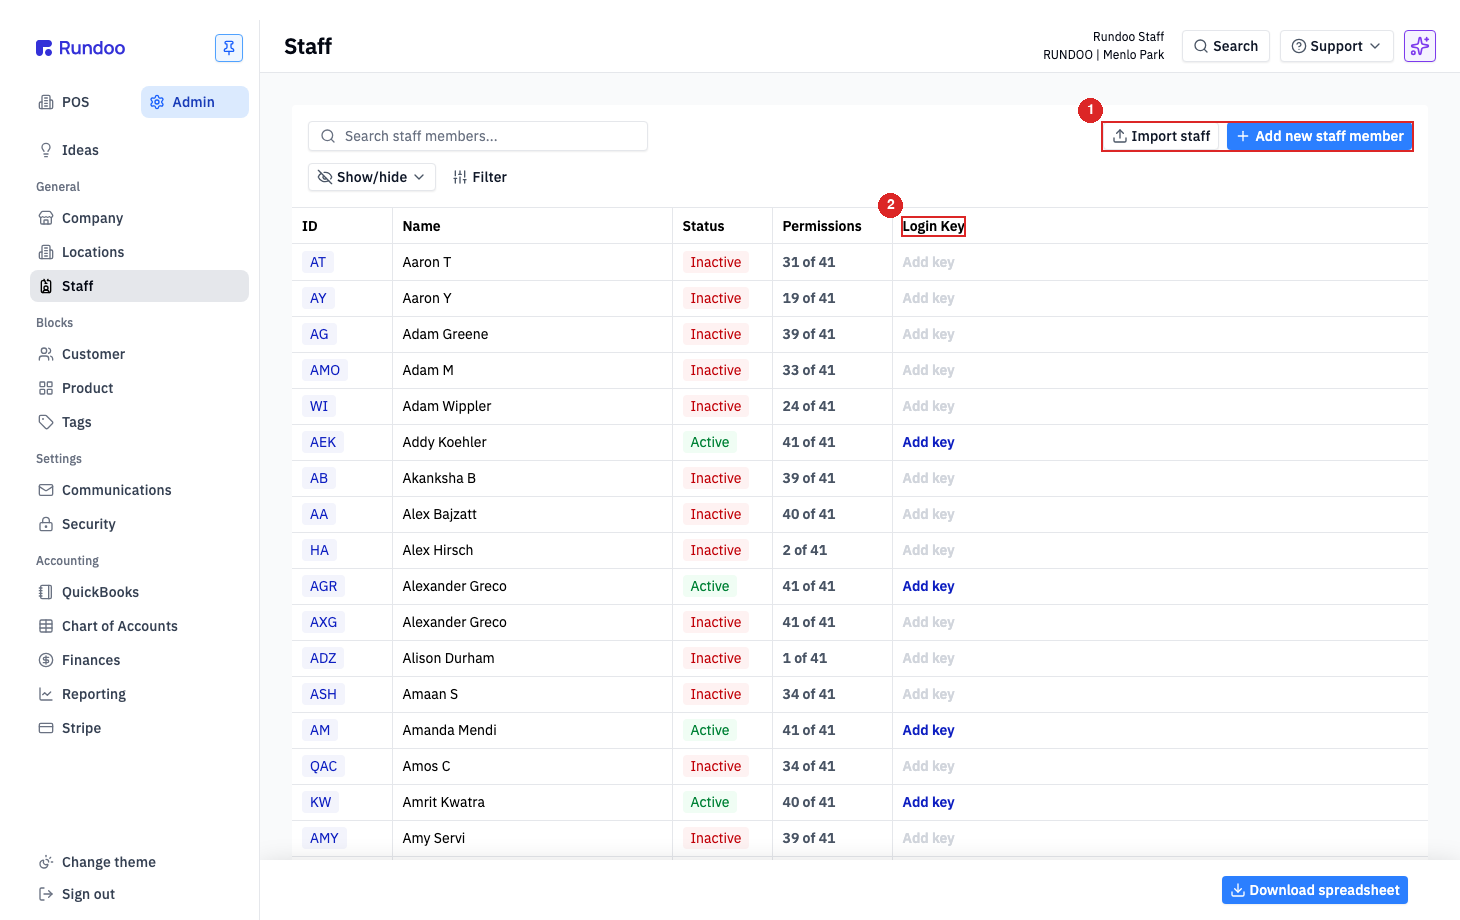
The Staff list shows everyone set up in the company, filtered by the pill at the top of the control strip (Status: Active by default. Flip it to Inactive to see deactivated staff). Columns: ID, Name, Status, Permissions (shown as a fraction (how many of the available permissions this person has)), and Login Key (an inline Add key or Edit key link).
Two action buttons sit in the action cluster at the top right:
-
Add new staff member. Opens the add modal (covered below).
-
Import staff (bulk-add staff from a spreadsheet).
Adding a staff member
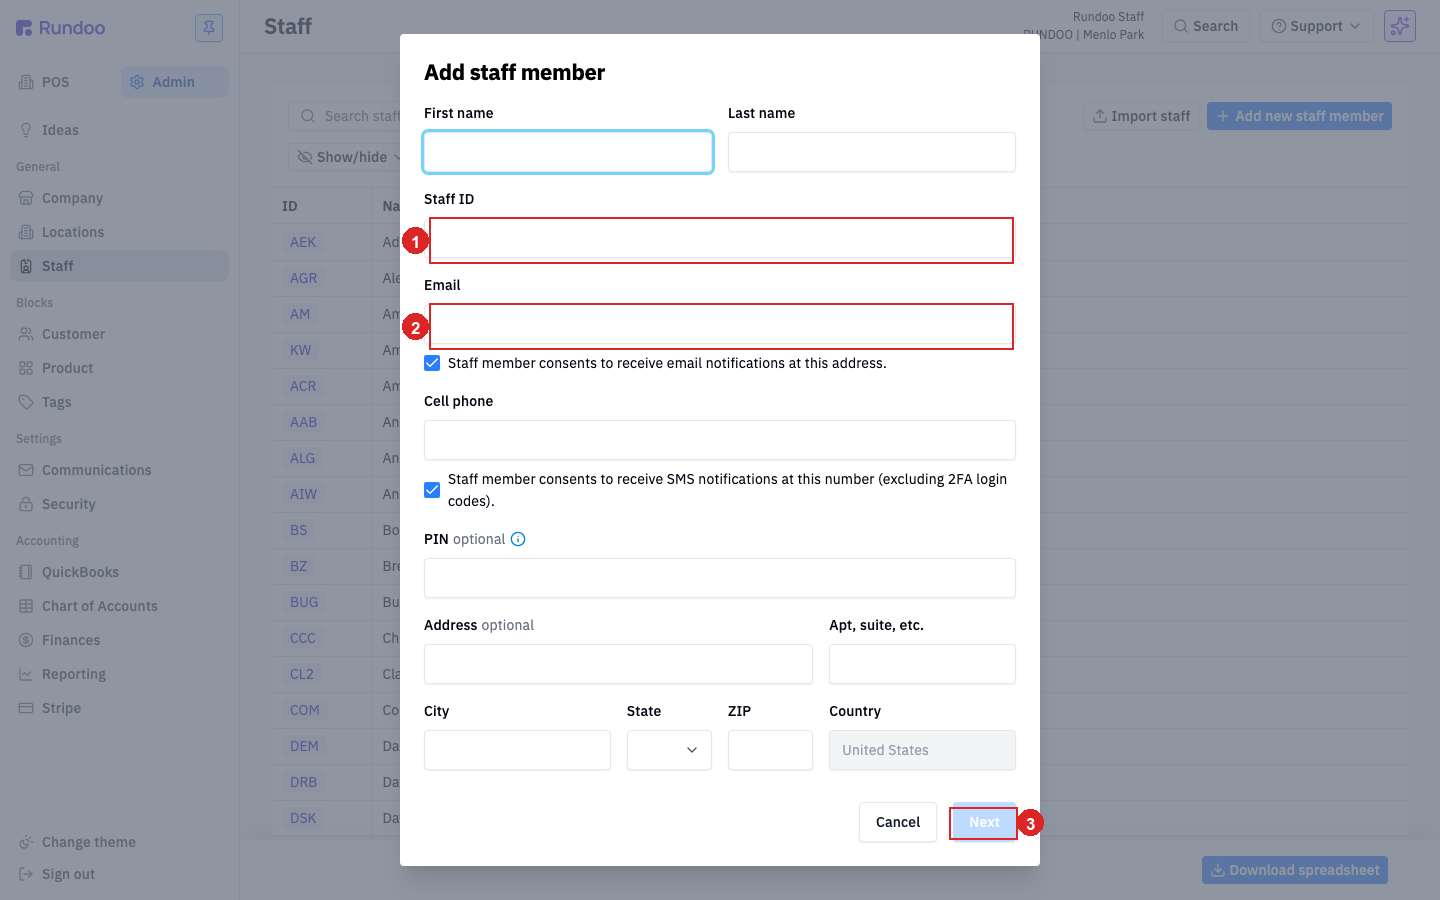
Click Add new staff member in the top-right action cluster. The modal has two steps. The first is the staff member's details, the second is an optional login-key setup.
The first step asks for:
| Field | Required | Notes |
|---|---|---|
First name |
Yes | |
Last name |
Yes | |
Staff ID |
Yes | The short POS identifier this person types at the sign-in screen (e.g. /N, AEK). Keep it short. They'll type it every shift. |
Email |
Yes | Where email-OTC codes and any notifications go. |
Cell phone |
Optional | Required only if they'll sign in via text-message code. |
PIN |
Optional | A short numeric PIN for quick POS unlock between cashiers. |
Address |
Optional | Mailing address, for your records. |
Two consent checkboxes sit under Email and Cell phone, defaulting on. Uncheck them if the staff member doesn't want non-login notifications. (2FA sign-in texts always send regardless of the SMS-consent box.)
Click Next to advance to the key-setup step (see Login keys below), or Cancel to back out without creating anyone.
Staff ID is the string a cashier types at the sign-in screen. Make it short and memorable (initials, a shortcode, or a single letter work well). See Sign-in for the full login flow.
Once you save a staff member, the Staff ID can be changed later, but anyone who had it memorized will need to learn the new one. Pick something they can live with.
Editing staff details
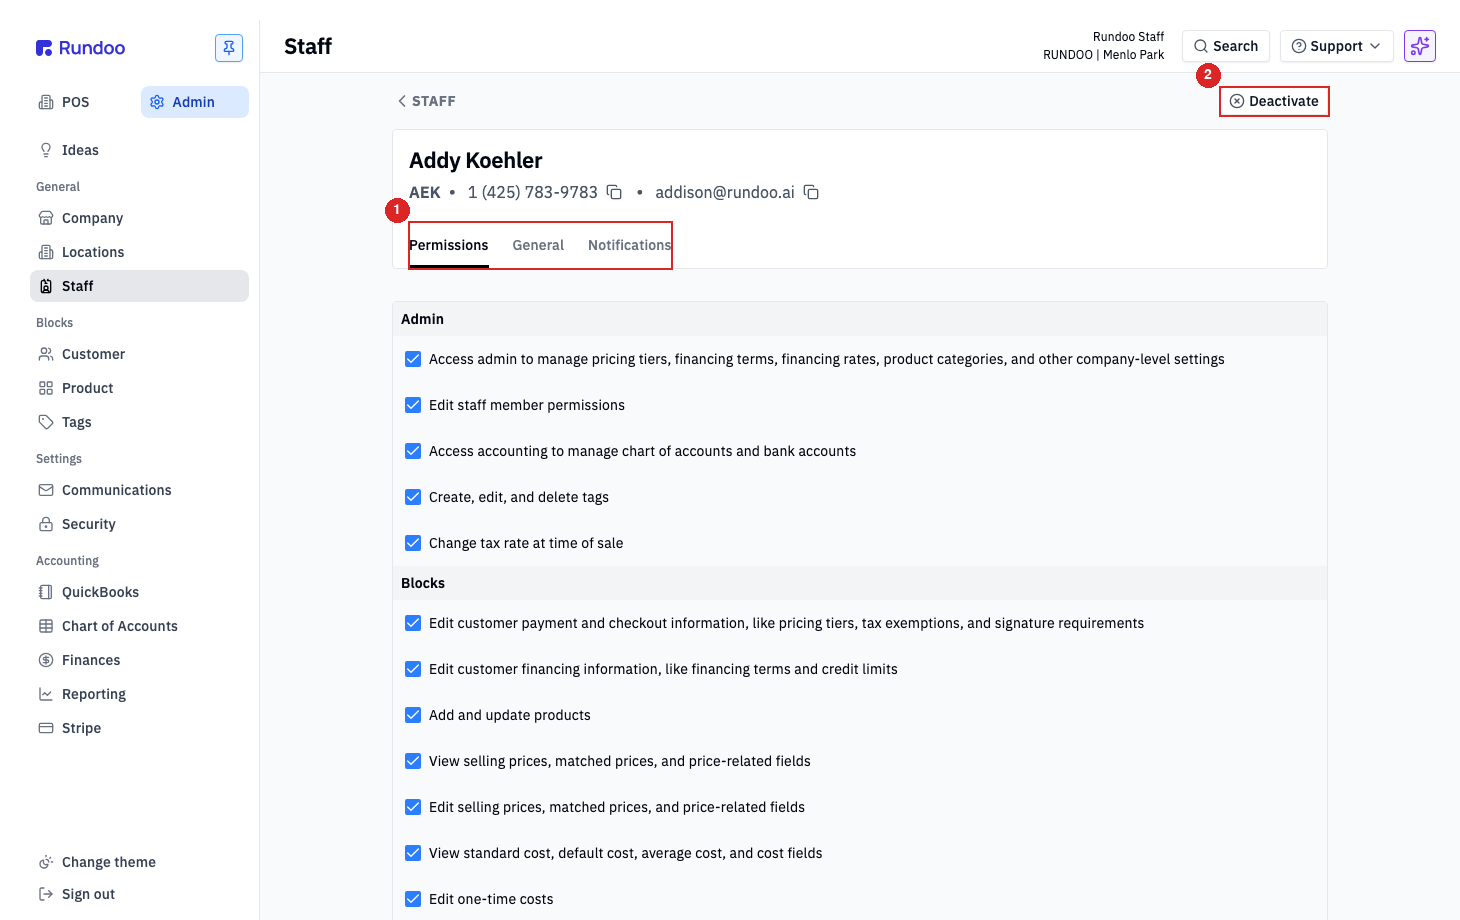
Click any row on the Staff list to open that person's detail page. The header card shows their name, Staff ID, phone, and email at a glance. Underneath, three top tabs split the settings:
-
Permissions, the per-feature checkboxes that control what this person can do (see the section below).
-
General (name,
Staff ID, email, phone, address, PIN). The same fields from the Add modal, plus an inline edit of each. -
Notifications, which system notifications this person receives (new sales, low stock, etc.).
Edits save per-section. When you leave a tab with unsaved changes, Rundoo prompts before navigating away.
The Deactivate button in the top-right action cluster is how you take someone offline (covered in Deactivating a staff member below).
Adding a phone number after creation. If a staff member was created with just an email, you can add their phone number later from the General tab on their detail page. Fill Cell phone and save the section. Once the phone is saved, the staff member can sign in via text-message code. See Sign-in for the full login flow.
Permissions
Each staff member has their own set of per-feature checkboxes (voids, price overrides, cost visibility, vendor edits, and so on) that decide what they can see and do across Rundoo. Open the Permissions tab on the staff member's detail page to set them. For the full breakdown of the panel, the six sections, and what each individual permission grants, see the Permissions Rundoc.
Notifications
The Notifications tab on a staff member's detail page controls which automated messages that person receives, and on which channels. It's the delivery side of things like vendor-order updates, the Daily AI Summary, and Routines (when a routine runs, its output is delivered through here).
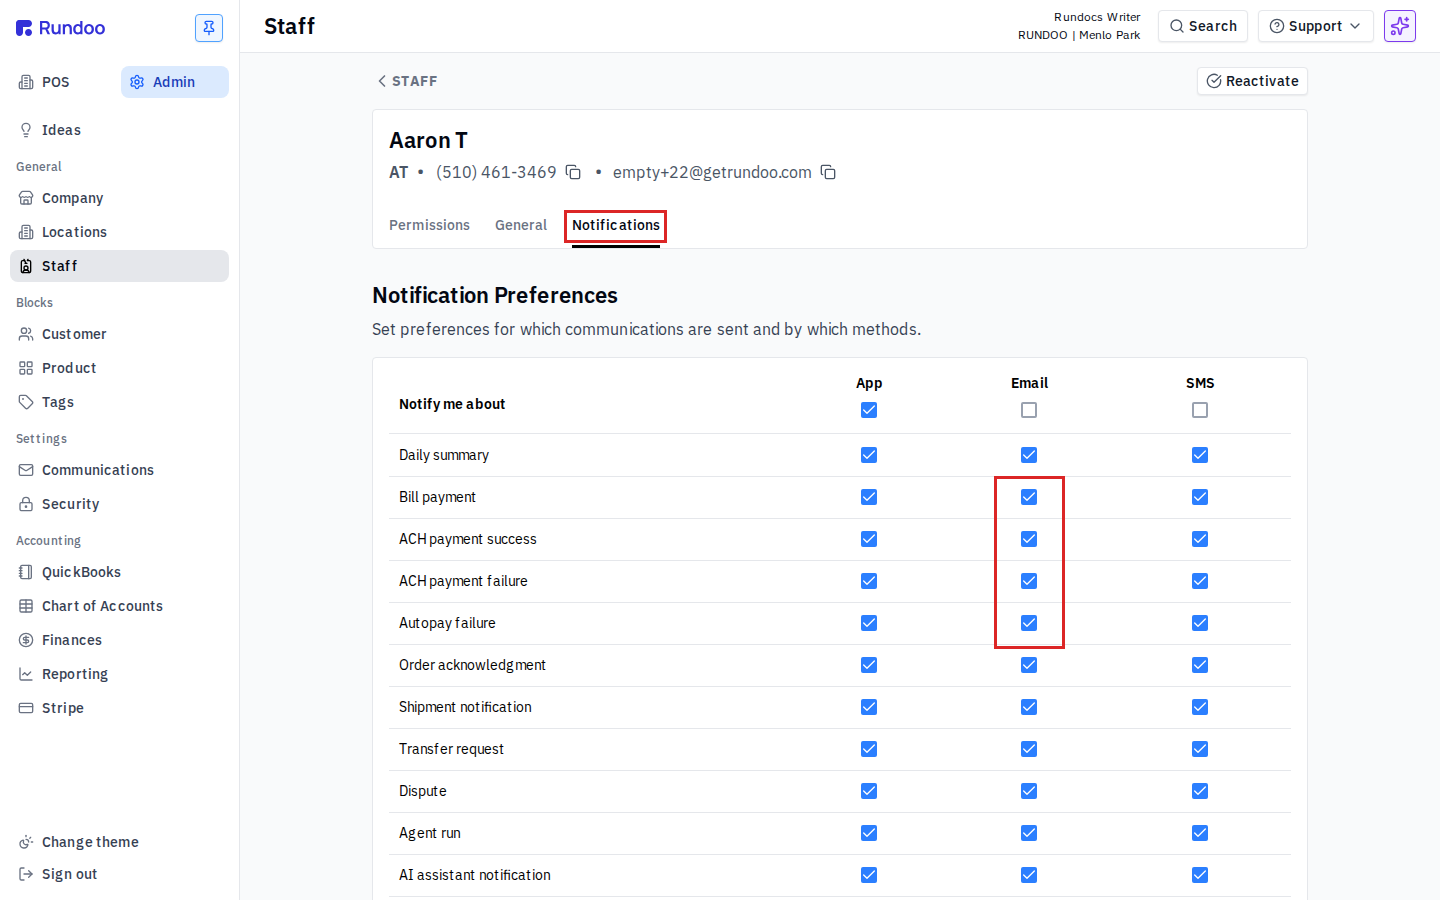
Each row is a notification event; each event offers up to three delivery channels:
-
App. Lands in the staff member's in-app Inbox.
-
Email (sent to the email on their General tab).
-
SMS (texted to the cell phone on their General tab).
Check a box to turn that channel on for that event. Which events appear depends on the staff member's permissions, for example Routine run and Daily summary only show for staff with Admin permissions; bill-payment and ACH events show for staff with analytics access; Price change shows for staff who can edit prices.
To stop receiving a type of notification (the autopay, bill-payment, and ACH emails that land every time a customer's payment or autopay runs are the ones people most often want to quiet) open your own staff detail page, go to the Notifications tab, and uncheck the channel you don't want. Unchecking Email on Bill payment, ACH payment success, ACH payment failure, and Autopay failure stops those billing emails while leaving the in-app copy intact. The setting is per-person. Each staff member controls their own inbox, and an admin can open anyone's profile to change it for them.
Getting a lot of autopay or billing notification emails and want to remove yourself from the list? Turn them off at the source here (uncheck the Email box on the Bill payment, ACH payment, and Autopay failure rows of your own Notifications tab) rather than building a mail-client rule to filter them after they arrive. If you'd still rather filter every Rundoo email in your inbox, see Filtering Rundoo emails.
Three things all have to line up for a message to actually arrive:
-
The channel is checked here on the Notifications tab.
-
The matching consent box (Email / SMS) is on (the two checkboxes set on the General tab or in the Add-staff modal).
-
There's an email address / cell phone saved for that channel.
How Routine reports get delivered. A Routine delivers its output through the Routine run notification to every staff member listed in the routine's Staff field, on whichever channels each of them has enabled here. So to receive a routine's report by email, the assigned staff member needs Routine run → Email checked on their own Notifications tab, email consent on, and an email saved.
The report always goes to the assigned staff member's own email. There's no way to point a routine at a different or external address (a customer's inbox, a shared alias). If a report needs to reach someone who isn't a staff member, have an assigned staffer forward it, or add that person as staff.
Login keys
A login key is a hardware security key (a YubiKey or similar WebAuthn device) that lets a staff member sign in by tapping the key to a register. The Login Key column on this list carries the inline Add key action. For the gear and the per-staff pairing flow, see Login keys.
Deactivating a staff member
Open the staff member's detail page and click Deactivate in the top-right action cluster. Deactivation:
-
Revokes all sign-in methods, no more email codes, no text codes, no key acceptance.
-
Drops the row out of the default Staff list view (flip the filter pill to
Status: Inactiveto see them). -
Preserves everything they did (sales, voids, notes, time stamps). Their name still appears on historical transactions.
Any sessions they had open will end the next time their browser pings Rundoo (typically within seconds), but there's no hard "boot them out now" button. If you need someone off immediately, deactivate and then have a manager physically confirm they're signed out.
To bring someone back, filter to Status: Inactive, open their row, and click Reactivate in the same slot where Deactivate used to be. Their permissions and login methods return as they were.
Deactivate instead of delete. Rundoo doesn't support hard-deleting a staff member, because their name is referenced on past sales. If you hired someone by mistake and never let them sign in, deactivation is the cleanup.
Recommended Rundocs
-
Sign-in, how staff actually log in once you've added them.
-
POS security, manager-approval gates on top of staff permissions (voids, price overrides, below-cost).