
Rundocs › Customers & Jobs
Customers
Last updated 2026-09-11
Customers are who you ring up (retail walk-ins who pay today and charge-account contractors who pay later). This page covers creating and editing customer records, the two types, how contacts roll up underneath, and how to add or remove a tag on a customer you've already set up.
In the POS mode, open Customers in the left sidebar.
What you can change yourself, and what needs Rundoo Support. Most customer-record edits are self-serve from the Settings tab, name, phone, email, address, pricing tier, finance term and credit limit, tax exemptions, checkout requirements. Putting a customer on hold (Credit limit → $0.00) and deactivating them are also self-serve, both covered below. Merging two customer records and recovering a customer that was deactivated and later cleaned up are run by Rundoo Support, email support@rundoo.ai with the customer IDs and we'll handle it.
Retail vs. charge account
Every customer in Rundoo is really one of two things: a retail customer who pays at the counter (cash, card, check, gift card), or a charge account customer who can put sales on their tab and pay the balance down later on a statement.
There is no charge-account toggle. What makes a customer a charge account is their Finance term. A customer with a term of Cash is a retail customer, they pay every time. A customer with a statement-based term like Net 30 Statement, Net 1 Statement, or similar is a charge account, their Charge account sales land on their balance and show up on the Statements run. Set the Finance term to switch between the two.
| Attribute | Retail walk-in | Charge account |
|---|---|---|
| Finance term | Cash |
Statement-based (Net 30 Statement, etc.) |
| Can charge to account? | No | Yes (Charge account tender unlocks at POS) |
| Receives statements? | No | Yes, monthly, via Statements |
| Typical use | DIY homeowner, one-off buyer | Contractor with a running tab |
| Credit limit matters? | No | Yes, caps the unpaid balance |
Both types still benefit from being attached to sales. Even a retail customer who pays cash every time gets purchase history, contact info on receipts, and access to any Pricing tiers you've assigned.
Step 1: Add a customer
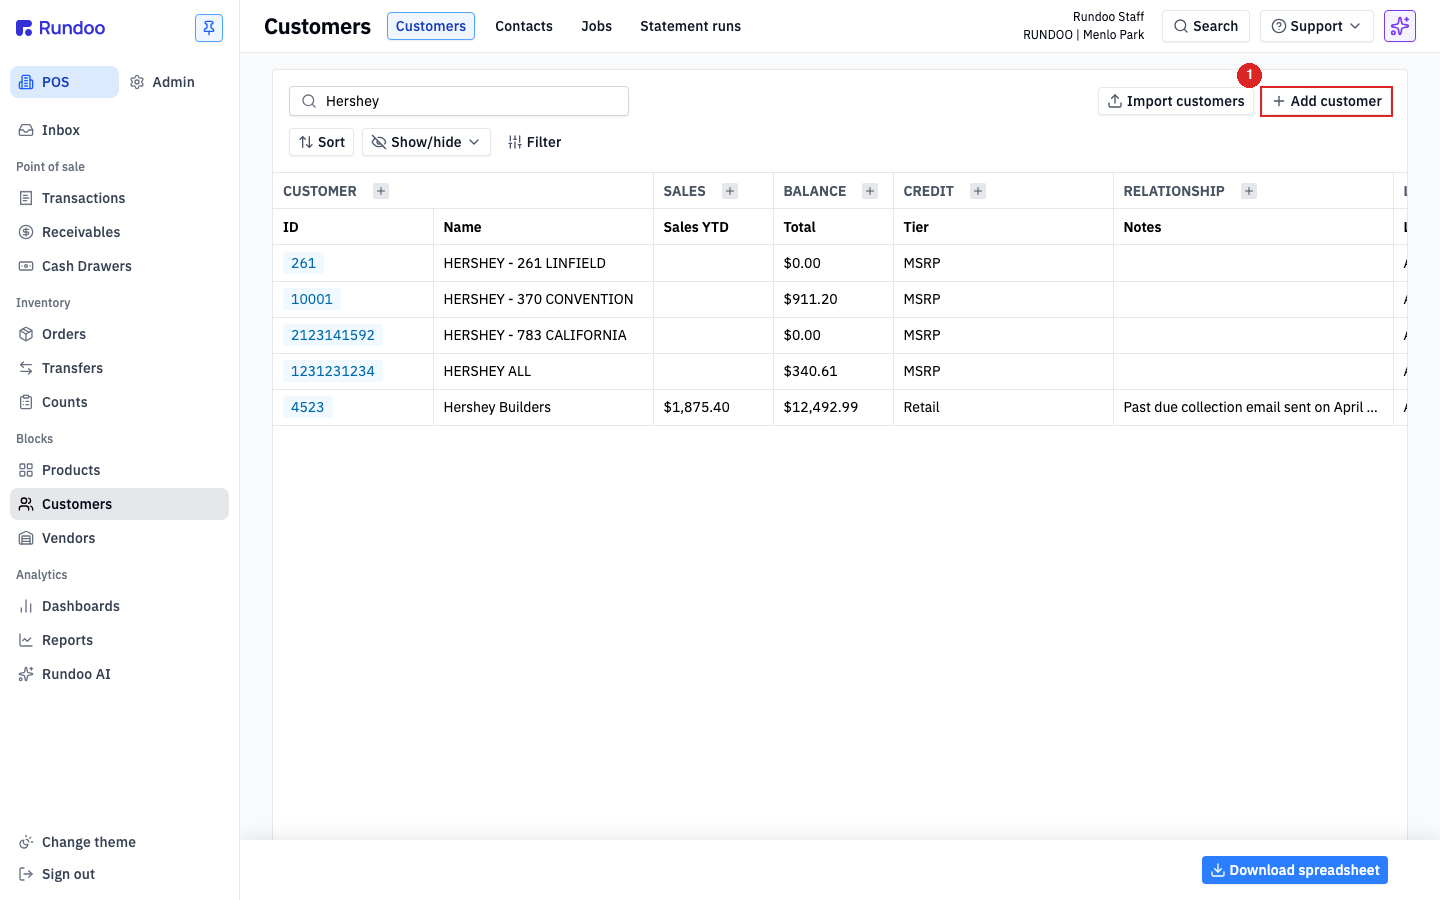
From the Customers list, click Add customer in the top-right. A modal opens with the fields you need to create the record. Everything else (Finance term, credit limit, custom prices, statement preferences) lives on the customer's detail page and gets set after creation.
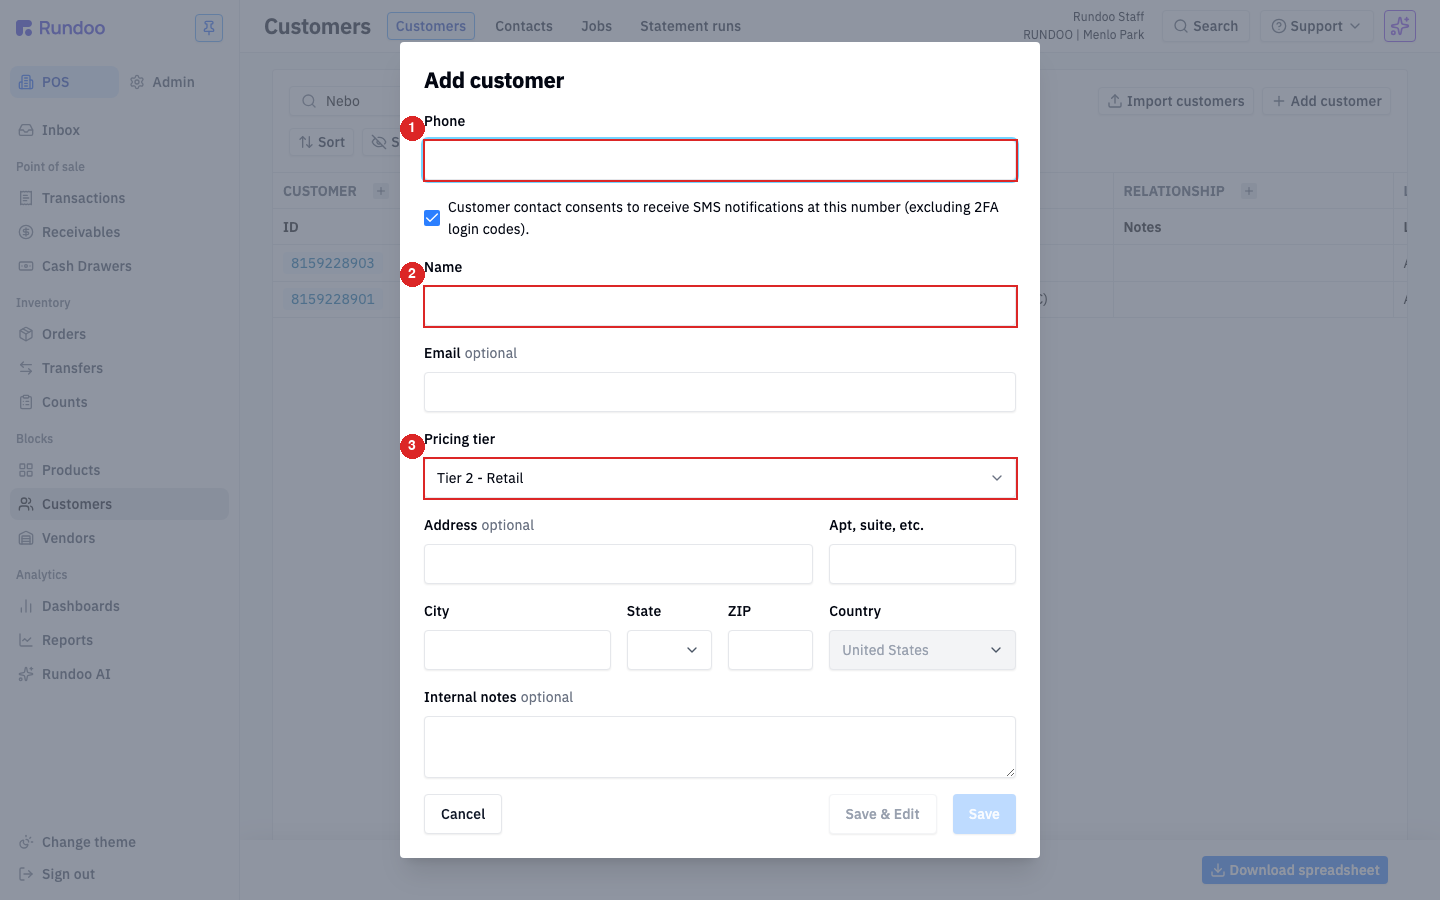
| Field | What it does | Required? | Default |
|---|---|---|---|
Phone |
Primary phone on the account. Powers search, text receipts, and customer notifications. | Yes | () |
| SMS consent checkbox | "Customer contact consents to receive SMS notifications at this number." Uncheck if they've opted out, 2FA codes are exempt either way. | , | Checked |
Name |
Customer name as it appears on receipts, statements, and in the list. | Yes | () |
Email |
Primary email for emailed receipts and statements. | Optional | () |
Pricing tier |
Which prices this customer sees at POS. See Pricing tiers. | Yes | Tier 2 - Retail |
Address, Apt, suite, etc., City, State, ZIP, Country |
Billing/mailing address. Used for mailed statements and for tax calculation on some tenants. | Optional | United States |
Internal notes |
Free-text notes visible to staff only, not to the customer. Good for "prefers matte finishes" or "check references before charging on account." | Optional | . |
The Attach tag button next to the Name field lets you tag the customer at create-time. Pick existing tags or type a new one to create it. Tags can also be attached later from the customer's detail page; see Tags below for what tags do and how they're used.
The modal has three save buttons at the bottom:
-
Save & Edit creates the customer and drops you onto their detail page. Use this when you'll immediately go set a Finance term (to make them a charge account), add a custom price rule, or add additional contacts.
-
Save & New, creates the customer and immediately reopens the Add modal with a blank form. Use this when you're entering several customers in a row at the counter, faster than closing and reopening Add customer each time, and lighter-weight than firing up Customer imports for a small handful.
-
Save creates the customer and closes the modal. Use this for walk-in retail customers where you have everything you need.
Duplicate phone numbers fail silently. If another customer already has the phone number you're entering, the Save click closes the modal without creating the customer, no error message, no toast. Search the list for the phone first, or use Save & Edit so you'd notice the missing detail page.
Adding customers one at a time at the counter is fine. For migrating a bulk list from your old system or a spreadsheet, see Customer imports instead.
Step 2: Turn a customer into a charge account
By default, every new customer is created as a retail customer (Finance term: Cash). To give them a tab, open the customer's detail page, go to the Settings tab, and scroll to the Financing section.
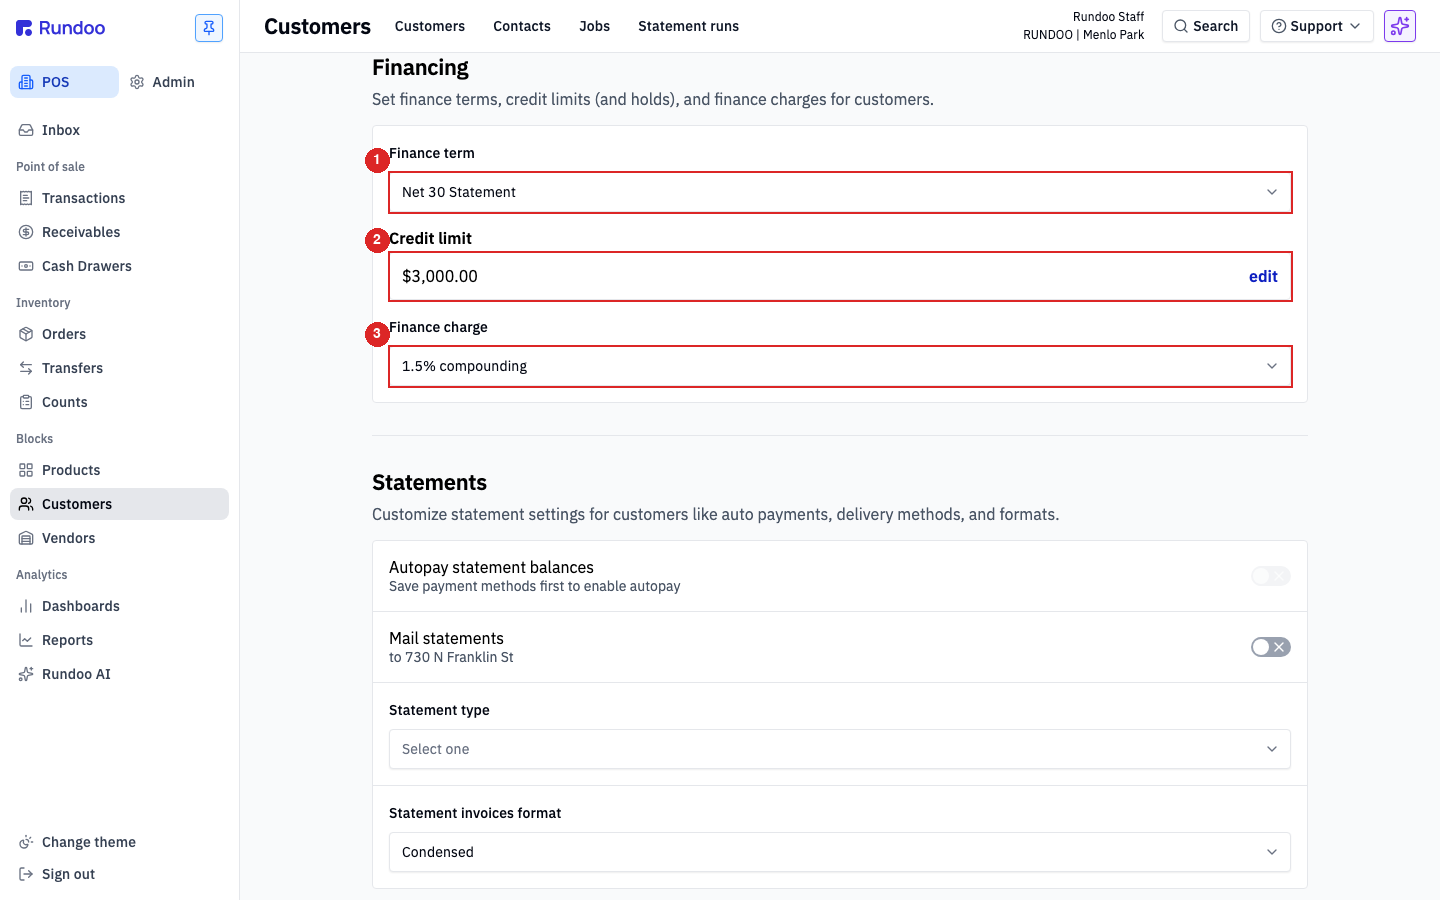
Three fields determine how their account works:
-
Finance term. The dropdown controls everything. Pick a
Statement-based term (Net 30 Statement,Net 1 Statement, etc.) to turn them into a charge account. PickCashto keep them retail. See Finance terms for how the terms themselves are configured and whatNet 30vsNet 1actually mean. -
Credit limit. Caps how much they can owe at once. When a sale would push their balance past this, the
Charge accounttender is blocked until they pay some down. Click edit to change it. -
Finance charge (interest applied to overdue balances). Typical values are
1.5% compoundingmonthly. Leave asSelect oneif you don't charge interest.
Finance term is what makes a customer a charge account. There's no separate toggle. If the Charge account tender doesn't show up at POS for a customer you thought had a tab, check this field first.
Where charge-account sales post
Rundoo doesn't assign a specific Accounts Receivable account to a customer. Every charge-account sale at a given location credits the one AR GL account configured for that location on Admin > Chart of Accounts > Mapping (the Accounts receivable control-account row). If you need a customer's balance to land in a different AR account, you change the location's AR mapping, which moves all customers at that location, not one. The customer-level controls that do exist live in the Financing section above: Finance term, Credit limit, and Finance charge. See Account mapping for the routing model.
Step 3: Edit a customer
Every customer has a detail page, reached by clicking their row in the list. The header card shows their ID, name, primary phone, mailing address, any tax-exemption status, pricing tier, current balance, and Sales YTD at a glance (you no longer have to open the Settings tab just to read the address); the action cluster at the top-right holds the page-wide actions.
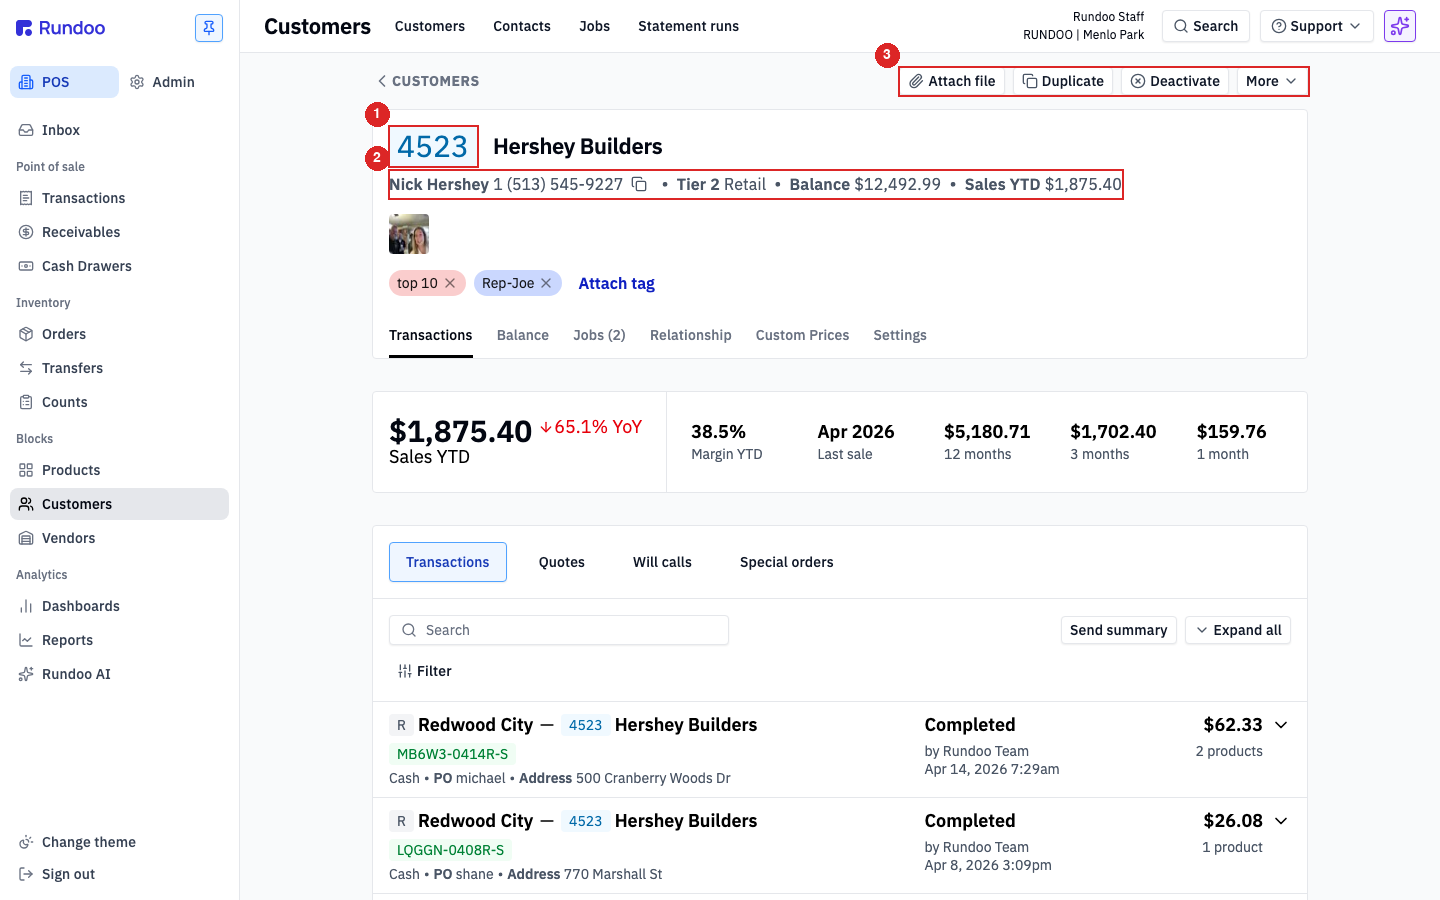
Under the header, six tabs split the customer's data:
-
Transactions (every sale, quote, will-call, and special order under this customer). Default view.
-
Balance, running balance with line-by-line invoice and payment history.
-
Jobs. Jobs tied to this customer (each sale can be tagged to one).
-
Relationship. The customer's
Sales representativeand a runningNew interactionlog. -
Custom Prices (per-customer overrides to standard pricing).
-
Settings, the editable fields (contact info, pricing tier, finance terms, notes, address, tax exemptions).
Most fields live in the Settings tab, grouped into small sections each with its own Cancel and Save buttons. Edit one section at a time. Saving one doesn't commit changes elsewhere on the page.
Tags
Tags are short labels (painter, commercial, 60-day-net) you attach to customers for filtering and grouping in the Customers list, in reports, and in pricing rules. They're separate from Pricing tier (a customer is on exactly one tier but can carry many tags).
Adding a tag to a customer you already set up. You don't have to tag a customer when you first create them. From the detail page of any existing customer, the Attach tag button next to the header opens a tag picker. Pick existing tags or type a new one to create it on the fly. Attached tags appear as pills on the header. Click a pill's × to remove one from this customer (the tag itself stays in the system for other customers).
💡 Tags vs Pricing tier vs Sales rep. All three are ways to slice your customer book. The right one depends on how the slicing is used. Use a
Pricing tierif it changes the prices customers see; useSales repif a person owns the relationship; useTagsfor everything else (segments for reporting, ad-hoc groupings for promotions, audit categories liketax-exempt-state-cert).
Tags can also be attached or stripped in bulk via the import (Tags column, comma-separated). See Customer imports. The system-wide Tags admin (managing the master list, renaming, archiving) lives at Admin > Tags. See Tags.
Per-customer requirements
A contractor account often needs more disciplined ringing-up than a retail walk-in (a PO number on every receipt, a Job pinned to every cart, a signature for liability, internal sale notes for the next cashier). Rundoo exposes a set of per-customer requirement settings in the Settings tab's Checkout settings section that block the cart from completing until the corresponding field is filled.
From the customer's Settings tab, scroll to Checkout settings:
-
Require PO, blocks Complete sale until a PO number is entered on the cart. Use for contractors whose AP team needs a PO on every invoice.
-
Require job. Blocks completion until a Job is attached. Useful when a contractor wants every receipt scoped to a project so their statements split cleanly.
-
Require buyer. Blocks completion until a named buyer (one of the customer's contacts) is picked on the cart. Pins accountability to a person, not just the company.
-
Require receipt signature. This one isn't a simple on/off, it's a dropdown with three settings:
Not required(the default),Charge account(capture a signature on this customer's account charges), andAll sales(capture one on every sale to them, however they pay). New customers start atNot required, so if the field just readsNot requiredand you're hunting for a switch to flip on, that is the control, open the dropdown and pickCharge accountorAll sales. You can also set it in bulk with theRequire Receipt Signaturecolumn in the customer import. -
Require sale notes. Blocks completion until a customer-visible sale note is entered (prints on the receipt and statement).
-
Require internal sale notes. Blocks completion until an internal sale note is entered (visible to staff, not customers). Use when you want internal context on every sale ("approved by Joe", "Wednesday delivery").
-
Hide prices on printed invoices. Prints invoices without per-line prices for contractors who pass receipts to their customers. The total still prints; just the line-item prices are masked.
Alongside these toggles, the Notes section above has a Sale reminders field, free-text that pops on the cart when this customer is attached. It doesn't block completion, but it's how you flag "check ID" or "call before charging on account" without inventing a new toggle.
Signatures are per-customer, with a three-way scope. The Require receipt signature picker gives you Not required, Charge account (their account charges only), or All sales (everything they buy). What it can't do: there's no single store-wide switch that turns signatures on for every customer at once (set it per customer, or in bulk via the import), and no way to exclude one tender (for example, require a signature on everything except cash and check, All sales includes cash). It also governs that customer's sales only, requiring a signature on a return isn't a setting today. If you need signatures on returns or scoped by tender type, let Rundoo Support know at support@rundoo.ai so we can flag your account and log the request.
These checkout settings + Sale reminders are stored on the customer record and apply at every register, not just the one where they were set. They also import via the Customer imports template (Require PO, Require Job, Require Buyer, Require Receipt Signature, Require Sale Notes, Require Internal Sale Notes, Hide Prices On Printed Invoices, Sales Reminder columns).
Each of a customer's job accounts carries its own copy of these toggles too, including Hide Prices On Printed Invoices, and they don't inherit from the parent. Turning one on for the customer does not cascade to that customer's jobs, so if the main account hides prices on invoices but a job under it is still printing them, set the toggle on the job as well. See Jobs for auditing or bulk-fixing many jobs at once.
Tax-exempt customers
There's no Tax exempt toggle on a customer. The Tax exemptions section on the Settings tab has two parts, and they do different things:
-
Exempt: Sales tax number,Exempt: Single-use tax number,Exempt: Eco fee number. Text inputs for the customer's reseller permit numbers. These are for your records (they print on invoices and statements where required and let your accountant prove why a sale wasn't taxed). They don't change how tax calculates on the cart. -
Use custom tax rate(this is the field that actually exempts the customer). Pick a custom tax rate you've defined in Admin > Locations > Custom tax rates (for example, aTax exemptrate at0.0%) and every sale for this customer bypasses the location's default rate and uses the one you picked. If you don't have aTax exemptrate yet, add one there first. Then come back here and pin the customer to it.
Tax exemption is really a custom-rate assignment, not a boolean flag. That means the same machinery lets you put a customer on any special rate (a reduced contractor rate, a particular jurisdiction's rate), not just 0.0%.
Contacts
Each customer can have multiple contacts, the actual people who work for or buy under that account. The business is the Customer; the people are Contacts underneath. A contractor customer like Hershey Builders might have the owner as the primary contact and two crew leads as additional contacts.
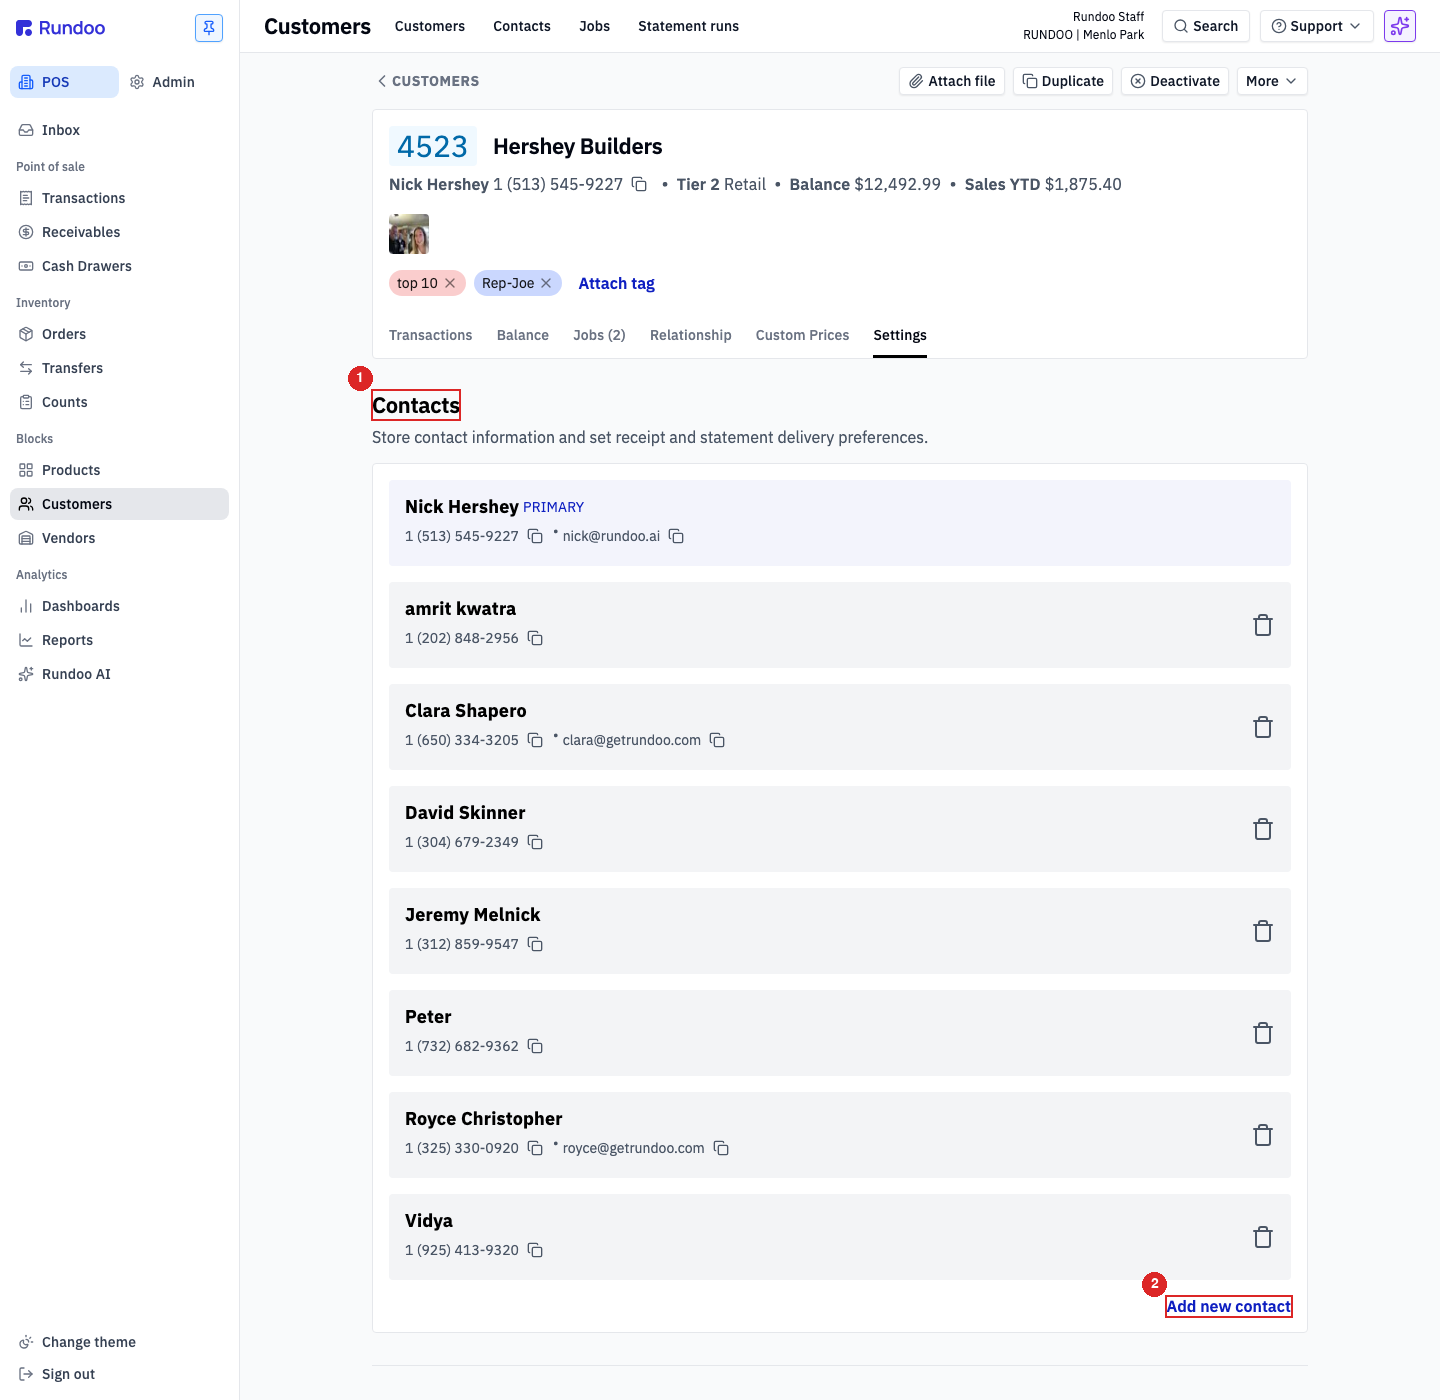
The Contacts section at the top of the customer's Settings tab is where you manage them:
-
The first contact is marked
PRIMARY(their phone and email are what receipts, statements, and notifications default to). -
Add new contact at the bottom right of the section opens a form for another person under the same customer (name, phone, email).
-
Click any existing contact to open its Edit Customer Contact modal, name, phone, email, per-contact receipt and statement delivery preferences, and the Authorized buyer checkbox that controls whether they can be picked as the buyer on a sale.
-
Each contact has its own delivery preferences for receipts and statements, so a back-office AP email can receive statements while the crew lead gets texts for will-call pickups.
Getting a former contact to stop coming up (a foreman who left, a buyer who's moved on). There's no delete button on a contact, the Edit Customer Contact modal only has Cancel and Save. To stop someone who's gone from being picked as the buyer on a sale, open their contact and uncheck Authorized buyer. To take the contact off the account entirely, email Rundoo Support at support@rundoo.ai with the customer and the contact's name, removing a contact is a Support action, the same as merging customer accounts.
Contacts don't have their own balance or pricing tier (those live on the customer). A contact is a person under the customer, not a sub-account. For separating work by project, use Jobs instead.
Saved cards
A saved card is a credit card stored on a customer's record so the next checkout (or the next statement-balance autopay) charges it without re-keying. Most contractors save one or two and tell you to put it on the card.
In the POS mode, open Customers in the left sidebar, click the customer's row, then open the Settings tab. Scroll to the Cards section.
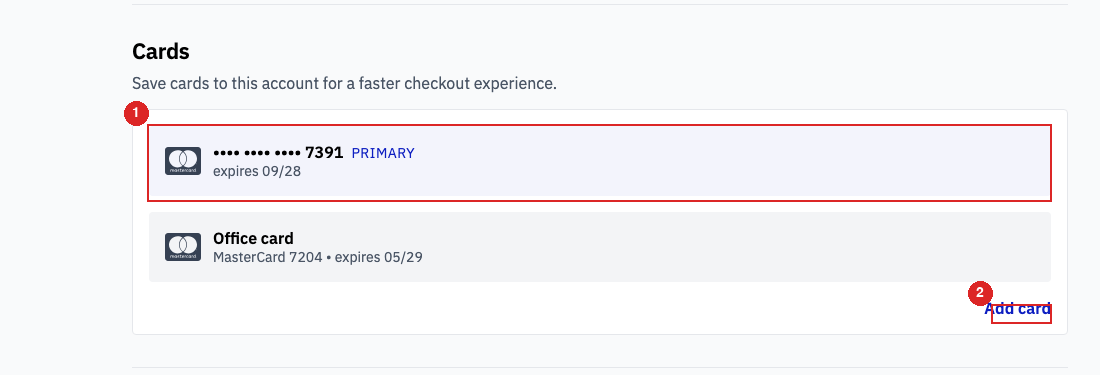
Each row shows the brand mark, the masked card number, the expiration, and (if you've named it) the nickname. The card marked PRIMARY is the default at checkout and the autopay source for statement balances, see the Statements section in the same Settings tab for that customer's autopay toggle.
Adding a card
Click Add card in the bottom-right of the section. The Add card modal opens.
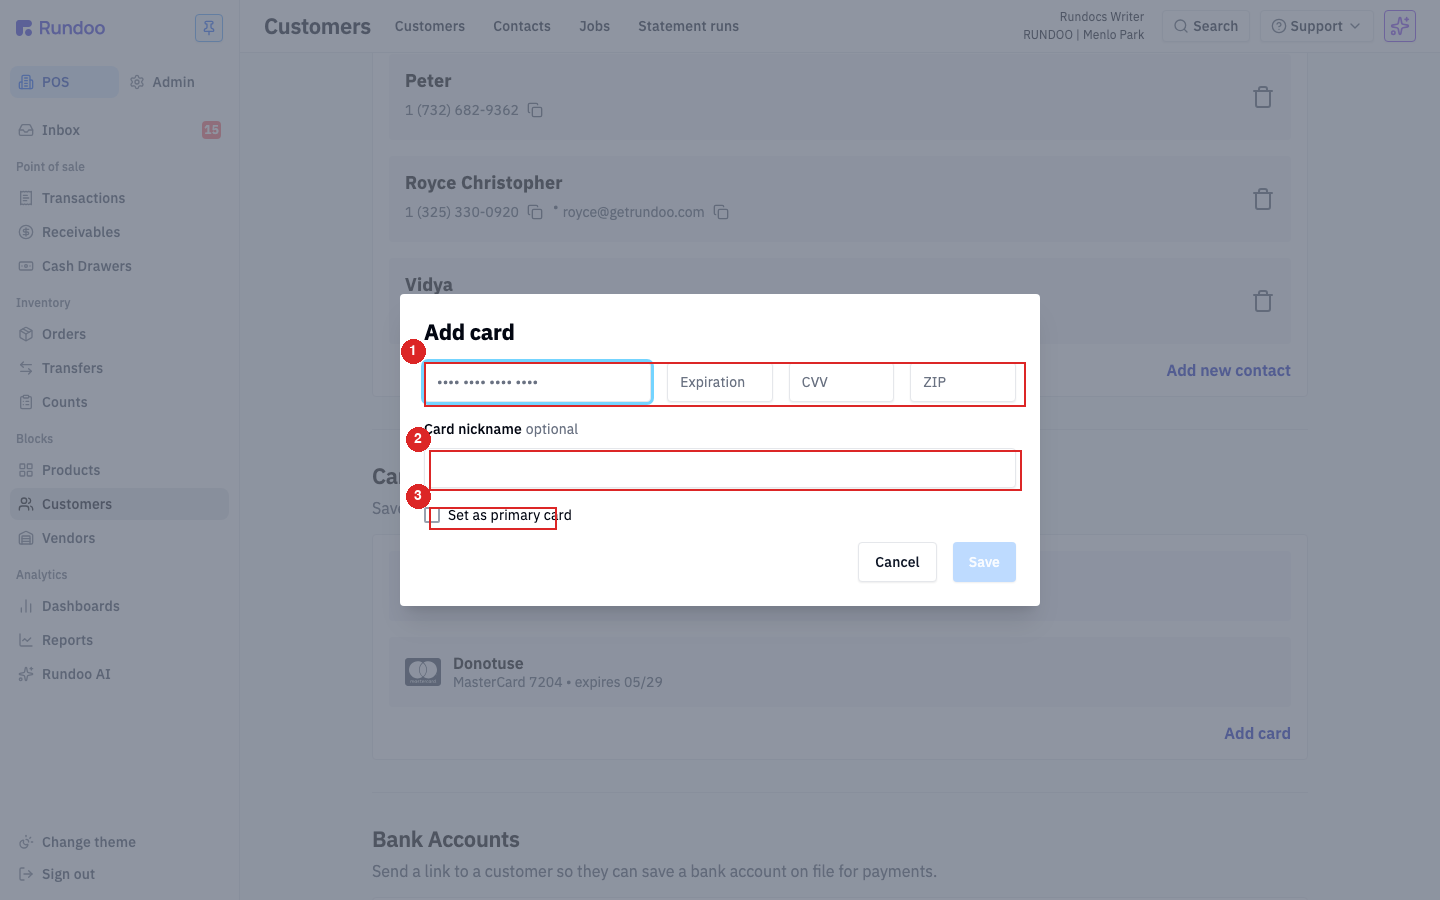
Fill in the card details, optionally name the card under Card nickname (handy when a customer has more than one (Office card, Owner's Visa, Joe's card)), and check Set as primary card if this should be the new default for charges and autopay. Click Save when the form is complete.
The Card nickname is plain text and isn't visible to the customer. It's an internal label so the cashier and AR staff can tell two cards apart at the counter. If a customer hands you "the company card" and "the owner's card," nickname them so future you can pick the right one without guessing.
Editing or deleting a card
Click any card row to open its Edit card modal. The card details (number, expiration) aren't editable. What you can change is the nickname and, on a non-primary card, whether to promote it to primary.
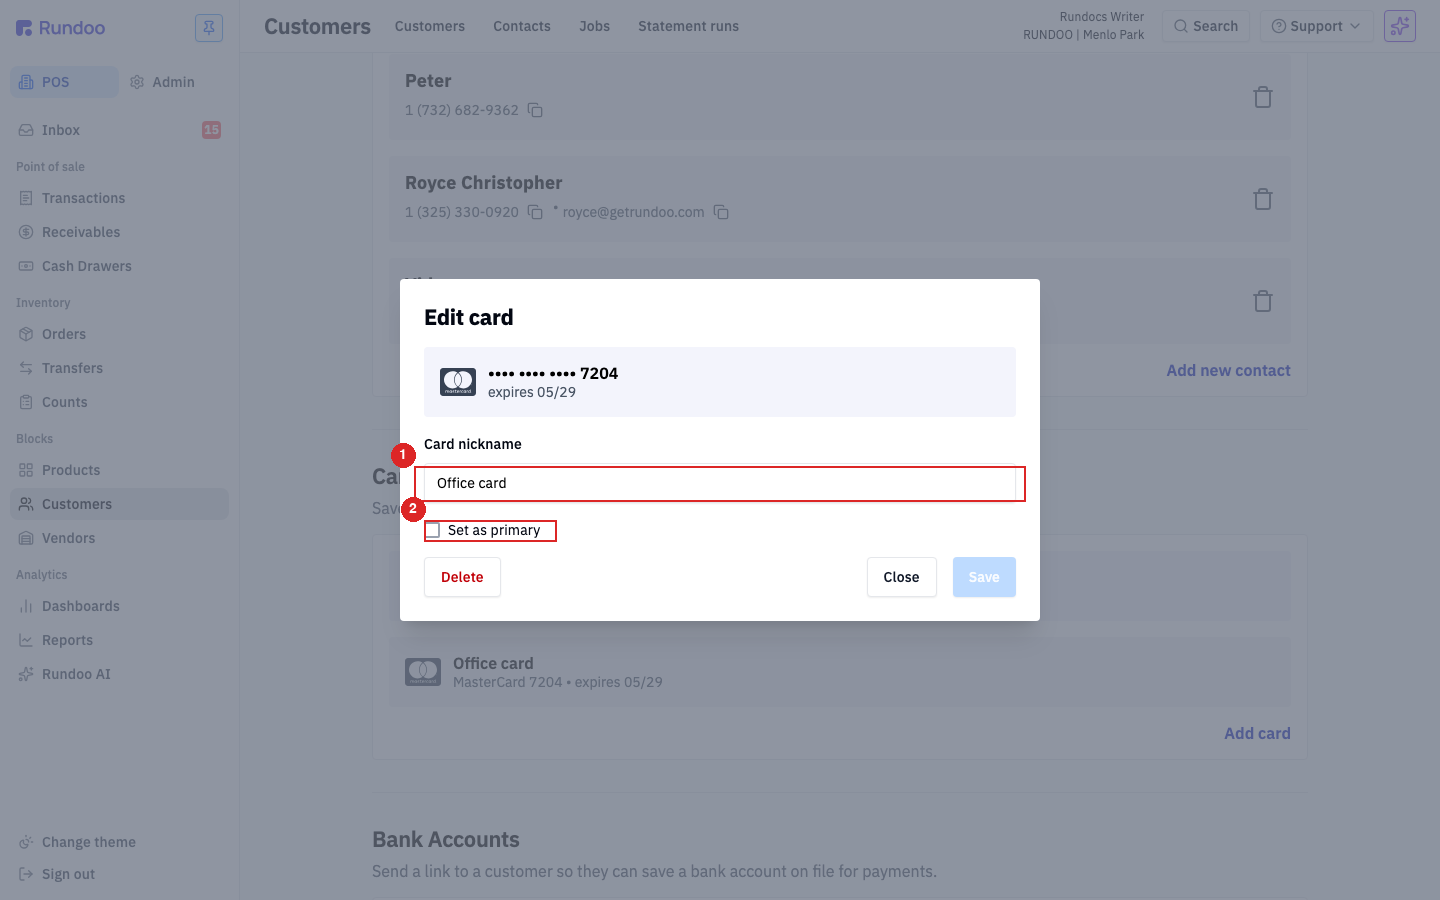
Set as primary flips this card to the customer's default for both checkout and statement-balance autopay; the previous primary becomes a regular saved card. Edit the nickname inline. Click Save to commit, or Delete to remove the card from the account entirely.
The Edit card modal on the primary card has no Set as primary checkbox. Rundoo doesn't let you "unset" primary directly. To change which card is primary, open the other card's Edit modal and toggle Set as primary there; that promotion automatically demotes the current primary.
Deleting a primary card. Deleting the primary card on an account that has autopay turned on breaks autopay until you set another card as primary. If a customer asks you to remove their primary card, walk through their Statements settings first to make sure autopay isn't pointed at it, or save and primary-flag a replacement card before clicking Delete.
What saved cards are good for
-
One-click charges at the counter. When the customer is attached on a sale, their saved cards show up in the payment panel as one-click options alongside the live card readers (no need to swipe or key in). See Sales for how the payment panel renders.
-
Autopay statement balances. The customer's primary card is what Rundoo charges when you turn on autopay in their Statements settings. See Statements.
-
Save the card during a Bill payment. When you ring a
Cardtender on a Bill payment, the Save card to account checkbox saves whatever card you just charged onto the customer's record, so the next time they call in to pay their balance, their card is already on file.
The underlying processor is Stripe. Rundoo doesn't store the raw card number, only Stripe holds it. Removing a saved card here removes it from Stripe's vault for this customer.
Bank accounts and the pay-by-link
Right below Cards on the Settings tab is a Bank Accounts section, where a customer's connected bank accounts live for ACH payments. This is also the answer to "can my customers pay through a link?" Yes, for saving a bank account on file.
Click Add bank account to open the Send bank account link modal. Pick a contact on the account, then click Send email and SMS, and Rundoo sends that contact a secure link where they save their own bank account, so you never key in a routing or account number. Once it's on file, you can take an ACH Bill payment against it, or turn on autopay so their statement balances draft automatically (see Statements).
The link saves a payment method, it isn't a self-serve invoice portal. Customers use it to put a bank account on file, not to log in and pay a specific invoice themselves. After the account is saved, the actual payment happens the usual way, an ACH bill payment you run at the counter, or autopay on their statement balances. For customers buying online, ordering and paying happens in your e-commerce store instead.
Assigning a sales rep
You can pin a staff member to a customer as their Sales representative (the store employee who owns that account relationship). Useful for contractor-heavy stores where each account has a dedicated counter rep, and for any spiff or commission program run off the books.
It lives on the Relationship tab of the customer's detail page, not in the Settings tab alongside the rest of the editable fields.
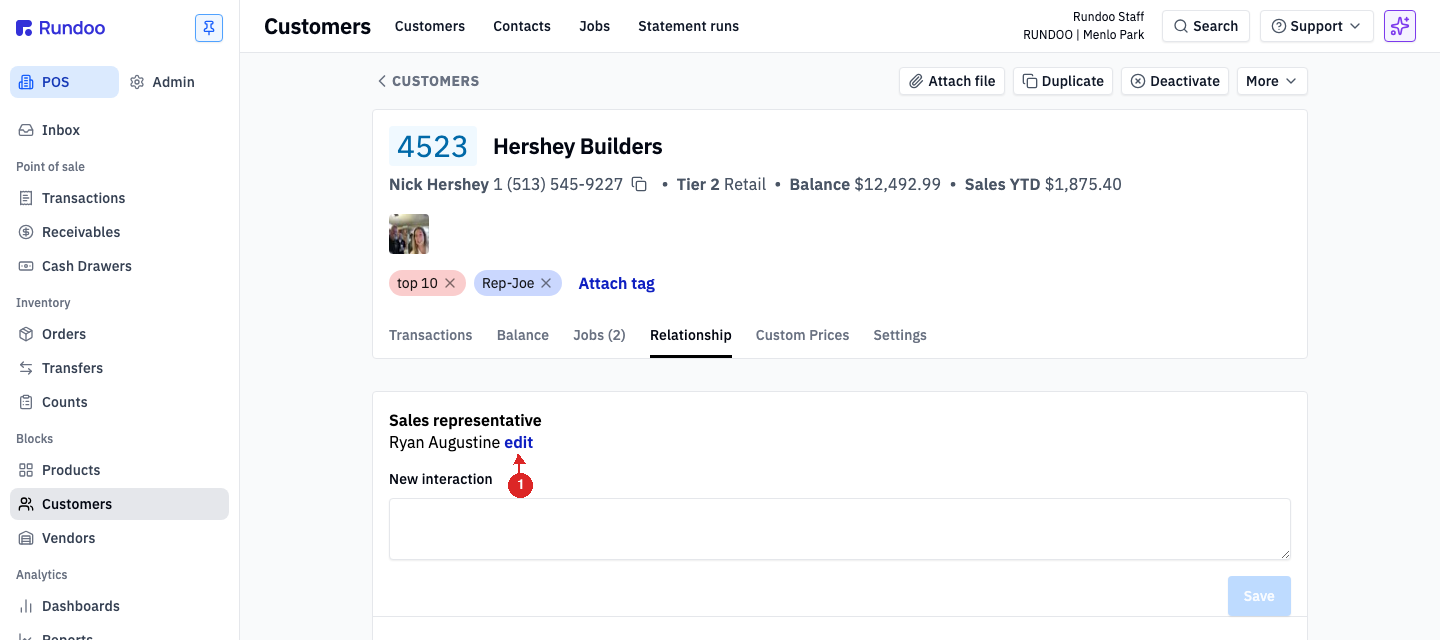
Click edit next to the current value to open the Edit sales representative modal, pick a staff member from the dropdown, and hit Save. Pick None to clear the assignment.
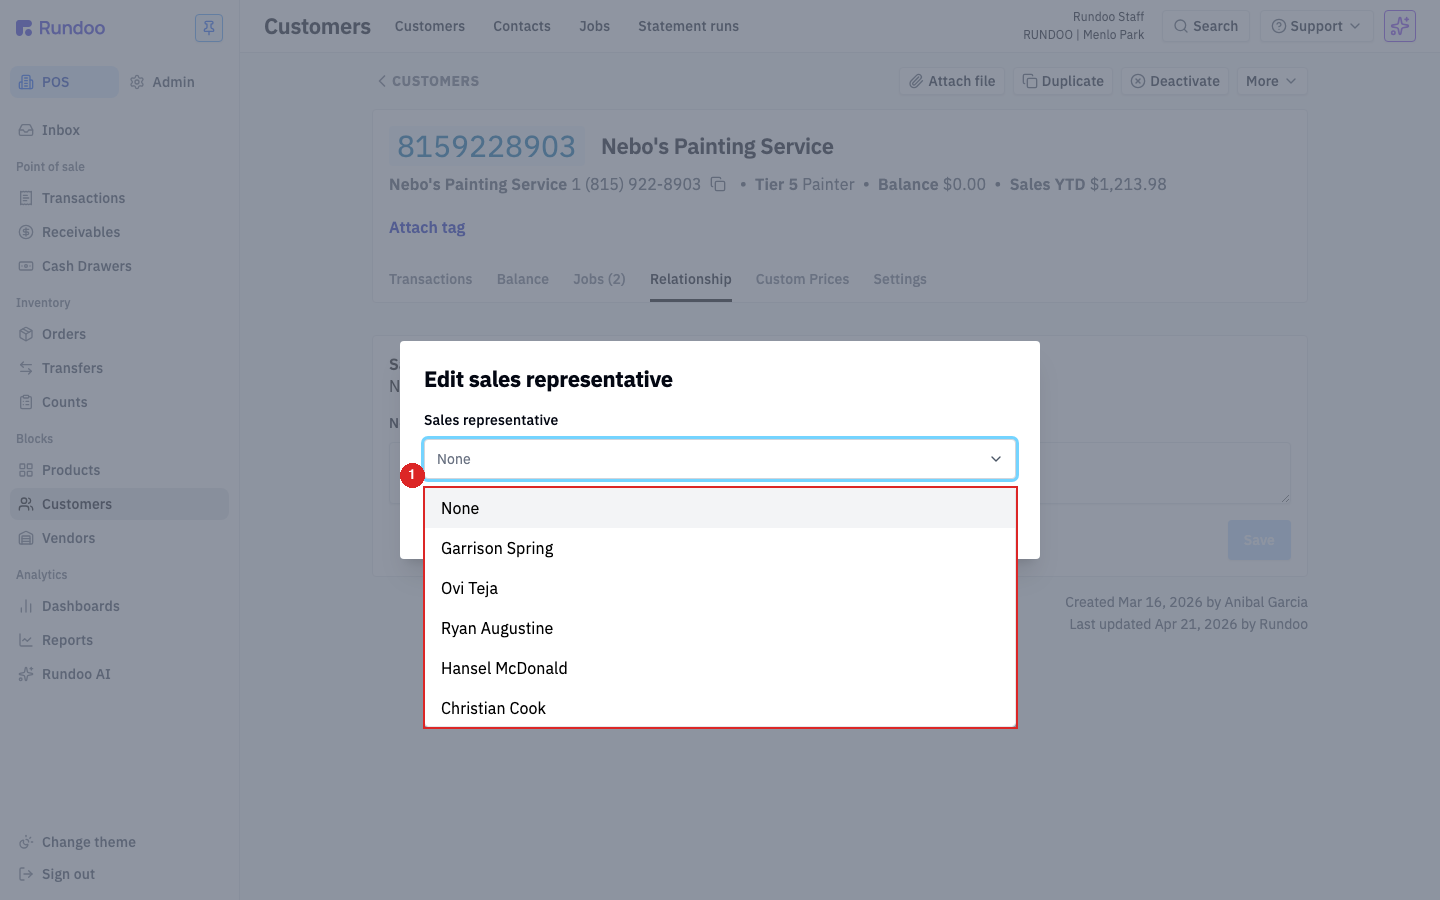
The dropdown lists every active staff member (it's not a separate "reps" list), so anyone who can sign in is a candidate.
Who can assign or change reps. The Assign and change the sales representative for a customer permission, under Customer Management on a staff member's Permissions tab (in Admin > Staff), gates this. Staff without it don't see the edit link, the current rep shows as read-only.
Rundoo doesn't currently filter sales or build reports by sales rep. The field is informational, captured on the customer record and surfaced back on the Relationship tab.
Sending a customer's purchase history
Contractors regularly ask for a summary of what they've bought over a date range (for their own records, for a tax document, or to reconcile against a subcontractor). On the customer's Transactions tab, filter to the date range and PO you want, click Send Summary, and Rundoo emails or prints a summary of those transactions with a running total at the bottom. The email goes to the customer's primary contact on file; swap to another contact or email before sending if the books-keeping address is different.
Merging customer accounts
When the same customer got created twice (once with a phone number, once with a business name, or under two spellings) Rundoo can't merge them in-product. From the customer's detail page, the action cluster's More menu does have a Merge entry, but clicking it opens a modal that says "To merge customers, email support@rundoo.ai" . The actual merge is run by Rundoo Support.
Email support@rundoo.ai with both customer IDs in the form {CustomerID1} into {CustomerID2}, and the team will merge the history, balance, and contacts onto the second ID.
Merges can't be undone. Double-check which customer ID is the one you want to keep. The other account's history (sales, balance, credits, statements) moves onto it and the original ID is retired. The customer's on-screen ID is the blue-boxed number next to their name on the detail page.
Putting a customer on hold
Rundoo doesn't have a dedicated Hold toggle (putting a customer on hold is a combination of the Credit limit and Deactivate controls you've already seen). Pick based on how much of the account you want to freeze:
-
Credit limitset to$0.00, the light-touch option. In the POS > Customers tab, open the customer, click the Settings tab, scroll to the Financing section, and click edit next toCredit limit. Set it to$0.00and hit Save. TheirCharge accounttender is now blocked at POS (any attempt to charge fails the credit check), but everything else about the account keeps working, they can still pay cash or card, their contacts and statement delivery stay intact, and their running balance still counts down as payments come in. Good for "settle up what you owe, then we'll let you charge again." When they do, come back here and raise the limit back to the number you want. -
Deactivatethe customer, the heavy-hand option. Hides them from search and the default list view entirely. Use this when you're done with the account, not when you're waiting for them to pay. SeeDeactivating a customerbelow for the specifics and the unpaid-balance gotcha.
Rundoo's own Financing section is labeled "Set finance terms, credit limits (and holds), and finance charges for customers.". Credit limit And hold are the same mechanic in the product. No separate button to hunt for.
Deactivating a customer
Click Deactivate in the action cluster at the top-right of a customer's detail page to hide them from everyday use. Deactivation is a soft archive, the customer disappears from search and the default list view, but their history (past sales, statements, balances) stays intact for reporting and for any in-flight transactions that reference them.
To bring them back, find the customer through the list's filter (show inactive), open their detail page, and click Reactivate where Deactivate used to be.
Don't deactivate a customer with an unpaid balance unless you're writing it off. The balance stays on the books even while inactive, and they won't appear in your normal statement runs. Settle or write off first, then deactivate.
On mobile
Customers show up in two mobile surfaces, with different audiences.
Staff view: looking up a customer on mobile-pos
The Rundoo POS mobile app's More menu has a Customers entry that opens a search-driven customer directory (the same data as the web's Customers list, just narrower-screen).
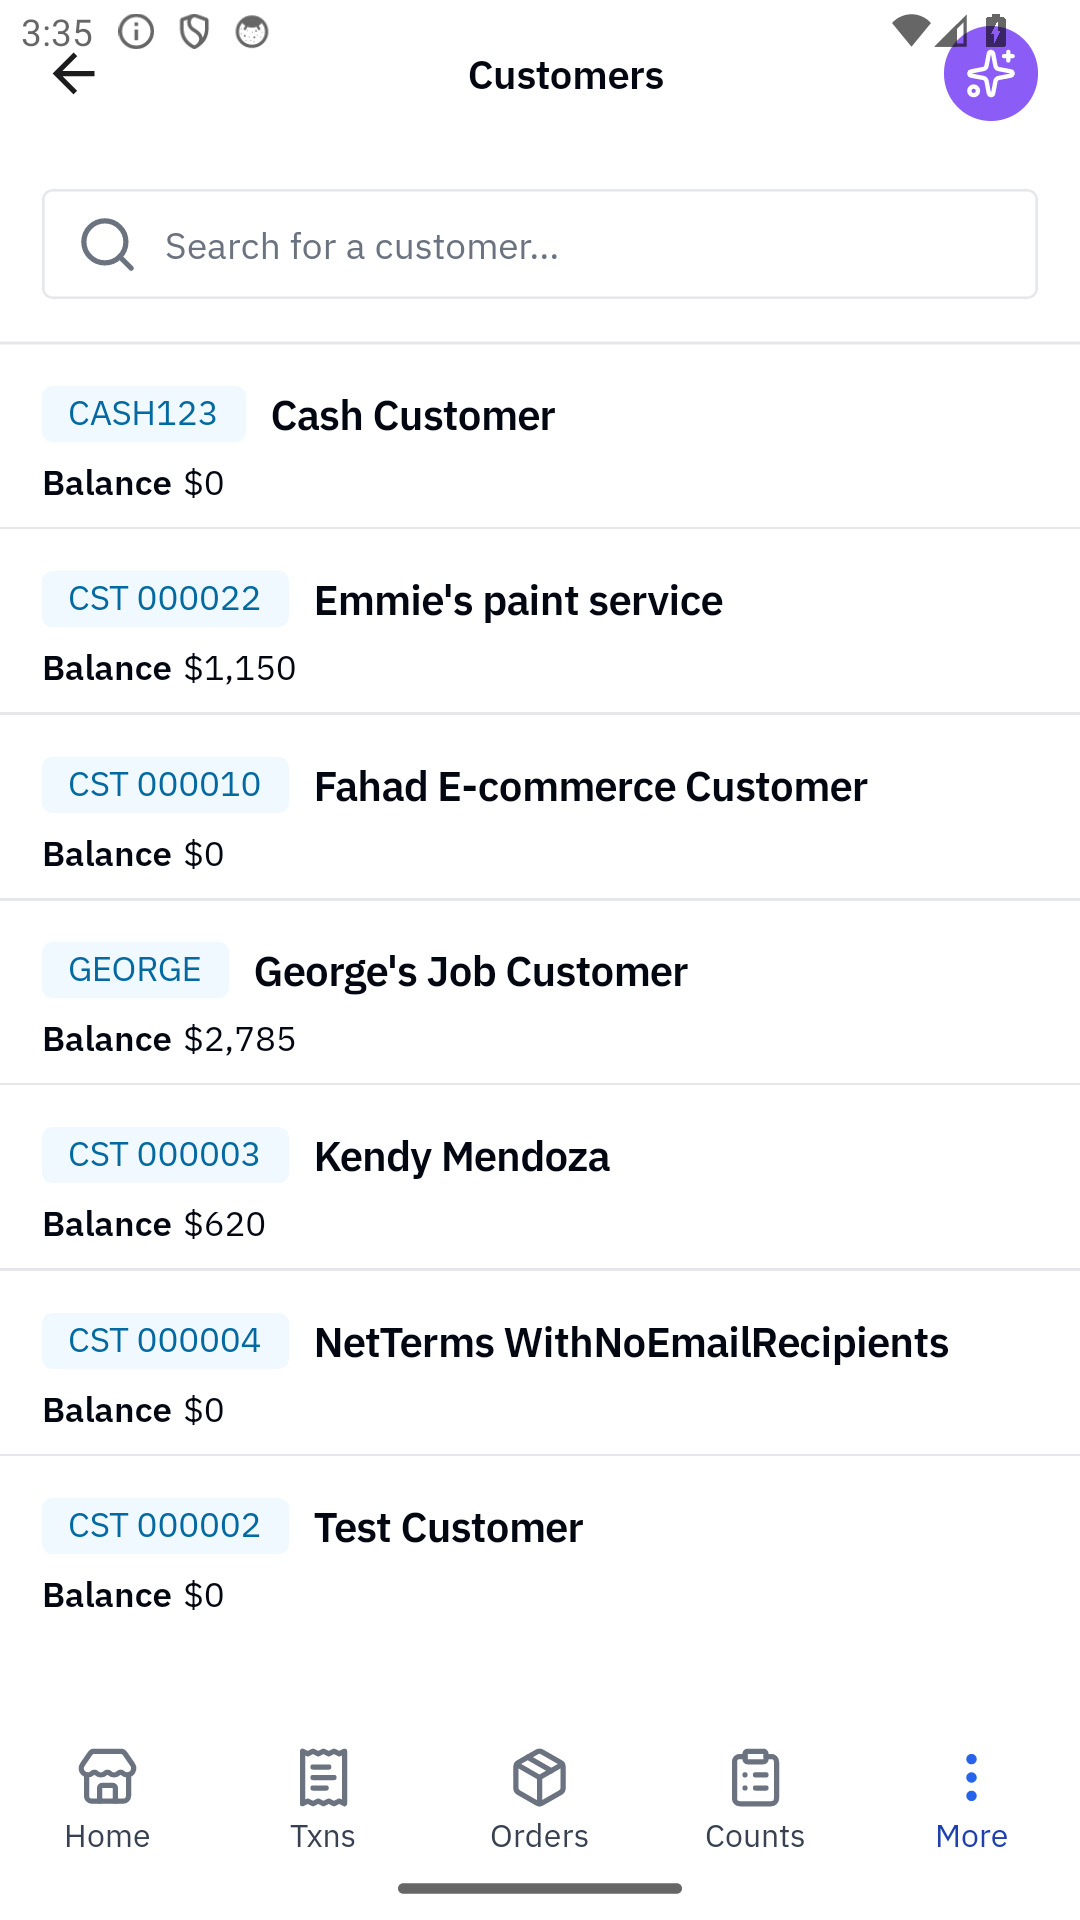
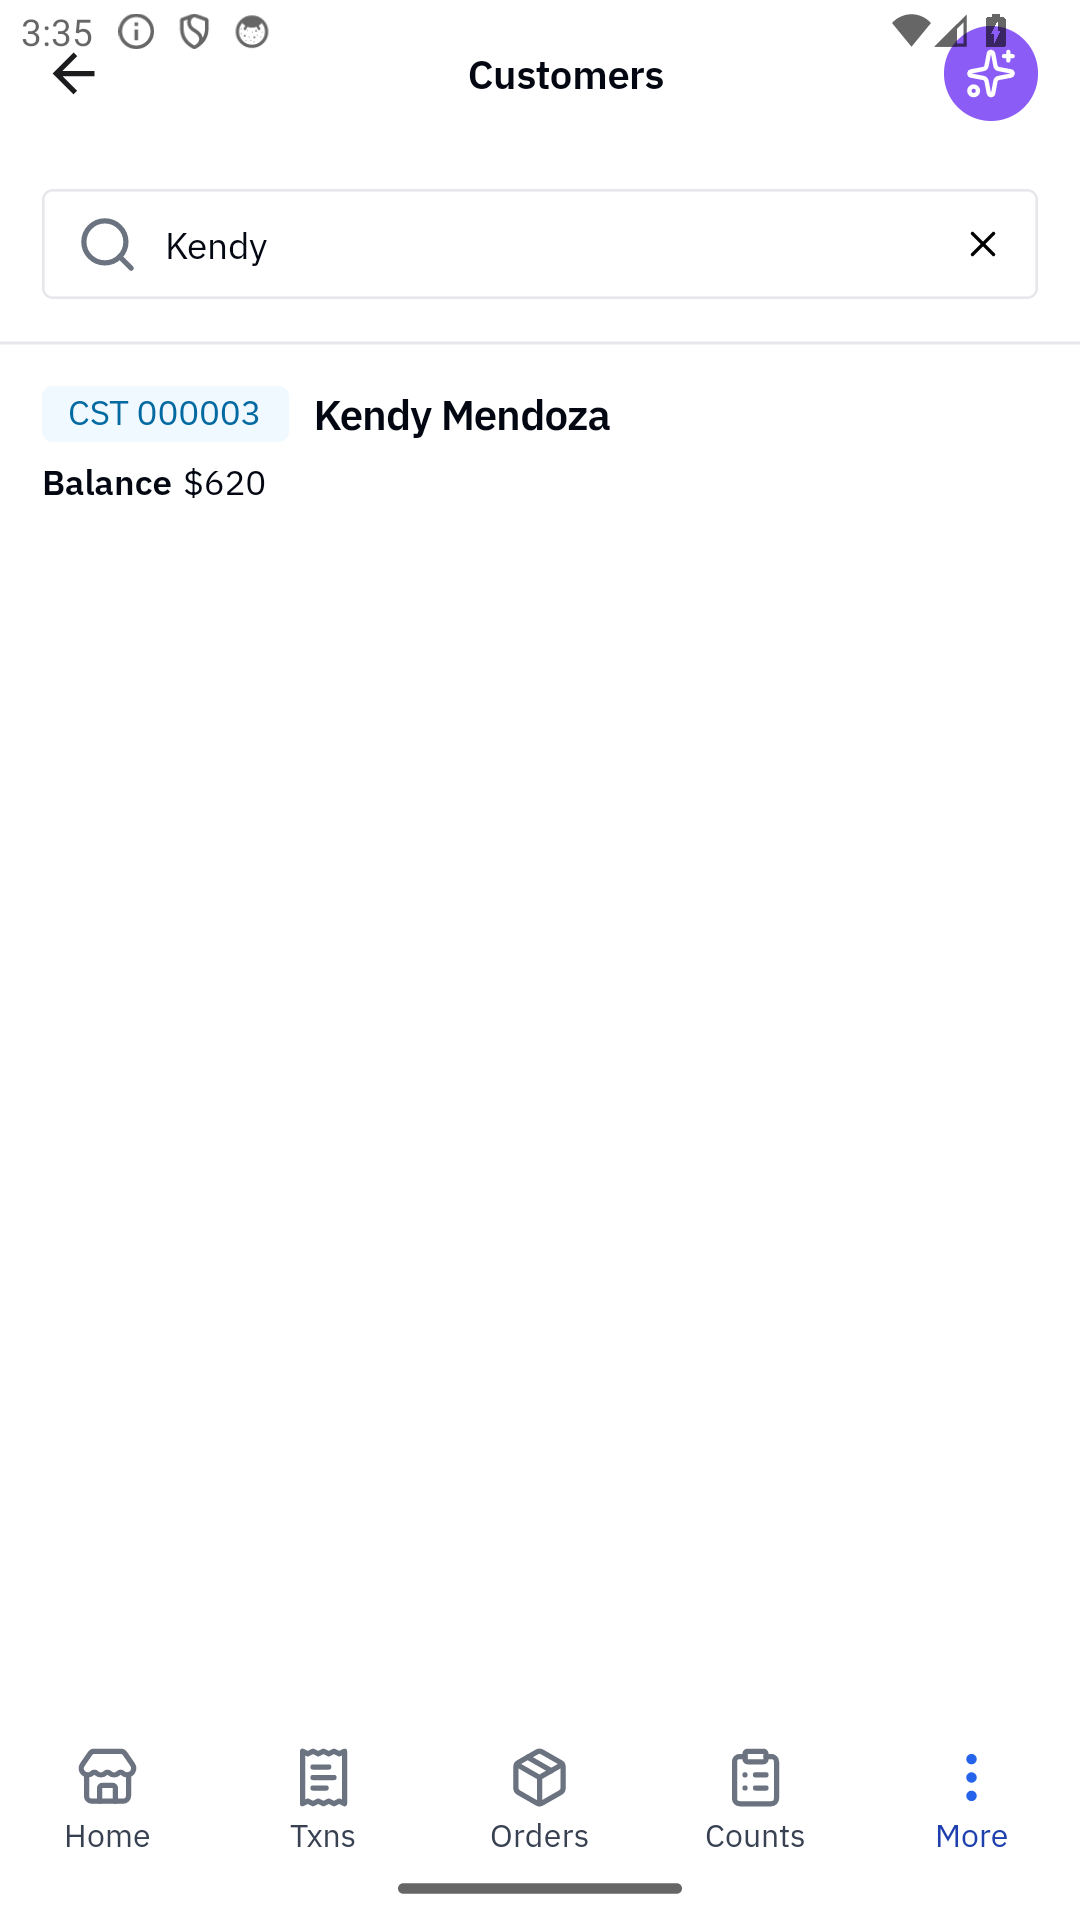
The list pre-loads recent customers; type to filter by name or phone. Tapping a result opens that customer's detail screen with pricing tier chip, contacts, jobs, attached files, and recent interactions.
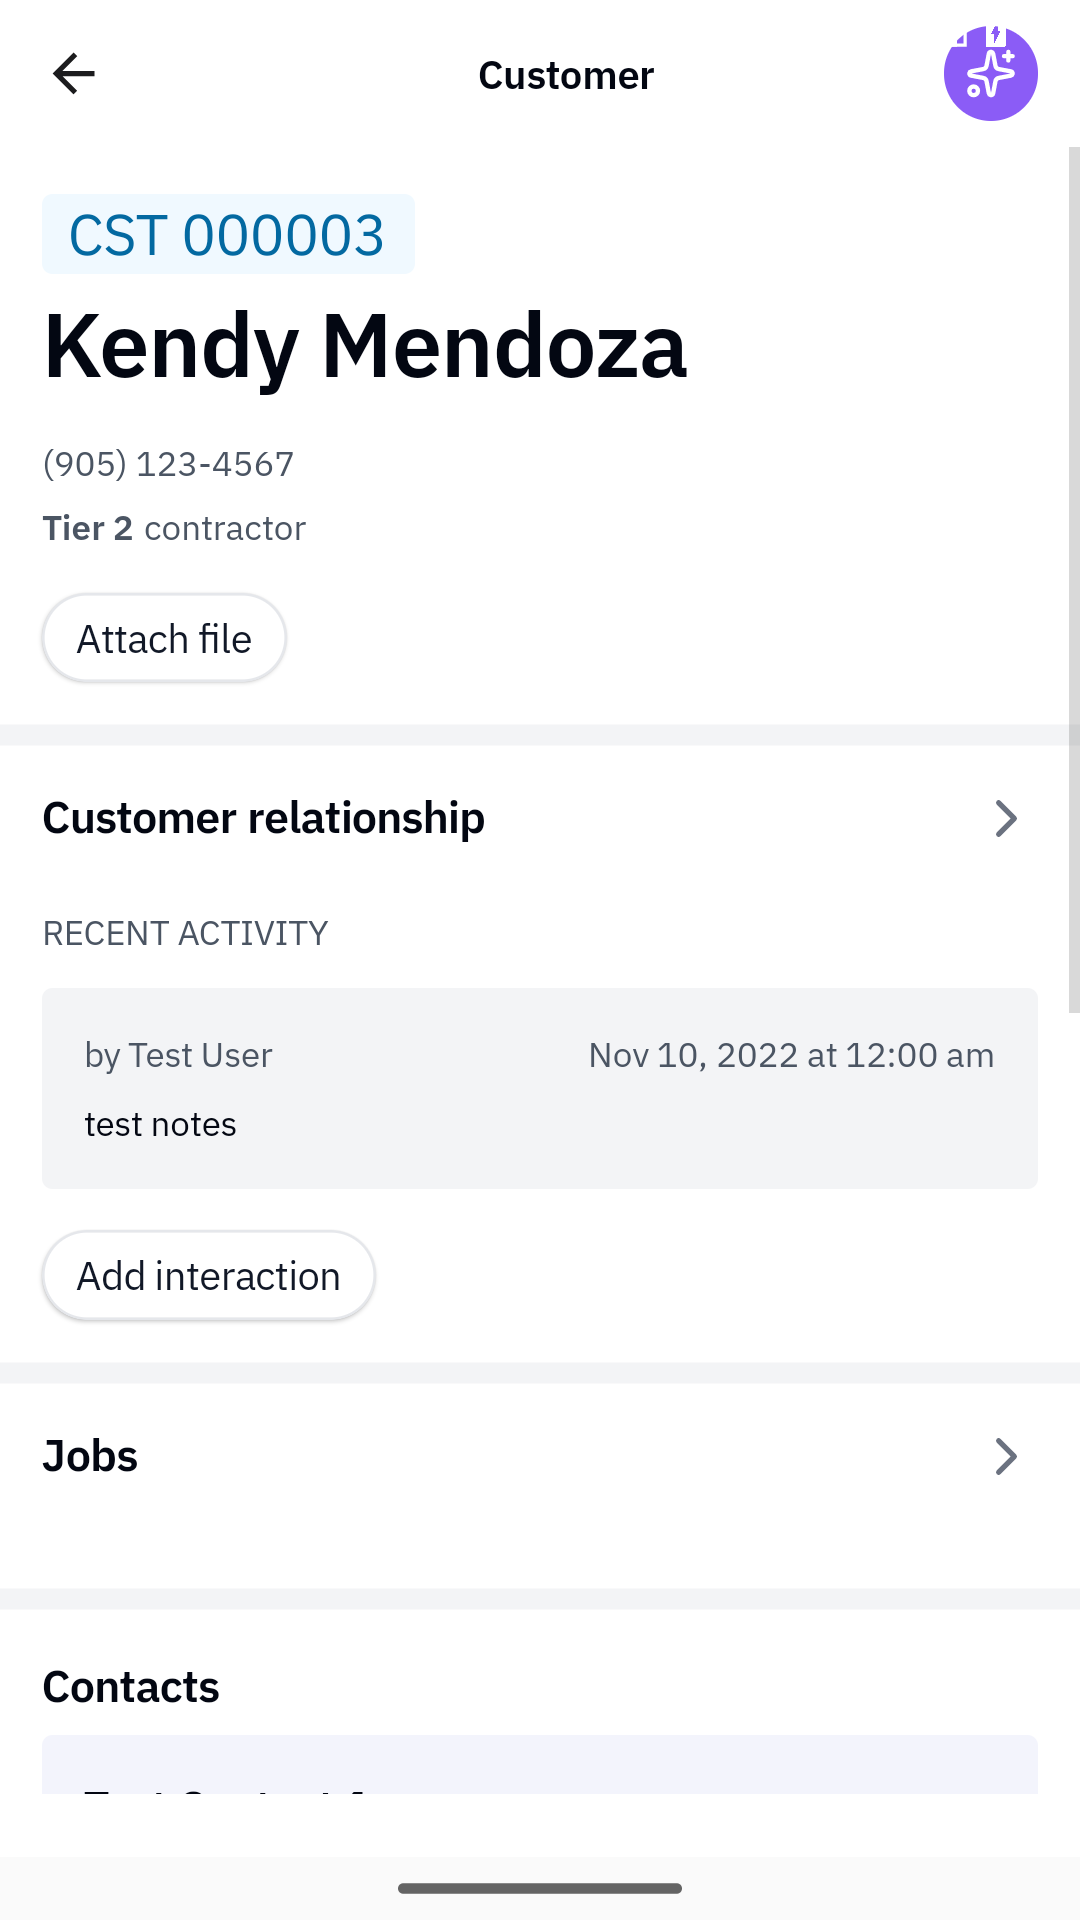
The customer-detail screen shows the same data you'd find on the web's Customer detail page (pricing tier pill, balance, contacts, jobs roll-up, and recent sales), reformatted for the phone.
💡 Adding or editing a customer's settings happens on the web POS, not the mobile app. The mobile lookup is read-focused. See a customer's history while you're standing in the aisle.
Customer view: contractor's Profile tab on mobile-cxa
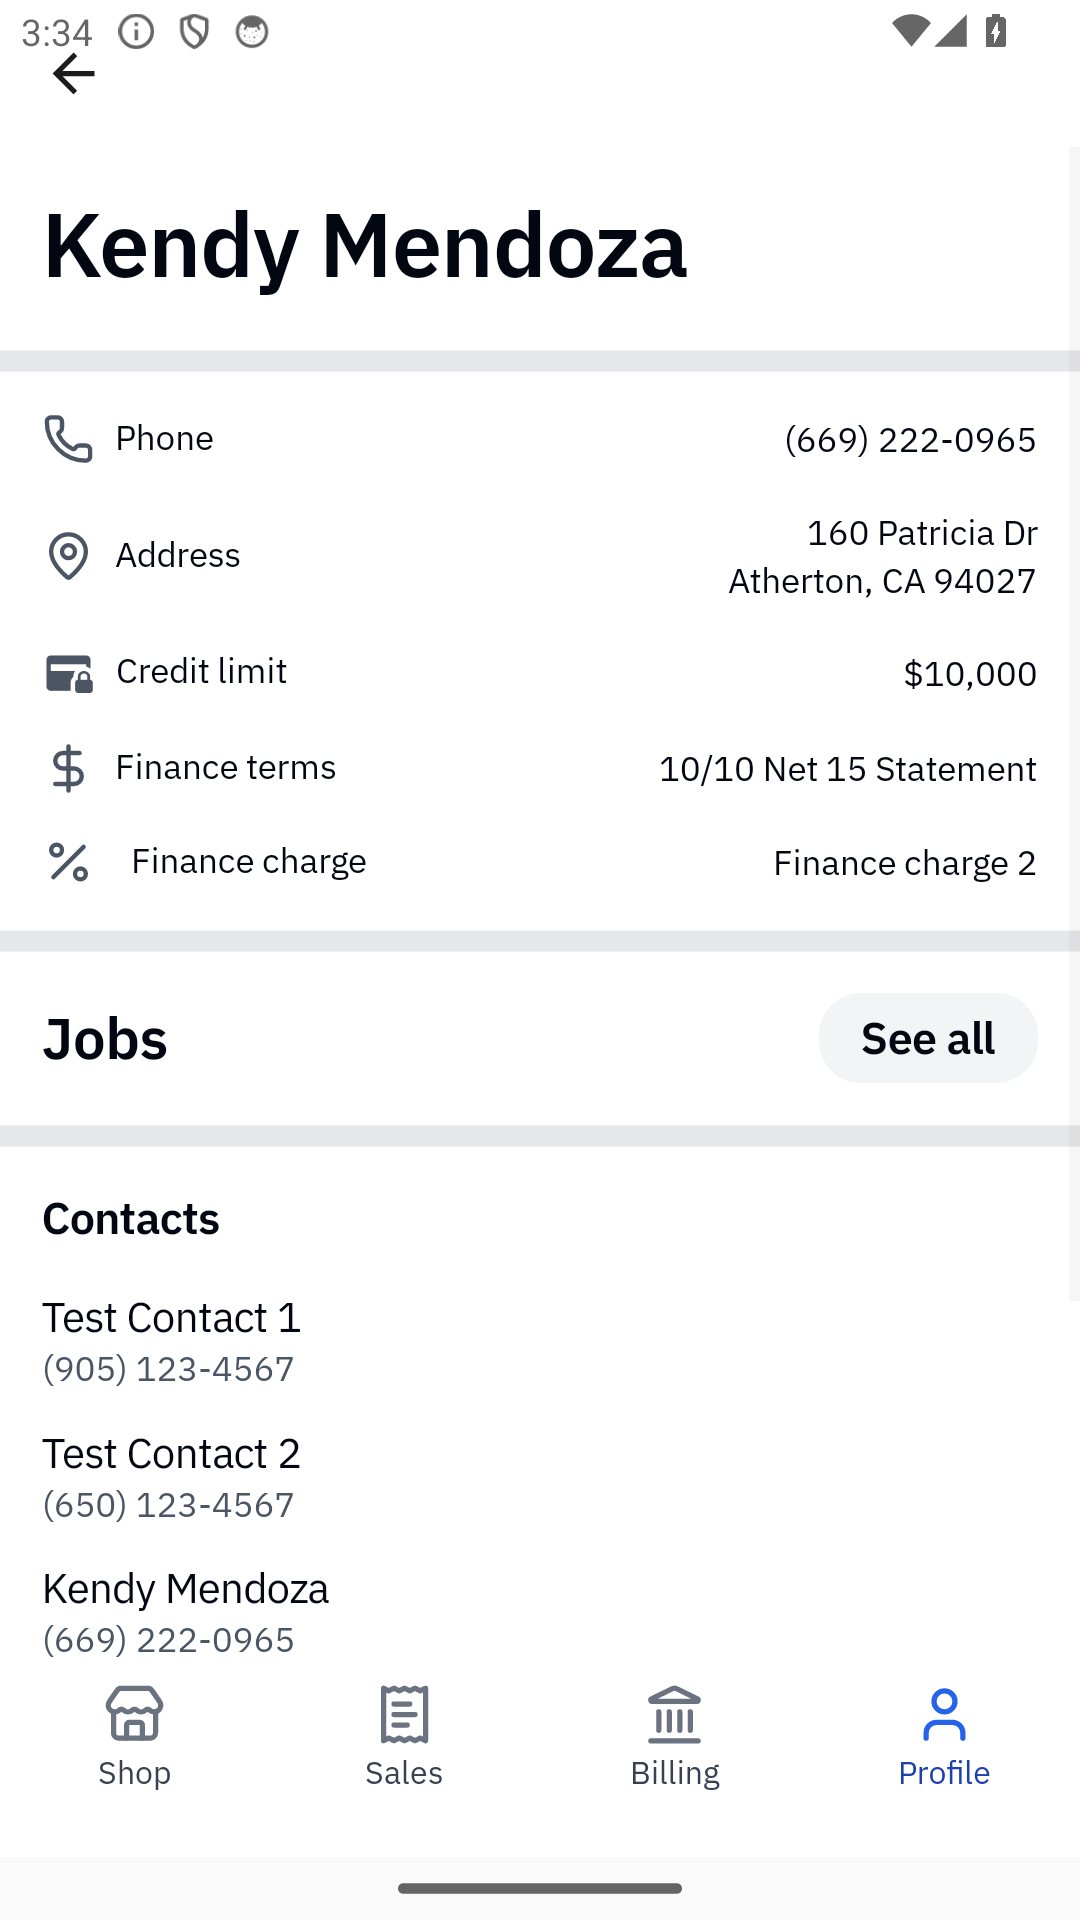
In the Rundoo customer app, contractors see a Profile tab with their own customer record, phone, address, credit limit, finance terms, finance-charge schedule, jobs roll-up, and the contacts roster you've added under their account. It's the customer-facing view of everything covered above; if a contractor calls asking "what's my credit limit again?", this is what they see.
See Mobile apps for the two-app overview, and Sign-in for how contractors first get into the customer app.
Recommended Rundocs
-
Jobs (tagging sales under a customer to a specific project).
-
Statements. Running month-end statements for charge accounts.
-
Finance terms, configuring the terms a customer can be assigned.
-
Pricing tiers, controlling what prices each customer sees at POS.
-
Customer imports (bulk-creating customers from a spreadsheet).