
Rundocs › Vendors & Purchasing
Vendor returns & credits
Last updated 2026-04-24
Returns to a vendor, vendor credits, and vendor-specific surcharges all land in the same place: a purchase order or its invoice. Rundoo doesn't have a separate "return to vendor" flow, you run the PO lifecycle in reverse with negative quantities, and layer credits and surcharges onto the received invoice.
In the POS mode, open the Orders left tab (the same surface that handles buying product from vendors also handles sending it back).
Returning product to a vendor
The mechanism is a purchase order with negative quantities on each line. The PO flows through the normal New → Ordered → Received → Vouchered → Paid lifecycle, but in reverse, stock leaves your shelves, the vendor's balance goes down instead of up, and any matching credit memo gets recorded alongside the rest of that vendor's invoices.
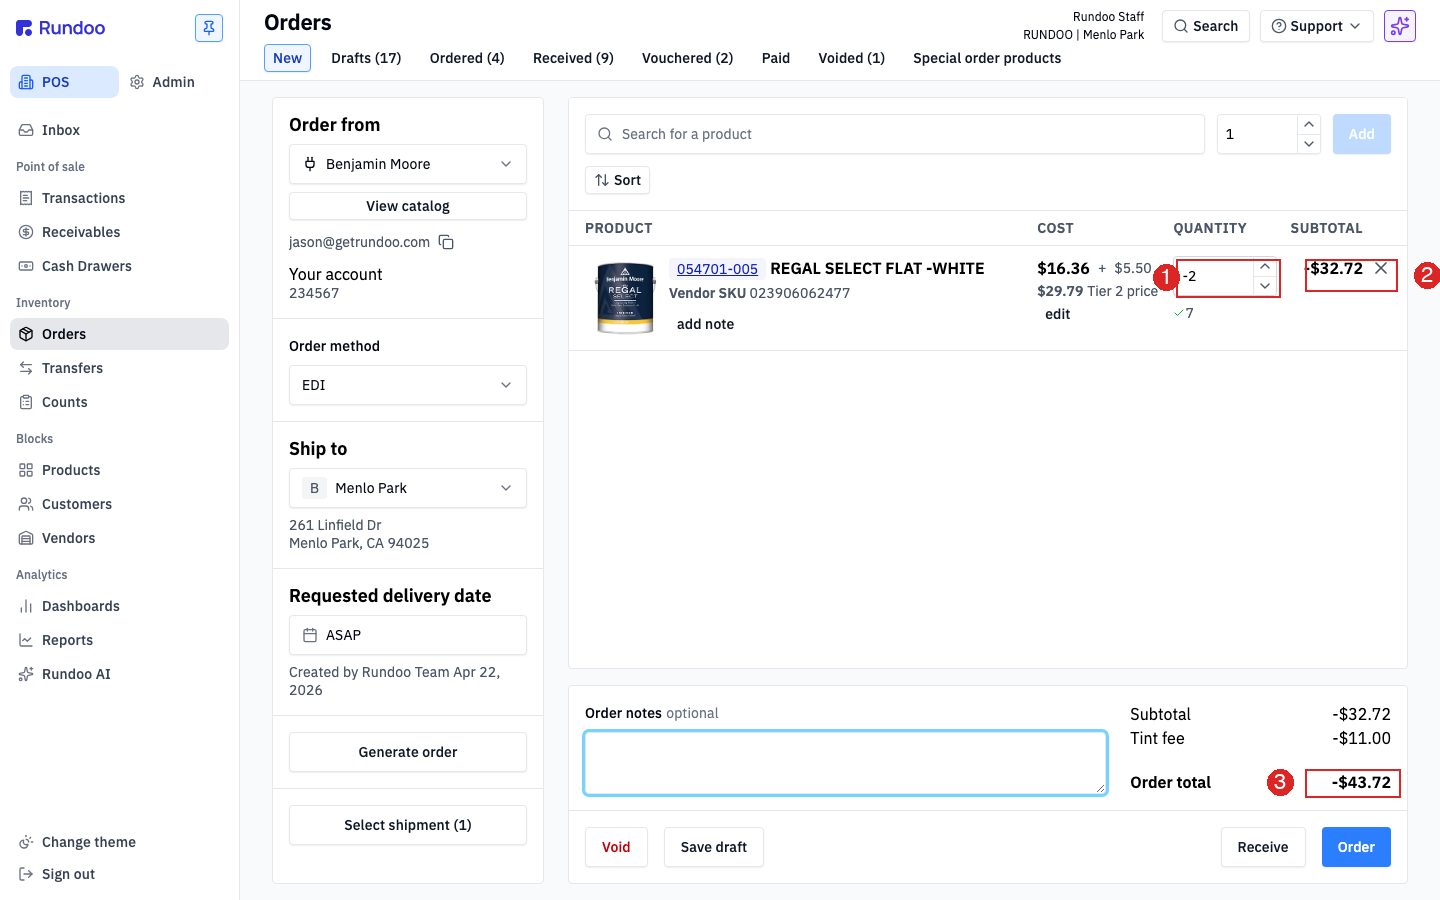
Step 1: Start a new PO
Open the New top tab under Orders, pick the vendor the return is going to, and add the products you're sending back. The builder works exactly the same as a normal purchase, see Purchase orders for the full walkthrough of Order from, Ship to, and Requested delivery date.
Step 2: Enter a negative quantity on each line
In the cart's QUANTITY column, type a minus sign followed by the number of units you're returning (-2 for two gallons coming off the shelf, -12 for a full case). The SUBTOTAL for the line flips negative, and the totals on the right (Subtotal, any tint fees, Order total) all roll up as negatives.
A return PO can mix negative and positive lines. If the vendor is swapping product (you send back one SKU and they ship a replacement), put the return on one line with negative quantity and the incoming product on another with positive quantity. The net Order total is what the vendor owes you or what you owe them.
Step 3: Send the return PO to the vendor
The action cluster at the bottom right works the same as on a normal PO: Save draft stashes the return for later, Order emails or prints the PO per the Order method you picked. The PO moves into the Ordered tab just like any other.
Rundoo doesn't relabel a negative-quantity PO as "Return" anywhere in the UI (the tab names (Ordered, Received, Vouchered) and the button labels (Receive, Voucher) stay the same). Use the Order notes field or a descriptive line-level note to flag the PO as a return so staff working it later don't think the negative totals are a bug.
Step 4: Receive the return when the vendor confirms
When the vendor picks up the product (or confirms receipt at their warehouse), open the return PO from the Ordered tab and click Receive, same as any PO. Rundoo records the stock change, on-hand inventory at the Ship to location drops by the returned quantity, since the quantities are negative, and moves the PO to the Received tab. Full receiving mechanics live in Order receipts.
Step 5: Voucher and pay (or apply the credit)
Once the vendor sends their credit memo, open the received return PO and fill in the Invoice date, Due date, Invoice Number, and Pay to fields, then click Voucher (same four fields, same button as a regular invoice). The PO moves to the Vouchered tab as a negative-balance bill, which your accounting side applies against future invoices from that vendor. See Vouchers for what the state means and how it flows through to your GL.
Vendor credits on an invoice
Not every credit needs its own return PO. If the vendor invoiced you less than you ordered (early-pay discount, negotiated rebate, promo credit, freight waived) that's an invoice-level adjustment, and it lives on the received PO itself.
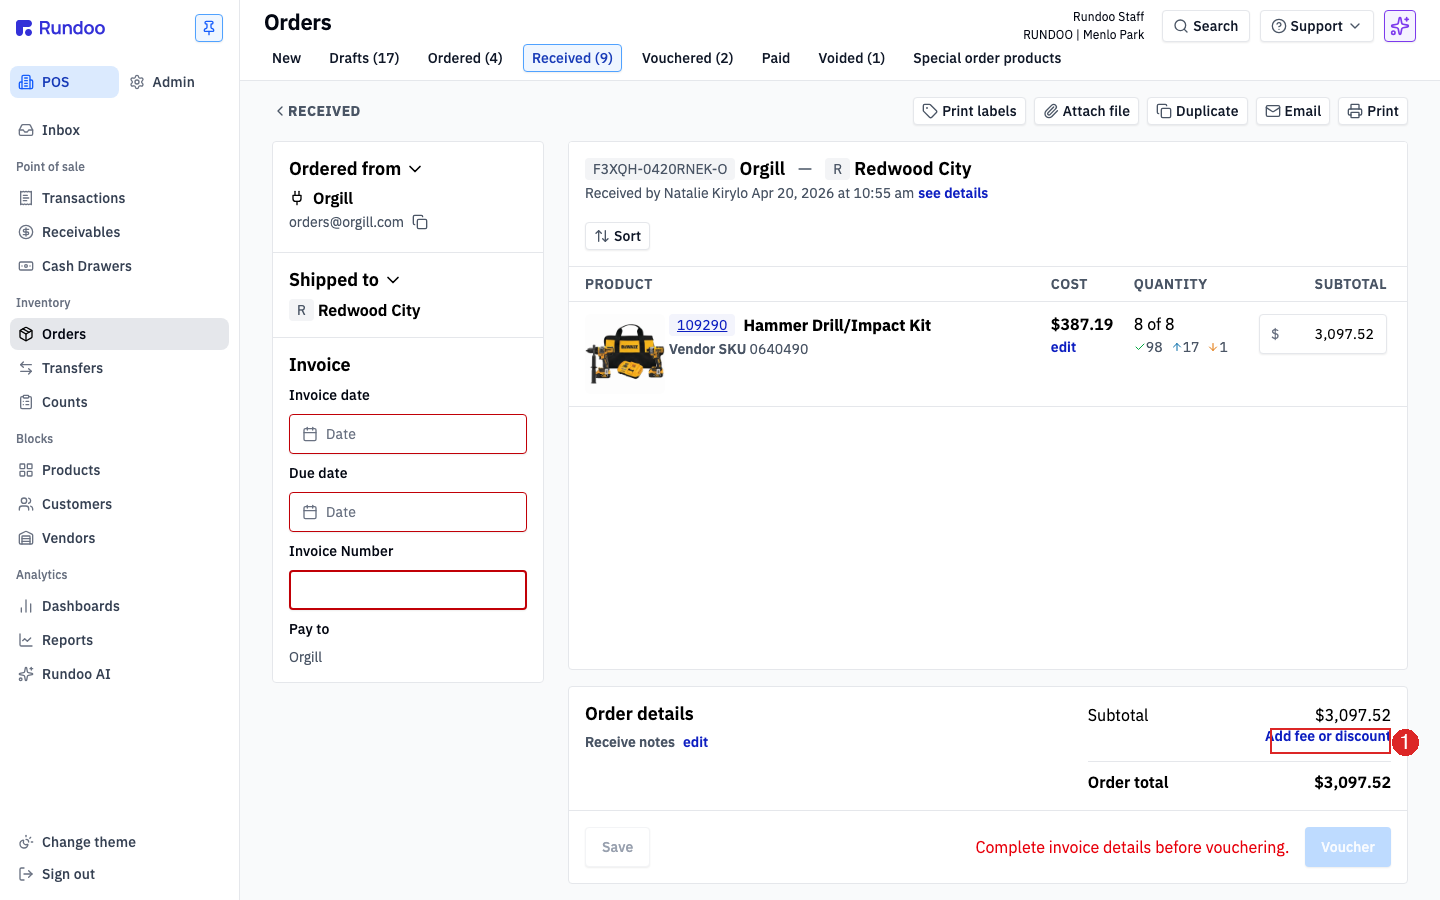
On a PO in the Received tab, the Order details panel at the bottom right has an Add fee or discount link. Click it before you voucher.
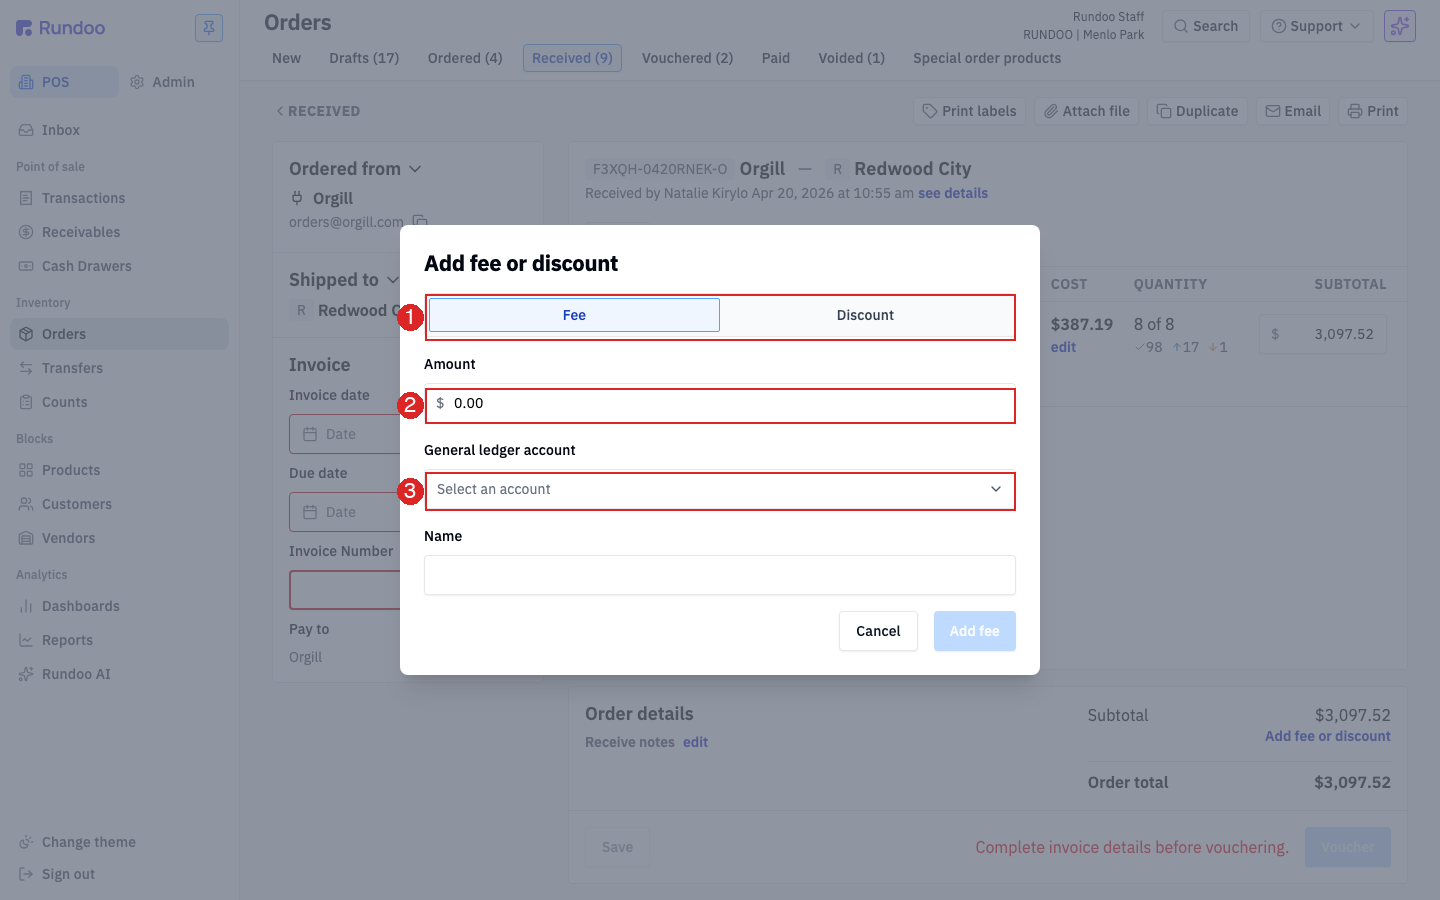
In the modal:
-
Toggle to Discount (it defaults to
Fee. See "Surcharges from a specific vendor" below for when that's what you want). -
Enter the
Amountas a positive number (Rundoo subtracts it from the invoice total automatically based on the toggle). -
Pick a
General ledger accountfor where the credit posts. Most shops route vendor credits to a rebate or discount-received income account; check with your bookkeeper if you're not sure which. -
Fill in a
Namedescribing the credit (Early-pay discount,Damaged goods credit,Freight rebate). This is the line item on the invoice and the memo on the journal entry.
Click Add fee to commit. The discount drops into the Order details panel as its own line, Order total reflects the reduced amount, and the Voucher button now pushes the net invoice through to accounting.
Add fee or discount edits the invoice total, not the line-level costs. If the vendor billed you a different unit cost than what you ordered (say, a per-gallon price bump since the PO was cut) correct that by clicking edit under the COST cell on the line itself. Use Add fee or discount only for invoice-wide adjustments.
Surcharges from a specific vendor
Same mechanism as credits, opposite direction. Some vendors charge per-invoice handling fees, fuel surcharges, pallet charges, or drop-ship premiums on top of line costs. Rundoo doesn't have a vendor-level setting that applies a surcharge automatically, each one gets keyed in at voucher time on the PO it applies to, via the same Add fee or discount link described above.
In the modal, leave the toggle on Fee, enter the Amount, pick a General ledger account that makes sense for the surcharge (freight, handling, or the vendor-specific expense account your bookkeeper prefers), and name it (Fuel surcharge, Pallet fee, Handling). Click Add fee and the cost rolls into the Order total, flowing through to your GL when you voucher.
If the same surcharge appears on every invoice from a vendor, use a consistent Name and General ledger account each time. That way you can filter the GL account later to see the total spent on that vendor's fuel surcharges across the year (Rundoo won't roll it up for you automatically), but consistent naming makes the report easy.
Admin > Communications has a setting called Card payment surcharge. That's a customer-facing card-fee surcharge on POS sales, not a vendor-purchase surcharge. The two don't overlap. See Card surcharges for the customer-side setting.
Recommended Rundocs
-
Purchase orders (the full PO builder, used in reverse for returns).
-
Vouchers (how vouchered POs move through accounts payable).
-
Vendor invoices, recording and paying what you owe each vendor.